Zextras Auth
What is Zextras Auth
Zextras Auth is the Zextras Suite module that influences the process of accessing a Zextras instance from the Login Page onwards, including:
The access modality. Depending on the authentication backends configured, the access mask changes, to allow user to provide their credentials using any of the backends. This also is reflected in the ZxAuth for users (Auth Zimlet).
Customisations. Define how the login page looks like. See dedicated section Custom Login Page for a list of customisable items.
Zextras Auth allows to manage all the Authentication Strategies (user/pwd, SAML, 2FA, MobilePwd, QrCode) and Service Authorizations supported by Zextras.
This section is divided in three main parts and organised as follows. Immediately below, you can find the description of all supported authentication methods; the next two sections are dedicated to administration tasks, which require privileged access and are mostly carried out from the CLI, and everyday’s task, which can be carried out from the Web GUI by both administrators and users, respectively. Finally, the list of all CLI commands is given as a reference, with link to each command.
Supported Authentication Methods
Zextras Auth supports the following backends:
Self service credentials management
Mobile password management
Application password
Custom login page
SAML integration
2FA Authentication using OTP token
Credential Management by CLI
Self Service Credentials Management
Self-service credential management allows every user to create new passwords and QR codes for third-parties—for example team members, personal assistants—accessing her/his email account and Zextras Applications from mobile devices.
QR Codes in particular can be used to access Zextras Apps, currently Team and Drive.
More information and step by step guidelines can be found in Section ZxAuth for users (Auth Zimlet).
Custom Login Page
All Zextras functionality can be accessed upon login from the login page of Zextras, which can be customised in several parts, for example to add the company’s logo or other elements of the company’s corporate identity.
This feature is carried out from the CLI and therefore requires administrator privileges; more information and guidelines in section Custom Login Page.
SAML
The Security Assertion Markup Language (SAML) is an XML-based open standard data format for exchanging authentication information. It enables web-based authentication and authorization scenarios including cross-domain Single Sign-On (SSO), which allows the use of the same credentials to access different applications.
SAML implementation in Zextras relies on an external IDentity Provider (IDP), to which a user identifies; the IDP then passes authorization credentials to a service providers (SP). SAML authentication is the process of verifying the user’s identity and credentials. In Zextras Suite, SAML requires little configuration, because an administrator can generate the SAML configuration by importing SAML metadata from the ISP. Each domain can have a different SAML endpoint and both SDP and IDP SAML authentication is supported.
These are the key concepts of SAML authentication:
- Service Provider
(SP) is the entity providing the service.
- Identity Provider
(IdP) is the entity providing the identities.
- SAML Request
is generated by the Service Provider to “request” an authentication.
- SAML Response
is generated by the Identity Provider and contains the assertion of the authenticated user.
Moreover, the Assertion Consumer Service (ACS) endpoint is a location to which the SSO tokens are sent, according to partner requirements.
Directions on how to configure SAML and integrate other applications in Zextras Suite is described in Section Setting up SAML Configuration.
Two Factor Authentication
Two Factor Authentication (usually spelled as 2FA) adds a security layer to the login phase, making unwanted accesses less likely to take place. In Zextras, this additional layer is given by an One Time Password (OTP), which can be read as a QR code on mobile devices.
When 2FA is configured on a Zextras domain, it is mandatory to have an
OTP to be able to login: providing only username and password will fail.
Moreover, the attribute zimbraAuthMech must be configured on the
domain with for 2FA to work properly.
2FA applies only to those protocols or apps supporting it, for example
HTTP and HTTPS but not to IMAP and SMTP, and can be configured at either
device, IP, or IP range level, by means of the trusted_device or
trusted_ip parameter. When an IP or IP range is trusted, 2FA will be
successful for any login originating from there, while the
trusted_device requires that the same browser or app be used,
otherwise it will fail: if a 2FA login is carried out on Chrome,
accessing the same page with Firefox will require a new login.
In order to use the OTP, a domain must be configured (see QR Code Requirements) by the site admin, while users can configure it using the Auth Zimlet.
See also
Community Article
https://community.zextras.com/improve-the-security-using-zextras-2fa/
This article showcases a few deployment scenarios of 2FA in Zextras and describes how Administrators can take advantage of such architecture.
ZxAuth for Admins
This section is dedicated to administrators and the activities they can carry out to manage and maintain Zextras Auth. Here administrators can find the requirements for the various authentication methods, then the installation instructions. Credential management follows, with the option to customise the login page at the end.
Requirements
QR Code Requirements
The QR Code Application Password feature requires the following properties to be set at domain level in order to be functional:
zimbraPublicServiceHostnamezimbraPublicServicePortzimbraPublicServiceProtocol
Should one or more of the properties be unset, a notification will be delivered to the Admin reporting the affected domains and their missing properties.
2FA Requirements
In order to properly have 2FA set up, the zimbraAuthMech attribute
bust be configured at domain level:
zmprov modifyDomain example.com zimbraAuthMech custom:zx
To enable 2FA it is also necessary to:
Enter the addresses of all mailbox and MTAs as
ZimbraMailTrustedIp, using the command:zmprov mcf +zimbramailtrustedip IP_ADDRESS
A
trusted ip rangemust be defined for all servicesFor all services the
ip_can_changeattribute must be validated ontrueand2fa_policy = 1
Warning
2FA requires a specific zimbraAuthMech and this makes it not compatible with other mechanism such as ldap, ad or kerberos5
SAML Requirements
Before enabling SAML login, it is necessary to modify the Zextras Backend processing, because these header attributes are required to compose the complete URL request: Protocol X and X-Port.
The files affected by this change are the templates:
nginx.conf.web.http.default.templatenginx.conf.web.http.templatenginx.conf.web.https.default.templatenginx.conf.web.https.template
In each of them, the location ^~ /zx/ code should be changed.
location ^~ /zx/
  {
      proxy_set_header X-Forwarded-For $proxy_add_x_forwarded_for;
      proxy_set_header Host $http_host;
      proxy_set_header X-Forwarded-Proto $scheme;
      proxy_set_header X-Forwarded-Port $server_port;
      proxy_pass ${web.upstream.zx};
  }
Installing the Zextras Auth Zimlet
To deploy the Zextras Auth Zimlet, simply run zxsuite auth
doDeployAuthZimlet as the zimbra user on any mailbox server of your
infrastructure.
Custom Login Page
The Auth module provides the ability to customise the Login Page as it is seen by other user.
The login page can be set at domain level and customized in terms of title, logo, background and favicon.
Enabling the Login Page
To enable the Login Page for a domain (we use example.com), set the
zimbraWebClientLoginURL and zimbraWebClientLogoutURL
configuration keys. You can do so from the GUI by adding the following
two values:
Web client login redirect URL:     /zx/login/page/?domain=example.com
Web client logout redirect URL:    /zx/auth/logout/
The same action can be done by using the following CLI command, which
configures also the authentication method (zimbraAuthMech):
zmprov md example.com zimbraAuthMech custom:zx zimbraWebClientLoginURL /zx/login/page/?domain=example.com zimbraWebClientLogoutURL /zx/auth/logout/
Customizing the Login Page
The Login Page can be customized through the use of the loginPage
Auth CLI command.
Image File Locations and Sizes
Zextras Auth offers two options for custom image files used by the Login Page, either by embedding remote image files or hosting them locally. Image files can be used for logo, background, and favicon.
Remote File
The image is available on a public online resource (like, e.g.,
a corporate server or a hosting service) and can be directly
accessed. When adopting this approach, use the full URL to the
resource in the CLI command, for example:
https://www.example.com/resources/logo.png
Hint
This is the preferred alternative.
Local File
The image is hosted locally and must be stored in a directory
under /opt/zimbra/jetty/webapps/zimbra/public/. When
configuring it, the relative path to the file from the
/opt/zimbra/jetty/webapps/zimbra/ base path must be used. If
the file is saved as
/opt/zimbra/jetty/webapps/zimbra/public/logo.png, then use
/public/logo.png
The optimal size for a logo image is 320x80 pixels. Other sizes can be used but the logo image could be stretched or scaled resulting in poor quality. The aspect ratio of 4:1 should always be maintained.
While the optimal size for the background image depends on the resolution of the client’s screen, it’s stongly advised to avoid images smaller than the current standard monitor resolutions to avoid vertical or horizontal bars to be displayed on screens with a bigger resolution than the background image.
Login Page Title
The login page title can be modified by using either of the following commands:
Global level by using zxsuite auth loginPage setTitle global
zxsuite auth loginPage setTitle global 'My Custom Login Page'
Domain level by using zxsuite auth loginPage setTitle domain
zxsuite auth loginPage setTitle domain example.com 'My Custom Login Page'
Viewing the current configuration
The current Login Page settings for a domain can be viewed by using the zxsuite auth loginPage getConfig domain command:
$ zxsuite auth loginPage getConfig domain example.com

        zimbraPublicServiceHostname                         mail.example.com
        loginPageBackgroundImage                            /public/background.jpg
        zimbraPublicServicePort                             443
        zimbraPublicServiceProtocol                         https
        zimbraDomainName                                    example.com
        publicUrl                                           https://mail.example.com
        loginPageLogo                                       /public/logo.png
Setting up Policy Management for 2FA
Zextras Auth introduced the second factor as part of the service authentication strategy. At domain or at global level, each service can either:
be enabled or disabled for the 2FA
have its own Trusted Networks
When enabled, the connection can be established only if the source is trusted, which means that the connection originates either from a trusted network, manually configured by the admin for the service, or from a previously trusted IP or device, depending on the 2FA policy configured for the service.
If none of the above conditions holds, the service must ask for the OTP, used as the second factor. If the service does not support the second factor, or is not able to interact with the user for it, the authentication process fails. For example, IMAP is a service not supporting OTP and therefore 2FA can not be used with it. Otherwise, when the user provides a valid OTP, the current user’s device and IP are stored in the Trusted Device table
Moreover, depending on the service policy, the connection should be valid even if the IP has been trusted by another service.
2FA Policy Management is a rather advanced technique which avoids the use of OTP in all cases when an authentication request is received from a device that is already in the Trusted Networks or Trusted Devices tables.
To set up and manage 2FA Policies, several CLI commands are available.
Display policies
The command zxsuite auth policy list returns the list of 2FA by domain, with option to filter specific services.
Example
zxsuite auth policy list domain example.com service EAS
Shows 2FA setting for domain example.com and for service EAS.
Example
zxsuite auth policy list global
Display for which services 2FA can be enabled. As a bonus, the output contains a lists of all supporter services, which fall in:
standard protocols or technologies (CLI, DAV, EAS, IMAP, POP3, and SMTP)
related to Zextras Zimbra components (MobileApp, WebAdminUI, WebUI, ZmWebUI).
Manage policies
The command zxsuite auth policy set enables or disables a service and accepts the following three optional parameters:
ip_can_changeThis attribute allows the server to deny connection requests coming from an IP other than the one used during the authentication. As an example, suppose that authentication was successfully carried out from a device with IP 192.168.1.72 and for any reason the IP of the device changes (e.g., a laptop moved to a different subnet). If
ip_can_changeis set to true, then the device is still authenticated and connections are allowed, otherwise, ifip_can_changeis set to false, authentication is invalidated and no connection is allowed for the device until a new authentication.trusted_ip_rangeIt defines the Trusted Networks, a set of IP ranges configured for each service (like e.g., DAV, EAS, SMTP, and more). If a connection comes from an IP in the Trusted Networks, the authentication will not require the second factor validation, independently from the policy specified, but users will be authenticated with username and password.
2fa_policyThis parameter determines how 2FA policies are enforced for each service and takes one of these three integer values:
0 (no_2fa): 2FA authentication is disabled for the service
1 (ip_2fa): Trust the IP from which the connection starts. All the subsequent logins from the same IP will not require the second factor.
2 (device_2fa): Trust the device from which the connection starts. All the subsequent logins from the same device (that is, same browser or Mobile App) will not require the second factor.
These parameters are supported by all services.
Manage expiration time
Two commands help to check and define the expiration time of trusted devices.
zxsuite auth policy TrustedDevice getExpiration
Check the current policy for expiration time, i.e., for how long a device will be considered as trusted. The number of days is returned. The command acts at domain and global level.
Example
zxsuite auth policy trustedDevice getExpiration domain example.com
Show how many days is the expiration time for example.com.
Example
zxsuite auth policy trustedDevice getExpiration global
Show how many days is the expiration time for the whole infrastructure.
zxsuite auth policy TrustedDevice setExpiration
Define the current policy for expiration time, i.e., for how long a device will be considered as trusted. The number of days is required. The command acts at domain and global level.
Example
zxsuite auth policy trustedDevice setExpiration domain example.com 20
Defines the expiration time for domain example.com to 20 days.
Setting up SAML Configuration
To integrate a SAML application into Zextras, you need to configure the SAML IDP (IDentity Provider) using the Zextras SAML SP data. In our sample scenario, we want to add SAML authentication to our domain example.com, accessible at SP_URL.
The SAML configuration is carried out at an IDP provider, then imported in Zextras Suite using a dedicated command.
The most important configuration options are the following. You should configure them on the SAML IDP side.
sp.entityidhttps://SP_URL/zx/auth/samlMetadata?domain=example.com
sp.assertion_consumer_service.urlhttps://SP_URL/zx/auth/saml
sp.nameidformaturn:oasis:names:tc:SAML:1.1:nameid-format:emailAddress
In order to validate against Zextras, make sure that the Name of the
attribute that is used as NameID is set to mailPrimaryAddress.
You can now integrate a SAML application in Zextras in two ways, either automatic or manual. The following sections describe each method in detail.
Import SAML Configuration Automatically
The SAML IDP provides a URL from which to download the configuration; assuming that this URL is https://my-saml-provider.org/simplesaml/saml/idp/metadata.php, you can import the configuration using the command:
zxsuite auth saml import example.com URL https://my-saml-provider.org/simplesaml/saml/idp/metadata.php
Note
The URL supplied by the SAML IDP for an unsecured connection may be slight different from the previous one, like in our example.
zxsuite auth saml import example.com url https://localidp.local.loc/app/xxxxxxxxxxxxxxx/sso/saml/metadata allow_unsecure true
You are now DONE! You can see the LOGIN SAML button on the login page.
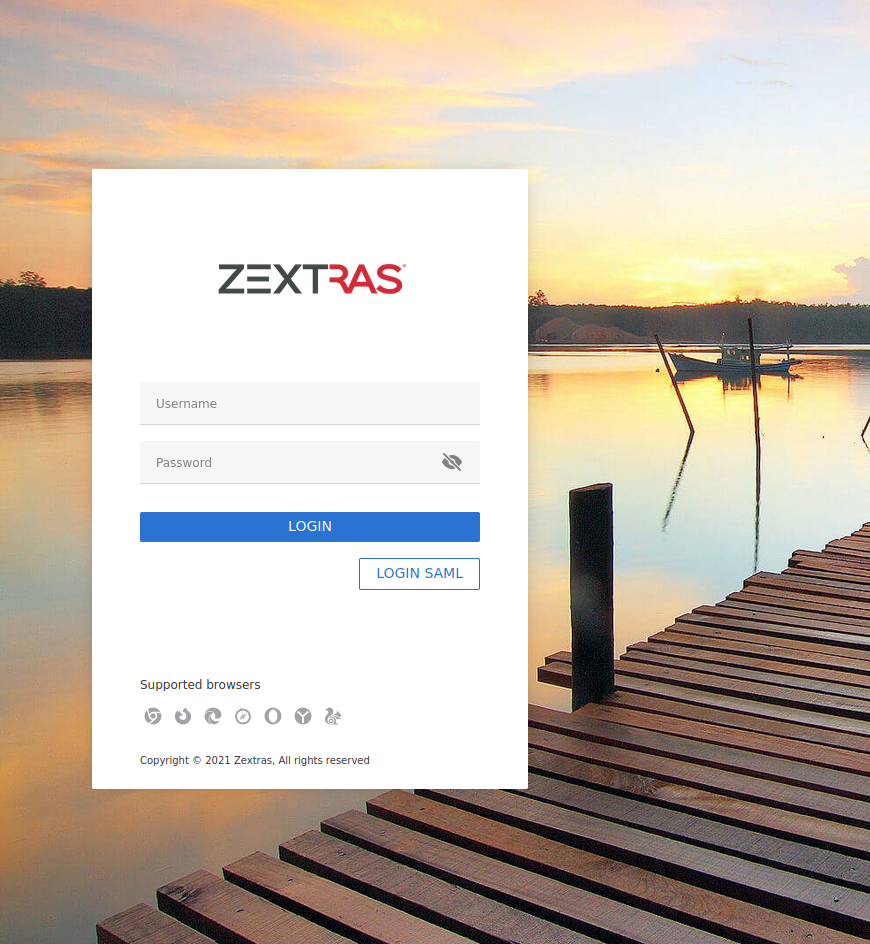
Fig. 9 Login page with enabled SAML.
By clicking it, you will be redirect to the SAML IDP login page.
Import SAML Configuration Manually
If you need to manually edit the SAML configuration, you need to follow this 4-step procedure. In a nutshell, you need to export the default SAML settings, modify them, then save and import them back.
Step 1. Export the default SAML settings
In order to export the default SAML setting, use
zxsuite auth saml get example.com export_to /tmp/saml.json
Step 2. Modify /tmp/saml.json
Open the resulting file /tmp/saml.json in any editor and modify
the requested attributes:
entityidassertion_consumer_service.urlnameidformat
Step 3. Check modified /tmp/saml.json
The /tmp/saml.json` file should look similar to this
one:
Simple saml.json file
{
  "sp.entityid":"https://SP_URL/zx/auth/samlMetadata?domain=example.com",
  "sp.assertion_consumer_service.url":"https://SP_URL/zx/auth/saml",
  "sp.nameidformat":"urn:oasis:names:tc:SAML:1.1:nameid-format:emailAddress",
  "sp.assertion_consumer_service.binding":"urn:oasis:names:tc:SAML:2.0:bindings:HTTP-POST",
  "sp.single_logout_service.binding":"urn:oasis:names:tc:SAML:2.0:bindings:HTTP-Redirect",
  "sp.single_logout_service.url":"https://SP_URL/?loginOp=logout",
  "sp.x509cert":"aabbcc",

  "idp.entityid":"https://IDP-URL/simplesamlphp/saml2/idp/metadata.php",
  "idp.x509cert":"xxyyzz",
  "idp.single_sign_on_service.url":"https://IDP-URL/simplesamlphp/saml2/idp/SSOService.php",
  "idp.single_sign_on_service.binding":"urn:oasis:names:tc:SAML:2.0:bindings:HTTP-Redirect",
  "idp.single_logout_service.binding":"urn:oasis:names:tc:SAML:2.0:bindings:HTTP-Redirect",

  "organization.name":"ACME, INC.",
  "organization.displayname":"Example",
  "organization.url":"https://www.example.com/",

  "security.requested_authncontextcomparison":"exact",
  "security.signature_algorithm":"http://www.w3.org/2000/09/xmldsig#rsa sha1",
  "security.want_nameid_encrypted":"false",
  "security.want_assertions_encrypted":"false",
  "security.want_assertions_signed":"false","debug":"true",
  "security.want_messages_signed":"false",
  "security.authnrequest_signed":"false",
  "security.want_xml_validation":"true",
  "security.logoutrequest_signed":"false"
  "security.logoutresponse_signed":"false",
}
Values appearing in the above code excerpt are taken from the example in the previous section. Certificates must be valid, they are omitted for clarity.
Step 4. Save the changes
The final step is to save the changes made to the file and import it into Zextras Suite using the command:
zxsuite auth saml import example.com file /tmp/saml.json
Hint
It is also possible to view or edit single attributes
by using the zxsuite auth saml get and zxsuite auth saml
set command options.
Configure SAML Logout
Some SAML IDP provider require that also the logout procedure be signed. In case you had already configured SAML, you can proceed in a similar fashion as described in the previous section: export the configuration, modify it, then import it again.
Here we show how to add signed logout to the configuration used in the
previous section, by modifying the configuration file
saml.json presented there.
Note
We also report below the configuration file presented in the previous section, modified according to the procedure described below and with the lines interested by the changes highlighted. The line numbers are those
First, you need to configure the SAML IDP logout service URL (line 7, sp.single_logout_service.url). We use Okta as example SAML IDP provider, so the URL will be similar to https://mycompany.okta.com/app/test/app_id/slo/saml.
Then, configure also the service provider’s certificate, sp.x509cert (line 8), which however should be already present.
At this point, you should be done and you can import the modified configuration file.
However, in case the SAMP IDP requires that also the requests be signed, or in case to sign the requests for security reasons, please follow these additional steps.
Create a new X509 certificate and register it to the SAML IDP. You can use a command similar to the following one to create one with openssl
# openssl req -x509 -sha256 -nodes -days 365  \
-newkey rsa:2048 -keyout privateKey.key -out certificate.crt
Add to the configuration file the certificate as sp.x509cert and the private key as sp.privatekey (lines 8 and 9 respectively)
Enable the signature generation, that is, set security.logoutrequest_signed to
true(line 30)You can also optionally enable the signature for the login request, by setting security.authnrequest_signed
to true(line 32)
saml.json file with signed logout and requests.
 1{
 2  "sp.entityid":"https://SP_URL/zx/auth/samlMetadata?domain=example.com",
 3  "sp.assertion_consumer_service.url":"https://SP_URL/zx/auth/saml",
 4  "sp.nameidformat":"urn:oasis:names:tc:SAML:1.1:nameid-format:emailAddress",
 5  "sp.assertion_consumer_service.binding":"urn:oasis:names:tc:SAML:2.0:bindings:HTTP-POST",
 6  "sp.single_logout_service.binding":"urn:oasis:names:tc:SAML:2.0:bindings:HTTP-Redirect",
 7  "sp.single_logout_service.url":"https://mycompany.okta.com/app/test/app_id/slo/saml",
 8  "sp.x509cert":"aabbcc",
 9  "sp.privatekey":"ddeeff",
10
11  "idp.entityid":"https://IDP-URL/simplesamlphp/saml2/idp/metadata.php",
12  "idp.x509cert":"xxyyzz",
13  "idp.single_sign_on_service.url":"https://IDP-URL/simplesamlphp/saml2/idp/SSOService.php",
14  "idp.single_sign_on_service.binding":"urn:oasis:names:tc:SAML:2.0:bindings:HTTP-Redirect",
15  "idp.single_logout_service.binding":"urn:oasis:names:tc:SAML:2.0:bindings:HTTP-Redirect",
16
17  "organization.name":"ACME, INC.",
18  "organization.displayname":"Example",
19  "organization.url":"https://www.example.com/",
20
21  "security.requested_authncontextcomparison":"exact",
22  "security.signature_algorithm":"http://www.w3.org/2000/09/xmldsig#rsa sha1",
23  "security.want_nameid_encrypted":"false",
24  "security.want_assertions_encrypted":"false",
25  "security.want_assertions_signed":"false","debug":"true",
26  "security.want_messages_signed":"false",
27  "security.authnrequest_signed":"false",
28  "security.want_xml_validation":"true",
29  "security.logoutrequest_signed":"true"
30  "security.logoutresponse_signed":"true",
31  "security.authnrequest_signed":"true",
32}
Access a Service Using SAML
Once SAML authentication has been properly configured on both the SP and IDP sides, it is possible to access to a Suite resource using different modalities:
Login to the IDP portal and click on the resource you want to access.
Directly go to the service’s web page and click the SAML LOGIN button that appears near the username and password fields
Note
The label on the button might slight differ, depending on IPD and configuration.
Use the direct link to the SAML authentication of the service. For example, given a Suite installation (the Service) located at mail.example.com, and provided you are already authenticated to the IDP, it is possible to access the mailbox by using the link https://mail.example.com/zx/auth/startSamlWorkflow?redirectUrl=https://mail.example.com/suite/mails
Hint
By replacing the URL after the
redirectUrlit is possible to allow direct access to other Carbonio components, for example: https://mail.example.com/zx/auth/startSamlWorkflow?redirectUrl=https://mail.example.com/suite/files will open the Carbonio Files component.
Temporary Auth Link
A typical user-management task that an administrator needs to carry out is to allow the first access to the company’s infrastructure to a new colleague or employee.
When 2FA is enabled on the mailstore, a new user can not login immediately, therefore the solution is to provide a temporary link (auth link) that allows the user to access and configure 2FA.
Administrators can generate a auth link easily from the Administration GUI:
In the user’s General Information section, in box called Temporary link, click the Create a temporary link button
A URL link will be shown in an overlay window and can be copied by clicking on the accompanying button
The link can then be sent to the new user
The user must access the mailbox within 5 minutes before the link expires
ZxAuth for users (Auth Zimlet)
Zextras Auth features a dedicated zimlet (see Fig. 10) to manage all user-side credential and features, such as the account and EAS Mobile Passwords, Mobile App QR Codes, and OTP for Two Factor Authentication.
Zextras Auth Zimlet overview
The Zextras Auth Zimlet can be accessed from the “Zimlets” section of the Zimbra Web Client. Users do not need any CLI access to use the Zextras Auth.
The creation of a new credential allows to give access to the account, possibly including the Zextras Mobile Apps, to other persons without having to share the personal credentials.
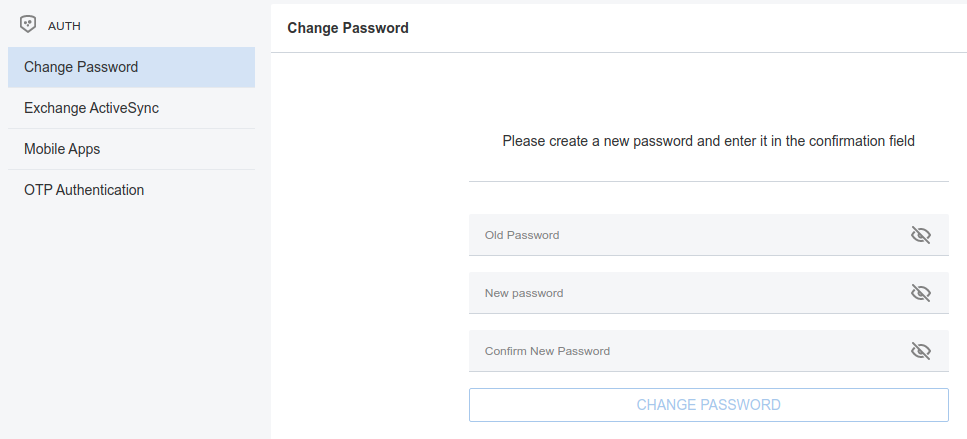
Fig. 10 The Zextras Suite Auth zimlet.
From the zimlet, the user can:
Change the password of the current logged in user
Add new credentials in the dedicated pages, accessible by clicking Exchange ActiveSync, Mobile Apps, or OTP Authentication
Check the status and other information for all Exchange ActiveSync and Mobile Apps credential created. In each section, entries in the list display the label of the password, its status, the service it is valid for, and its creation date.
Check the status and other information for every One Time Password created. Here, each entry shows a description, its status, the failed attempts, and its creation date.
Manage the 2FA access. Each user can decide whether to enforce access using 2FA, unless its use has been enabled or disabled at COS, domain, or global level.
Delete any credential created
Important
Users can in no case modify their assigned credentials, change the password of credentials they generate, or modify any property of the credential. Limited editing of a credential is strictly limited to the administrators.
In the remainder of this section, we give an overview of the various possibilities to create new credentials and provide instruction to add or delete them them.
Change Password
In order to change password, access the Auth zimlet and click change password. Here, you need to provide the current password, then enter twice a new one.
Hint
Make sure you use a robust password, which includes lowercase and uppercase letters, numbers, characters, and is at least *8 characters long.
To save the new password, click the blue CHANGE PASSWORD button.
Create New Credentials: EAS
To create a new Password for EAS service, open the Zextras Auth Zimlet and click Exchange ActiveSync, then NEW AUTHENTICATION +.
Here, enter an easy to remember identifier for the password in the Authentication description field.
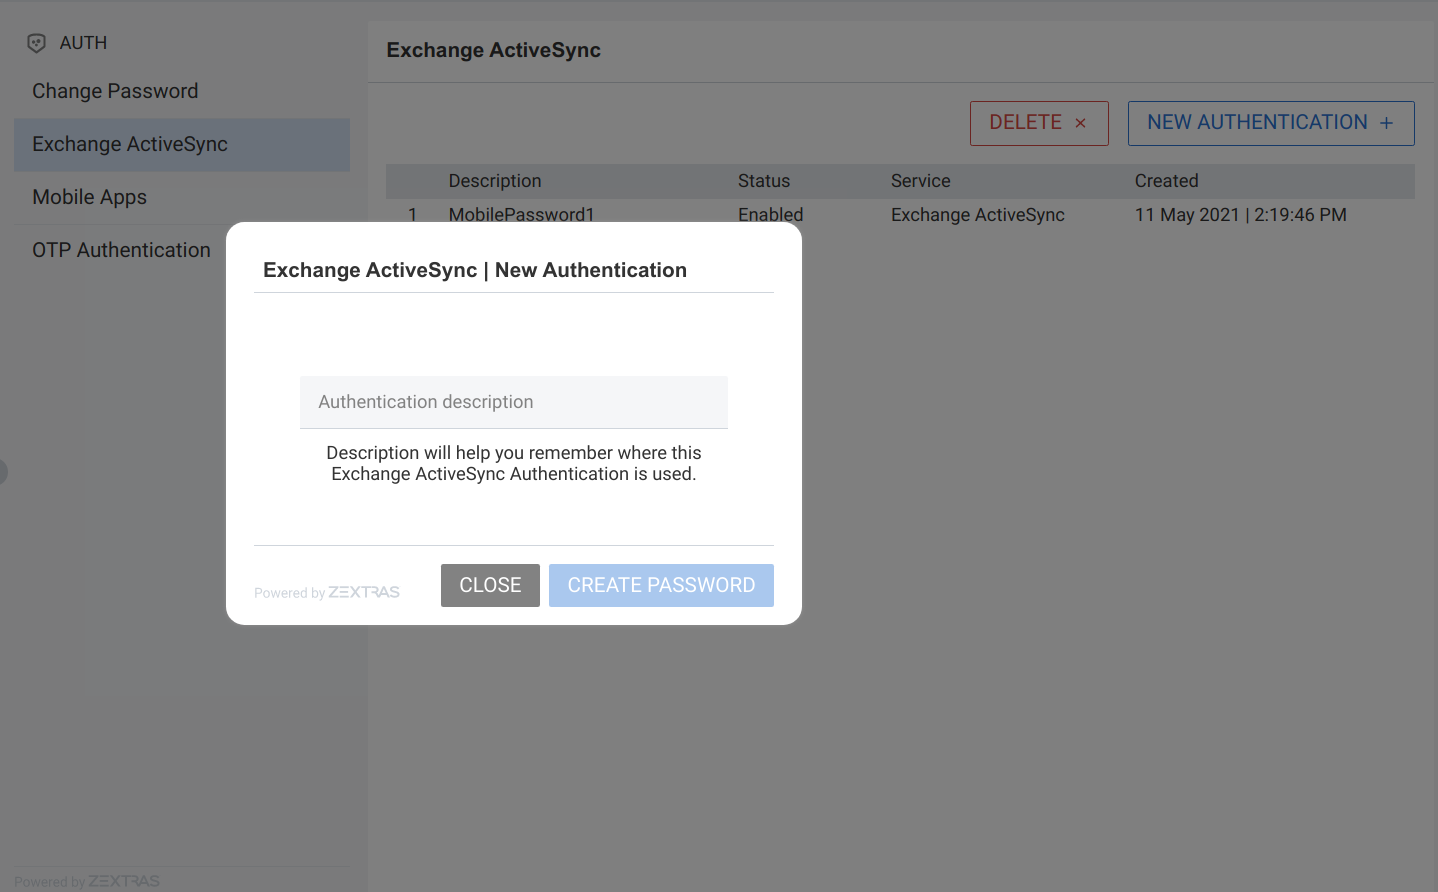
Then click CREATE PASSWORD: the new Mobile Password will be displayed.
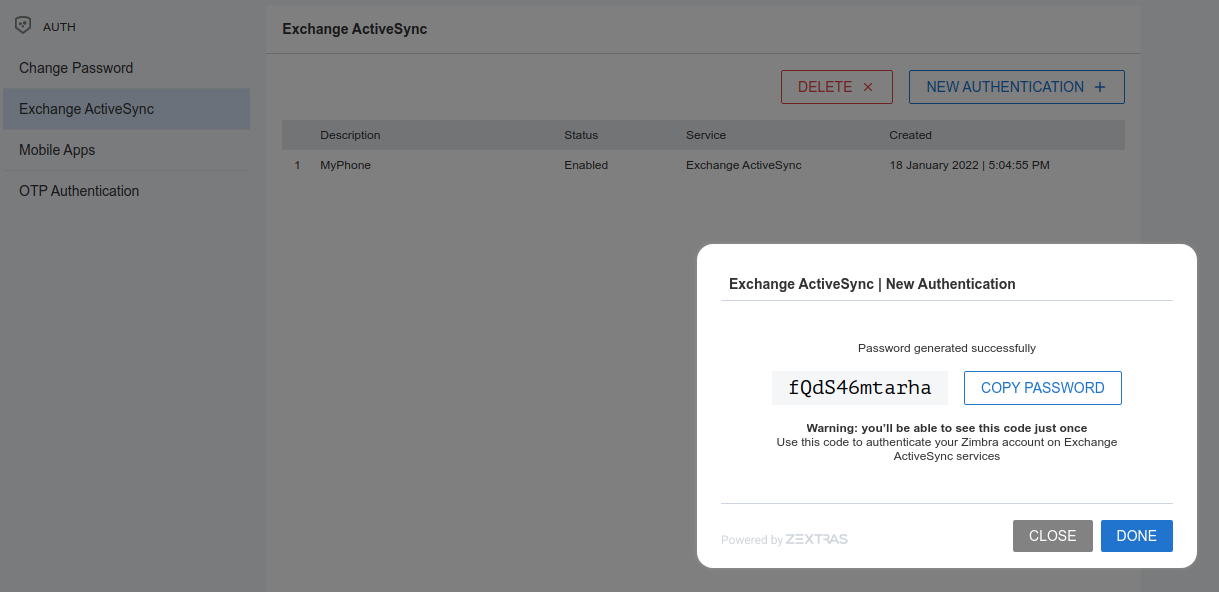
Finally, click the COPY PASSWORD button to copy the password to the clipboard.
Warning
Mobile Passwords are randomly generated and cannot be displayed again after the creation is complete.
Click DONE to close the Zextras Auth window. An entry for the new Mobile Password is now visible in the Active Passwords list of the Zextras Auth Zimlet.
Create New Credentials: Mobile Apps
Zextras Auth can speed up and manage Zextras Application logins, such as those for the Team Mobile App and Drive Mobile App.
This is achieved through the creation of a QR Code, which the user can then scan from the App’s login page to log in. The procedure is very similar to the one described in the previous section.
Warning
QR Codes are a one-time credential only, meaning that once generated it will grant access to the app until the relevant credential itself is deleted from the account. Once generated, the QR Code can only be viewed once.
In order to create a new QR Code for Mobile Application, open the Zextras Auth Zimlet and click Mobile Apps, then NEW AUTHENTICATION +.
Here, enter an easy to remember identifier for the password in the Authentication description.
Click CREATE PASSWORD and the new QR code for Mobile Application will be displayed. You can use the Zextras mobile app to frame the code and grant access to the app.
Warning
QR Codes are randomly generated and cannot be displayed again after the creation is complete.
Click on DONE to close the Zextras Auth window. An entry for the new Mobile Application is now visible in the Active Passwords list of the Zextras Auth Zimlet.
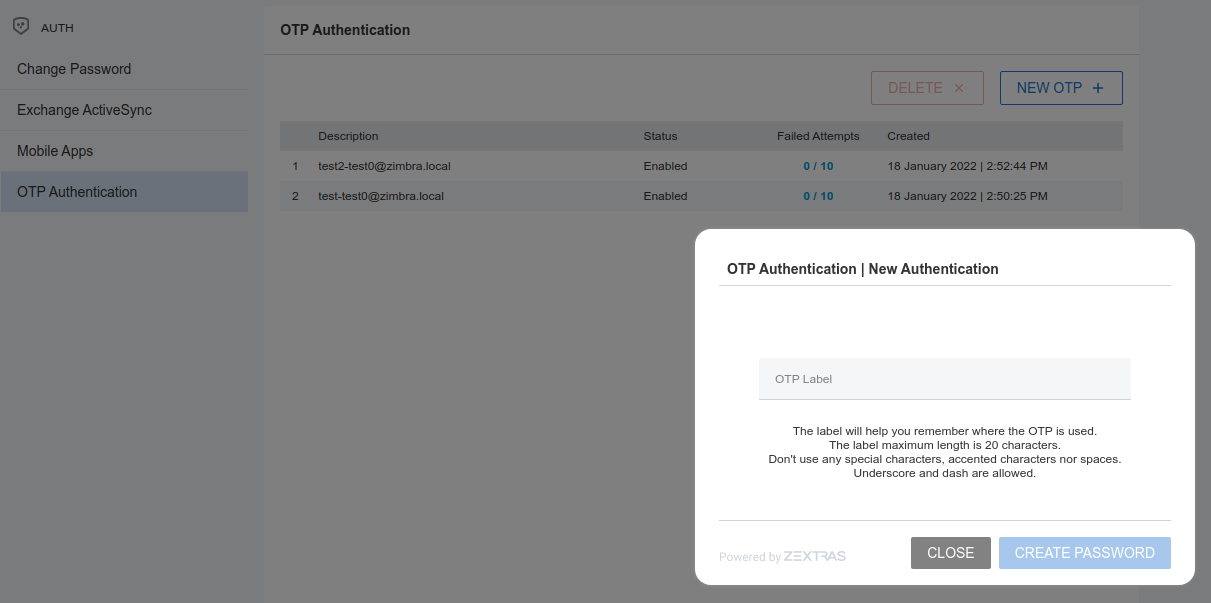
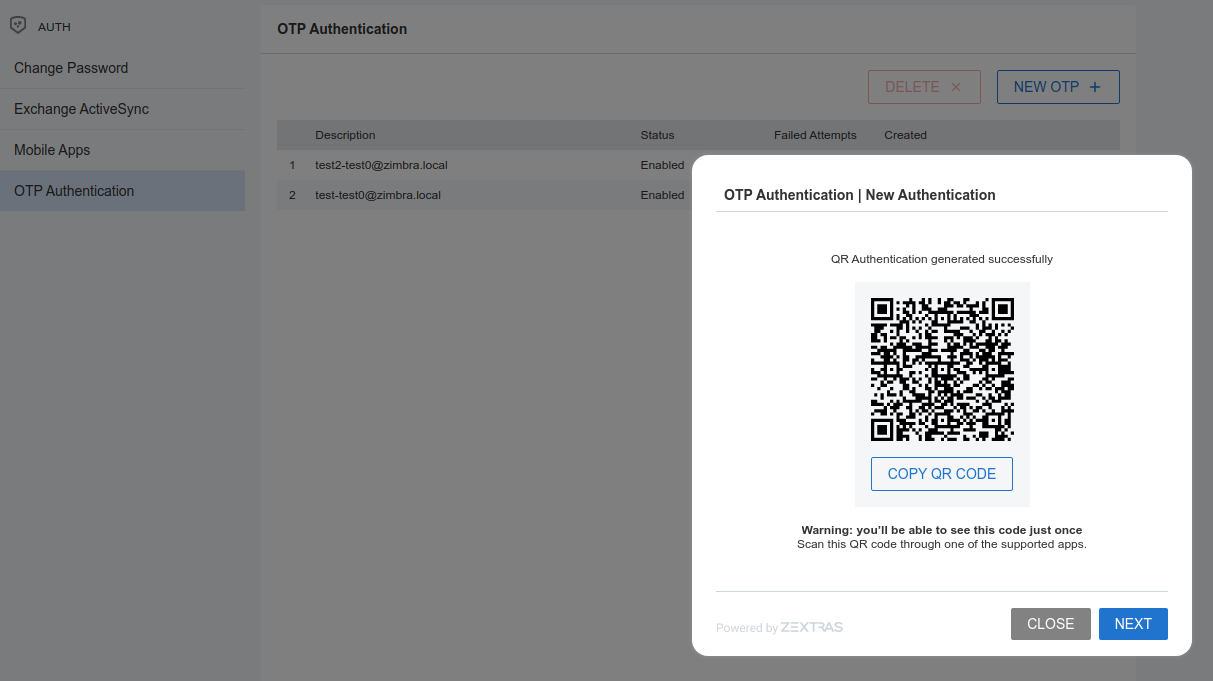
Create New Credentials: OTP
In order to create a new One Time Password access, open the Zextras Auth Zimlet and click OTP Authentication, then NEW OTP + to open a dialog in which you have to enter a unique label to identify the OTP.
You will be presented with the QR code and a list of PIN codes to be used for authentication.
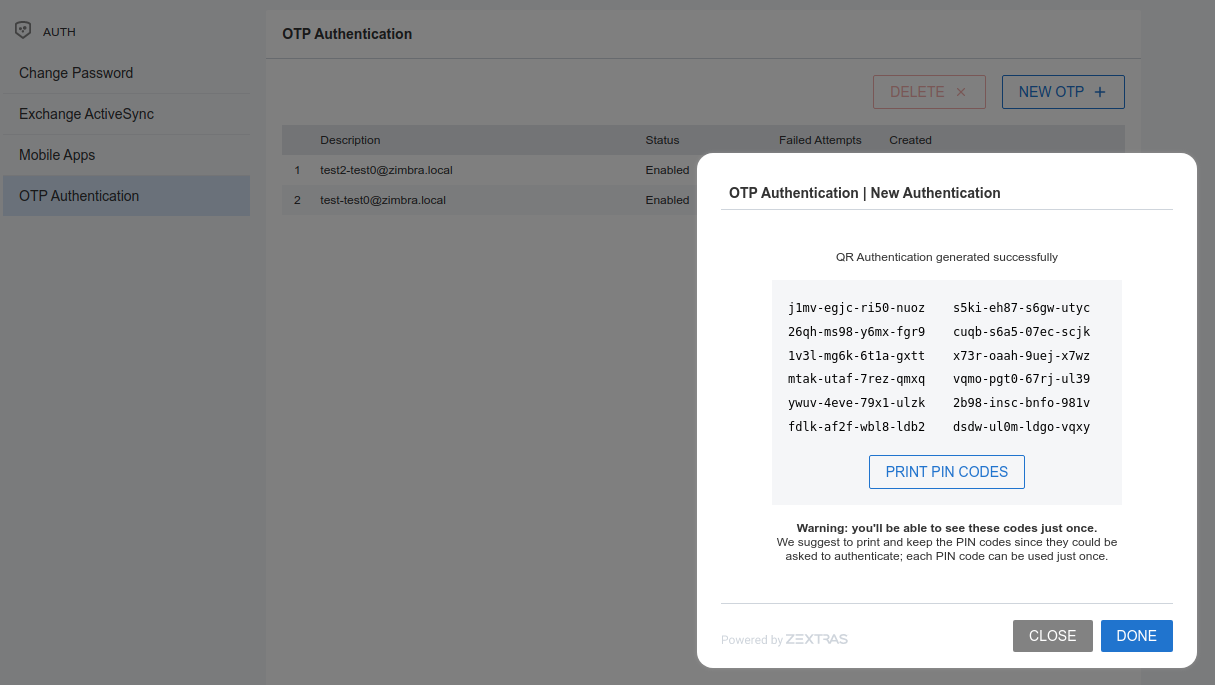
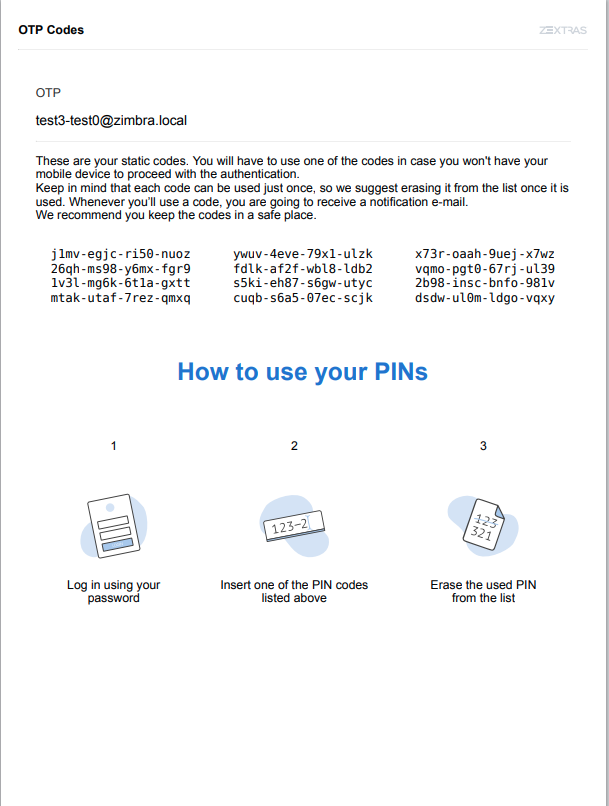
Next, click the PRINT PIN CODES button to print the codes on paper or to a file. The printed document includes all the codes, the username/e-mail address for which they are valid and instructions to use them.
Warning
QR codes and their associated PINs are randomly generated and cannot be displayed again after the creation is complete.
Finally, click DONE to close the Zextras Auth window. An entry for the new OTP entry will be shown in the list.
Note
The Description is automatically created using the email address to which it is associated.
Delete Credentials
In order to delete a credential, simply select it from the list of Active passwords or OTPs, and click the DELETE x button:
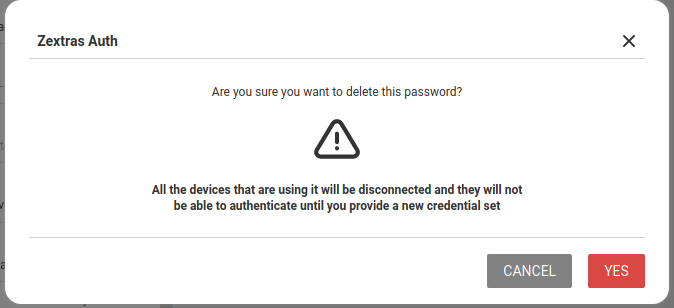
Click YES to confirm the removal of the credential.
Credential Management
Within Zextras Suite, a credential is something that allows access to one of its services or modules.
Zextras Suite Auth’s Credential Management system allows to create dedicated passwords for different services such as Exchange ActiveSync devices, Mobile Applications (e.g., Team and Drive) or the Zimbra WebClient itself.
It is also possible to share the access to a service with other colleagues, team members, or even third-party persons by simply creating a new authentication means (e.g., a QR code for mobile access) for the service, without the need to share the password. Once the access for these persons is not needed anymore, it suffices to delete the authentication means to revoke the access.
This also implies, as an additional advantage, that users are able to decide who can have access to the same services they use, providing a high level of granularity also at user level.
In the remainder of this section, we show a few common and relevant tasks that an administrator can carry out.
Services supported
Zextras Auth allows to create or update custom passwords for the following services:
EAS |
Mobile Password |
WebUI |
Zextras Auth Login Page |
WebAdminUI |
Admin Console |
MobileApp |
Zextras Mobile Apps |
ZmWebUI |
Standard Zimbra Login Page |
Dav |
Zextras LDAP Address Book |
Smtp |
SMTP Authentication |
Imap |
IMAP Authentication |
Pop3 |
POP3 Authentication |
Administrators can combine these services to set up multiple basic to complex scenarios, including:
enable only WebAccess
enable IMAP without SMTP
enable IMAP/SMTP only for managed client (pre-setup without the user)
create SMTP password that are not enabled for Web/Soap/Imap access, to be used for automation or external services
See the next section for a few examples.
Add new credentials
Administrators can set the password of any user account on the command line when they create the credentials. In no other circumstances they have access to the password, not even for changing it.
New credentials for each of the active authentication services can be added using the zxsuite auth credential add command:
# zxsuite auth credential add john@example.com [param VALUE[,VALUE]]
By default, this command uses EAS (Exchange ActiveSync) as
service. Multiple services can be added as comma separated list.
Some examples follow, the first includes a commented output.
create a password and a label for user john@example.com who can access service eas (mobile password).
# zxsuite auth credential add john@example.com password 'easpass' label "Smartphone" service eas
Credential correctly added

list
   generated 0
   created 1620892109473
   label Smartphone
   id aKcLK
   services EAS
   hash 6Fs6knbW1+fJmWMB1nKoCgLFPy+IGsuZGtmkW0NzV4A=
   enabled true
   algorithm SHA256
text_data
   auth_method password
   password easpass
   user john@example.com
generated- whether the credential was randomly generated or not, 0 true and 1 means falsecreated- the creation timestamplabel- the label, useful to remember the purpose or user of the credentialsid- the unique ID, which is mandatory to edit or update the credentialsservices- the services for which access is allowedhash- the hashed credential itselfenabled- whether the credential can be actually used or notalgorithm- the hashing algorithm usedpassword- the password assigned or randomly generated. As mentioned, this is the only occasion that the administrator can see a user’s password
Create a password for jane@example.com, that can be used only for Web Access (both ClassicUI and Zextras Login Page)
# zxsuite auth credential add jane@example.com password \
  'SecretPassword!' label "Web access" service ZmWebUI,WebUI
Create a password for alice@example.com that can be used only for IMAP and POP3 download (no SMTP)
# zxsuite auth credential add alice@example.com password \
  'LocalClient' service imap,pop3
Create a password for bob@example.com/SMTP_Service_Credential can be used to enable SMTP for an external client
# zxsuite auth credential add bob@example.com password \
'SMTP_Service_Credential' service smtp
An important parameter is qrcode, to create a new QR code to be
used by mobile devices, provided QR code support has been
enabled. Used together with the --json switch,
it will show the QR code’s payload as well. An example is:
# zxsuite auth credential add charles@example.com password \
  'SMTP_Service_Credential' qrcode true service smtp
List existing Credentials
System Administrators can view an extended list of all credentials active on an account by using the zxsuite auth credential list command:
# zxsuite auth credential list john@example.com
Note
The zxsuite auth credential list does not give access to the
user’s password.
The output of this command can be quite long, because it shows all the credentials configured on an account, including a number of additional information. Let’s see an example and which are the relevant information:
# zxsuite auth credential list john@example.com

        values
                generated           1
                created             Tue 04 May 2021 at 08:39:41
                label               MobilePassword 1
                id                  5llDP
                services            SMTP,IMAP
                hash                W6q6hvf10TcPasPL+Oy96iHWO7SrjZBDHfaldt6ZxQk=
                enabled             true
                algorithm           SHA256

                generated           0
                created             Wed 05 May 2021 at 17:53:38
                label               My Label
                id                  Fr2jM
                services            EAS
                hash                +Crk6YcPL7IapCg6xfT6oXWP977uTeZdJTVQDQZd+Io=
                enabled             true
                algorithm           SHA256
is the id of the credentials, which is unique and necessary to edit the credential—see next section
the service(s) for which the credential is valid.
Editing a Credential
While usually the credential (password) itself cannot be edited, the System Administrator can update its label and properties, including the services for which it is valid, by using the zxsuite auth credential update command:
# zxsuite auth credential update *john@example.com* *f51as* \
  [param VALUE[,VALUE]]
Building on the above example, we want to change the label of credential id Fr2jM belonging to user john@example.com. This can be achieved with:
# zxsuite auth credential update john@example.com Fr2jM label "New Label"
The successful credential update will be displayed as output of the previous command, reporting all credential’s properties:
Credential Fr2jM updated

        values
                generated           0
                created             Wed 05 May 2021 at 17:53:38
                label               New Label
                id                  Fr2jM
                services            EAS
                hash                +Crk6YcPL7IapCg6xfT6oXWP977uTeZdJTVQDQZd+Io=
                enabled             true
                algorithm           SHA256
Zextras Auth CLI
This section contains the index of all zxsuite auth commands. Full
reference can be found in the dedicated section
ZxAuth CLI Commands.
credential add credential delete credential list credential update doDeployAuthZimlet doRestartService doStartService doStopService enforce2FA get account enforce2FA get cos enforce2FA set account enforce2FA set cos getServices loginPage getBackgroundImage domain loginPage getBackgroundImage global loginPage getColorPalette domain loginPage getColorPalette global loginPage getConfig domain loginPage getConfig global loginPage getFavicon domain loginPage getFavicon global loginPage getLogo domain loginPage getLogo global loginPage getSkinLogoAppBanner domain loginPage getSkinLogoAppBanner global loginPage getSkinLogoURL domain loginPage getSkinLogoURL global loginPage getTitle domain loginPage getTitle global loginPage setBackgroundImage domain loginPage setBackgroundImage global loginPage setColorPalette domain loginPage setColorPalette global loginPage setFavicon domain loginPage setFavicon global loginPage setLogo domain loginPage setLogo global loginPage setSkinLogoAppBanner domain loginPage setSkinLogoAppBanner global loginPage setSkinLogoURL domain loginPage setSkinLogoURL global loginPage setTitle domain loginPage setTitle global policy list domain policy list global policy set Cli domain policy set Cli global policy set Dav domain policy set Dav global policy set EAS domain policy set EAS global policy set Imap domain policy set Imap global policy set MobileApp domain policy set MobileApp global policy set Pop3 domain policy set Pop3 global policy set Smtp domain policy set Smtp global policy set WebAdminUI domain policy set WebAdminUI global policy set WebUI domain policy set WebUI global policy set ZmWebUI domain policy set ZmWebUI global policy trustedDevice getExpiration domain policy trustedDevice getExpiration global policy trustedDevice setExpiration_domain policy trustedDevice setExpiration global saml delete saml get saml import saml update saml validate token invalidate token list totp delete totp generate totp list trustedDevice delete trustedDevice list