Zextras Backup
This chapter describes Zextras Backup, Zextras Suite’s component that is responsible to back up all the data. The chapter is divided into several sections: at the beginning, an overview of the most common task is given along with pointers to more technical references.
Next, the architecture of Zextras Backup is described, which includes also important concepts to know beforehand; the concepts will be detailed in the remainder of the chapter.
Finally, the available options to periodically store and check the data backed up are presented. All sections are accompanied with the corresponding Command Line Reference.
Important
Restore Strategies for the Backup and Advanced Backup Techniques, including Disaster Recovery are in dedicated chapters.
See also
Community Article
https://community.zextras.com/zimbra-migration-with-zextras-backup/
A detailed, step-by-step guide to migrate Zimbra domains, accounts and emails using Zextras Backup.
Zextras Backup Common Tasks
This section contains guidelines for the most common task required by the users; also links to technical resources are also provided.
How to Activate Zextras Backup
Once you have finished your servers setup, you need a few more steps to configure the Backup module and have all your data automatically backed up.
Mount a storage device at your target location. We use the default
/opt/zimbra/backup/zextrasthroughout this section; remember to replace it with the path you chose.
Important
The size of the device should be at least 80% of primary + secondary volume size.
Set the correct permission on the backup path:
chown zimbra:zimbra
/opt/zimbra/backup/zextras
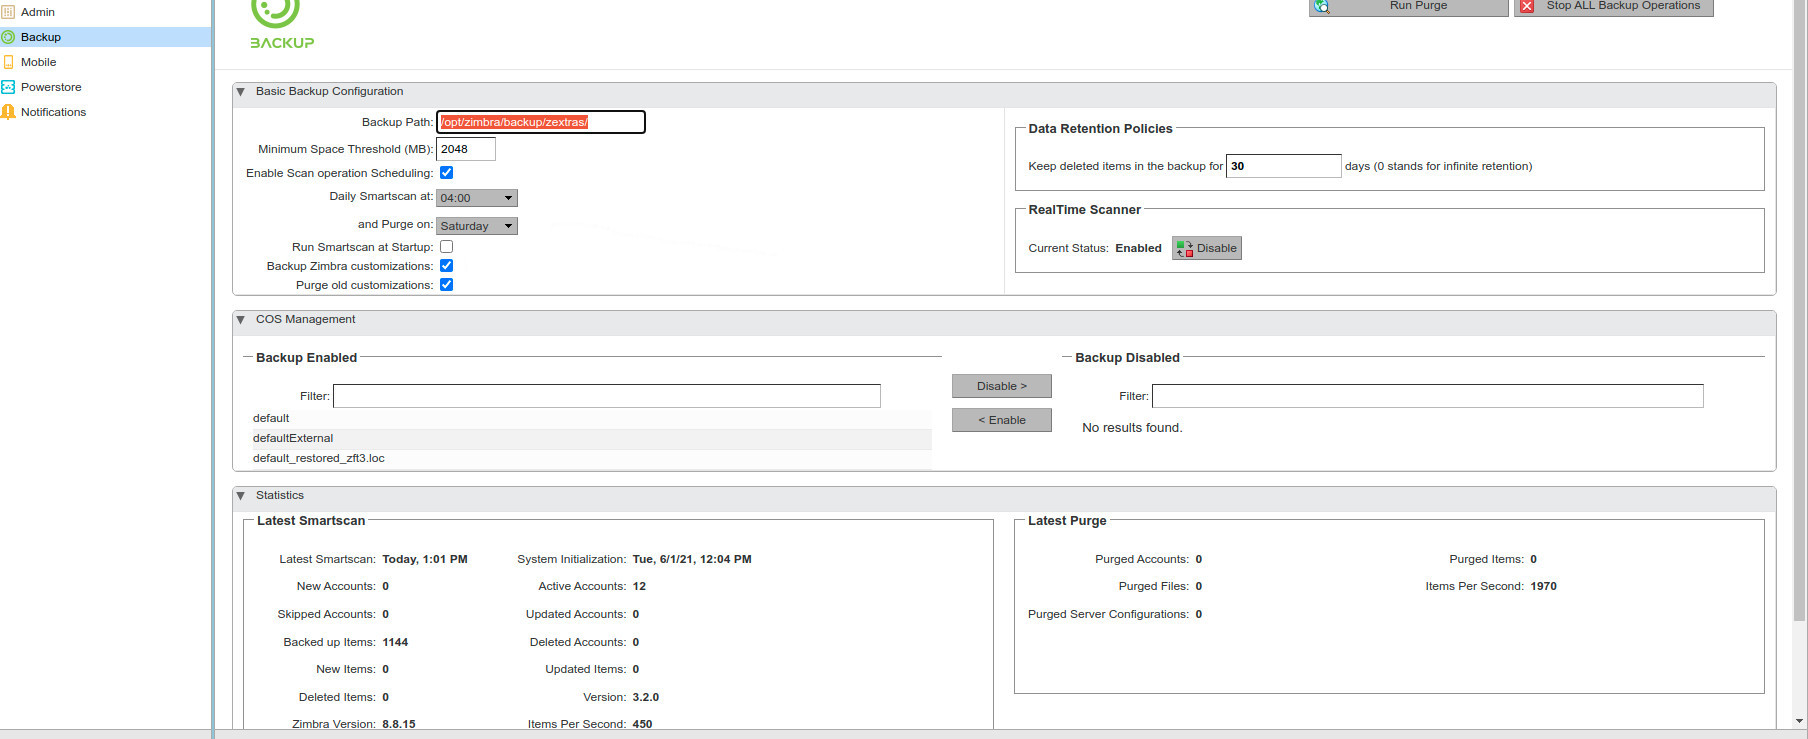
Fig. 6 Zextras Backup Admin Console
Once you have specified the backup path, it must be initialised, an
operation that can be done either from the admin console or the
command line. In the first case, click on the
Initialize NOW! button on the top right corner of
Fig. 6. From the CLI, initialization is done by
simply starting SmartScan for the first
time: zxsuite backup doSmartScan start
Hint
To avoid a flood of notifications about running operations, it is suggested to lower the default Notification level from Information to one of Warning, Error, or Critical (see Fig. 7).
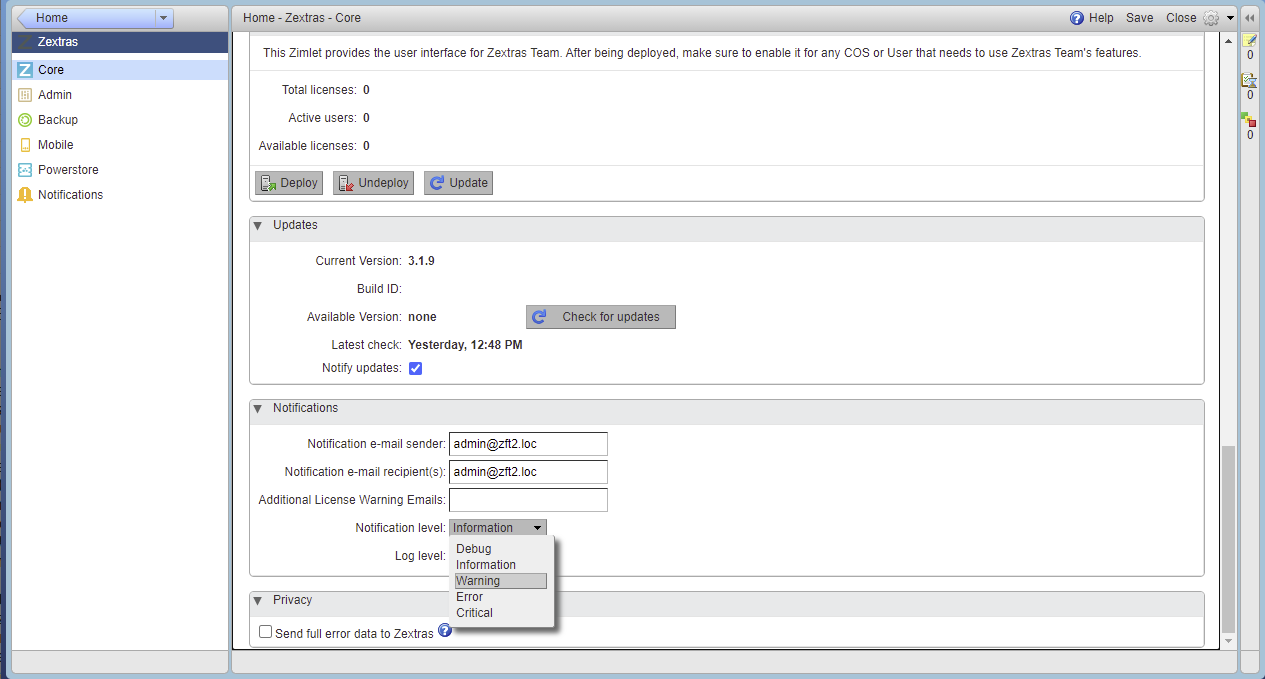
Fig. 7 Zextras Backup Notification Level
Architecture of Zextras Backup
This section introduces the main concepts needed to understand the architecture of Zextras Backup and outlines their interaction; each concept is then detailed in a dedicated section.
Before entering in the architecture of Zextras Backup, we recall two general approaches that are taken into account when defining a backup strategy: RPO and RTO.
The Recovery Point Objective (RPO) is the highest amount of data that a stakeholder is willing to loose in case of a disaster, while the Recovery Time Objective (RTO) is the highest amount of time that a stakeholder is willing to wait to recover its data.
According to these definitions, the ideal acceptable value zero, while the realistic values are usually near zero, depending on the size of the data. In Zextras, the combination of Real Time Scan and SmartScan guarantees that both RTO and RPO values are quite low: The Real Time Scanner ensures that all metadata changes are recorded as soon as they change, while the SmartScan copies all items that have been modified, hence the possible loss of data is minimised and usually limited to those items that have changed between two consecutive run on SmartScan.
Item
The whole architecture of Zextras Backup revolves around the concept of ITEM: An item is the minimum object that is stored in the backup, for example:
an email message
a contact or a group of contacts
a folder
an appointment
a task
a Drive document
an account (including its settings)
a distribution list
a domain
a class of services (COS)
Note
The last three items (distribution lists, domains, classes of services) are subject to the SmartScan only, i.e., the Real Time Scan will not record any change of their state.
There are also objects that are not items, and as such will never be scanned for changes by the Real Time Scan and will never be part of a restore:
Server settings, i.e., the configuration of each server
Global settings of Zextras product
Any customizations made to the software (Postfix, Jetty, etc…)
For every item managed by Zextras Suite, every variation in its associated metadata is recorded and saved, allowing its restore at a given point in time. In other words, whenever one of the metadata associated with an item changes, a “photograph” of the whole item is taken and stored with a timestamp be means of a transaction. Examples of metadata associated to an item include:
when the email was read, deleted, moved to a folder
a change in the name/address/job of a contact
the deletion or addition of a file in a folder
the change of status of an item (e.g, an account)
Technically, an item is stored as a JSON Array containing all changes in the item’s lifetime. More about this in the Structure of an Item section.
A Deleted Item is an item that has been marked for removal.
Note
An element in the thrash bin is not considered as a deleted item: It is a regular item, placed in a folder that is special only to us, from the Zextras Backup’s point of view, the item has only changed its state when moved to the thrash bin.
Transaction
A Transaction is a change of state of an item. With change of state we mean that one of the metadata associated with an item is modified by a user. Therefore, a Transaction can be seen as a photography of the metadata in a moment in time. Each transaction is uniquely identified by a Transaction ID. It is possible to restore an item to any past transaction. See more in Zextras Backup Restore Strategies.
SmartScan and Real Time Scan
The initial structure of the backup is built during the Initial Scan, performed by the SmartScan: the actual content of a Mailbox is read and used to populate the backup. The SmartScan is then executed at every start of the module and on a daily basis if the Scan Operation Scheduling is enabled in the Administration Zimlet.
Important
SmartScan runs at a fixed time—that can be configured—on a daily basis and is not deferred. This implies that, if for any reason (like e.g., the server is turned off, or Zextras is not running), SmartScan does not run, it will not run until the next day. You may however configure the Backup to run the SmartScan every time Zextras Suite is restarted (although this is discouraged), or you may manually run SmartScan to compensate for the missing run.
SmartScan’s main purpose is to check for items modified since its previous run and to update the database with any new information.
The Real Time Scan records live every event that takes place on the system, allowing for a possible recovery with a split-second precision. The Real Time Scanner does not overwrite any data in the backup, so every item has an own complete history. Moreover, it has the ability to detect there are more changes that relate to the same item in the same moment and record all them as a single metadata change.
Both SmartScan and Real Time Scan are enabled by default. While both can be (independently) stopped, it is suggested to leave them running, as they are intended to complement each other.
Warning
If none of the two Scan Operations is active, no backup is created.
When to Disable Scan Operations
Backups are written on disk, therefore the Scan operations result in I/O disk access. Therefore, there are a number of scenarios in which either of the SmartScan or Real Time Scan might (or should) be disabled, even temporarily. For example:
You have a high number of trasactions every day (or you often work with Drive documents) and notice a high load in the server’s resource consumption. In this case you can temporarily disable the Real Time Scan.
You start a migration: In this case it is suggested to stop the SmartScan, because it would create a lot of I/O operations on disk and even block the server. Indeed, it would treat every migrated or restored item as a new one.
You have a high traffic of incoming and outgoing emails per day. In this case, you should always have the Real Time Scan active, because otherwise all transactions will be backed up only by the SmartScan, which might not be able to complete in a reasonable time, due to the resources required for the I/O operations.
Backup Path
The backup path is the place on a filesystem where all the information
about the backup and archives is stored. Each server has exactly one
backup path; different servers can not share the same backup path. It is
structured as a hierarchy of folders, the topmost of which is by default
/opt/zimbra/backup/zextras/. Under this directory, the following
important files and directories are present:
map_[server_ID]are so-called map files, that show if the Backup has been imported from an external backup and contain in the filename the unique ID of the server.accountsis a directory under which information of all accounts defined in the Mailbox are present. In particular, the following important files and directories can be found there:account_infois a file that stores all metadata of the account, including password, signature, preferencesaccount_statis a file containing various statistics about the account, like for example the ID of the last element stored by SmartScanbackupstatis a file that maintains generic statistics about the backup, including the timestamp of the first rundrive_itemsis a directory containing up to 256 subfolders (whose name is composed of two hexadecimal lowercase letters), under which are stored Drive items, according to the last two letters of their UUIDitemsis a directory containing up to 100 subfolders (whose name is composed of two digits, in which items are stored according to their ID’s last two digits
serversis a directory that contains archives of the server configuration and customisations, Zextras configuration and of the chat, one per day up to the configured server retention time.itemsis a directory containing up to 4096 additional folders, whose name consists of two hexadecimal (uppercae and lowercase) characters. Items in the Mailbox will be stored in the directory whose name has the last two characters of their ID.id_mapper.logis a user object ID mapping and contains a map between the original object and the restored object. It is located at/backup/zextras/accounts/xxxxx-xxxx-xxxx-xxxx-xxxxxxxxxxxx/id_mapper.log. This file is present only in case of an external restore.
See also
Community Article
https://community.zextras.com/zextras-backup-path/
A more in-depth and comprehensive overview of the Backup Path.
Setting the Backup Path
The Backup Path can be set both via GUI and via CLI:
Via GUI: in the “Backup” section of the Zextras Administration Zimlet, under “Backup Path”.
Via CLI: using the zxsuite config server command to change the
ZxBackup_DestPathconfig key.
Warning
Backup paths are unique and not reusable. Copying a Backup Path to a new server and setting it as its current Backup Path will return an error, and forcing this in any way by tampering with the backup file will cause corruption of both old and new backup data.
Retention Policy
The Retention Policy (also retention time) defines after how many days an object marked for deletion is actually removed from the backup. The retention policies in the Backup are:
Data retention policy concerns the single items, defaults to 30 days
Account retention policy refers to the accounts, defaults to 30 days
All retention times can be changed; if set to 0 (zero), archives will be kept forever (infinite retention) and the Backup Purge will not run.
In case an account is deleted and must be restored after the Data retention time has expired, it will be nonetheless possible to recover all items up to the Account retention time, because in that case, even if all the metadata have been purged, the digest can still contain the information required to restore the item.
Backup Purge
The Backup Purge is a cleanup operation that removes from the Backup Path any deleted item that exceeded the retention time defined by the Data Retention Policy and Account retention policy.
Coherency Check
The Coherency Check is specifically designed to detect corrupted metadata and BLOBs and performs a deeper check of a Backup Path than SmartScan.
While the SmartScan works incrementally by only checking items modified since the last SmartScan run, the Coherency Check carries out a thorough check of all metadata and BLOBs in the Backup Path.
To start a Coherency Check via the CLI, use the zxsuite backup doCoherencyCheck command:
zxsuite backup doCoherencyCheck *backup_path* [param VALUE[,VALUE]]
See also
Community Article
https://community.zextras.com/coherency-check/
A detailed analysis of the Coherency Check
How Zextras Backup Works
Zextras Backup has been designed to store each and every variation of an ITEM. It is not intended as a system or Operating System backup, therefore it can work with different OS architecture and Zimbra versions.
Zextras Backup allows administrators to create an atomic backup of every item in the mailbox account and restore different objects on different accounts or even on different servers.
By default, the default Zextras Backup setting is to save all backup
files in the local directory /opt/zimbra/backup/zextras/. In
order to be eligible to be used as the Backup Path, a directory must:
Be both readable and writable by the
zimbrauser.Use a case sensitive filesystem.
Hint
You can modify the default setting by using either technique shown in section Setting the Backup Path.
When first started, Zextras Backup launches a SmartScan, to fetch from the mailbox all data and create the initial backup structure, in which every item is saved along with all its metadata as a JSON array on a case sensitive filesystem. After the first start, either the Real Time Scanner, the SmartScan, or both can be employed to keep the backup updated and synchronised with the account.
Structure of an Item
The basic structure of the item is a JSON Array that records all the changes happening during the lifetime of each item, such as information related to emails (e.g., tags, visibility, email moved to a folder), contacts, tasks, single folders, groups, or drive documents, user’s preferences (e.g., hash of the password, general settings).
To improve performance, only the changes that are needed to restore the items are recorded: for example is not useful to store the user’s last login time or the IMAP and Activesync state, because if the account will be restored on a new one, the values of that attributes would be related to the old account.
By collecting the timestamp of the transaction, we are able to restore data at a specific moment of its life.
During the restore, the engine looks at all the transactions valid evaluating the “start-date” and “end-date” attributes.
The same logic is used to retrieve deleted items: when an item is deleted we store the timestamp and so, we are able to restore items that have been deleted within a specific time frame.
Even if the blob associated to the item changes, and consequently its digest changes too (as happens for Drive Document), the metadata records the validity of the old and the new digest.
Backup of Team Database
Zextras Team is an instant messaging platform with a number of features, including file sharing, Web conferencing, and more. Since Team keeps track of everything (uploaded files, chat, and so on), its database can grow quickly to a large size: This slows down any Backup operations and is not usable for a restore operation.
For this reason, the backup of Team’s DB has been disabled by default. An Administrator may enable it, in theory, but only after having contacted beforehand a TSE (Technical Support Engineer).
SmartScan
What is the SmartScan?
The SmartScan operates only on accounts that have been modified since the previous SmartScan, hence it can improve the system’s performances and decrease the scan time exponentially.
By default, a SmartScan is scheduled to be executed each night (if
Scan
Operation Scheduling
is enabled in the Zextras Backup section of the
Administration Zimlet). Once a week, on a day set by the user, a Purge
is executed together with the SmartScan to clear Zextras Backup’s
datastore from any deleted item that exceeded the retention period.
How Does it Work?
The Zextras Backup engine scans all the items on the Zimbra Datastore, looking for items modified after the last SmartScan. It updates any outdated entry and creates any item not yet present in the backup while flagging as deleted any item found in the backup and not in the Zimbra datastore.
Then, all configuration metadata in the backup are updated, so that domains, accounts, COSs and server configurations are stored along with a dump of all configuration.
When LDAP is part of the setup, SmartScan will save in the Backup Path a compressed LDAP dump that can also be used standalone to restore a broken LDAP configuration.
Note
In case the LDAP backup can not be executed (e.g., because the access credential are wrong or invalid, SmartScan will simply ignore to back up the LDAP configuration, but will nonetheless save a backup of all the remaining configuration
When the External Restore functionality is active, SmartScan creates one (daily) archive for each account which include all the account’s metadata and stores it on the external volume. More information in section Backup on external storage.
When is a SmartScan Executed?
When the Zextras Backup module is started.
Note
While it is possible to enable this option, it is suggested to leave it disabled, because in certain situations, running SmartScan at every module restart can become a performance bottleneck, as it has been discussed in section When to Disable Scan Operations.
Daily, if the Scan Operation Scheduling is enabled in the Administration Zimlet
When the Real Time Scanner is re-enabled via the Administration Zimlet after being previously disabled
Running a SmartScan
To start a SmartScan via the Administration Zimlet,
Open the Administration Zimlet
If a multiserver installation, choose the server on which to run the SmartScan
Click the Zextras Backup tab
Click Run Smartscan
To start a SmartScan via the CLI, use the zxsuite backup doSmartScan command:
zxsuite backup doSmartScan *start* [param VALUE[,VALUE]]
Checking the Status of a Running Scan
Before actually carrying out this check, it is suggested to verify how many operations are running, to find the correct id. you can do this by using the zxsuite backup getAllOperations command.
zxsuite backup getAllOperations [param VALUE[,VALUE]]
To check the status of a running scan via the CLI, use the zxsuite backup monitor command:
zxsuite backup monitor *operation_uuid* [param VALUE[,VALUE]]
Real Time Scan
What is the Real Time Scanner?
The Real Time Scan is an engine tightly connected to the Mailbox, which intercepts all the transactions that take place on each user’s mailbox and records them with the purpose of maintaining the whole history of an item for its entire lifetime.
Thanks to the Real Time Scan, it is possible to recover any item at any point in time.
How Does it Work?
The Real Time Scanner reads all the events of the mail server almost real-time, then it ‘replicates’ the same operations on its own data structure, creating items or updating their metadata. No information is ever overwritten in the backup, so every item has its own complete history.
Managing the Real Time Scanner
Enabling the Real Time Scanner
Select the Zextras Backup Tab.
Under Real Time Scanner, press the Enable button.
Note
When the Real Time Scanner is enabled for the first time or re-enabled after a stop, a SmartScan is required. A warning will be displayed after enabling the Real Time Scanner, and you will be prompted to start the SmartScan.
To enable the Real Time Scanner via the CLI, the
ZxBackup_RealTimeScanner property of the Zextras Backup module must
be set to true:
zxsuite config server set $(zmhostname) attribute ZxBackup_RealTimeScanner value TRUE
Disabling the Real Time Scanner
Select the Zextras Backup Tab.
Under Real Time Scanner, press the Disable button.
To disable the Real Time Scanner via the CLI, the
ZxBackup_RealTimeScanner property of the Zextras Backup module must
be set to false:
zxsuite config server set $(zmhostname) attribute ZxBackup_RealTimeScanner value FALSE
Why Should I Disable the Real Time Scanner?
The only time you should disable the Real Time Scanner is while performing an External Restore of multiple domains. This is a safety measure to avoid high load on your server. After the import, re-enable the Real Time Scanner and perform a SmartScan when prompted.
Limitations and Safety Scan
The main limitation when restoring data acquired via the Real Time Scanner is:
Emptied Folder - when a user uses the
Empty Folderbutton in the right-click context menu
In this case, and any time Zextras Backup cannot determine the status of an item by reading the metadata saved by the Real Time Scan, an Account Scan on the given account is triggered BEFORE the restore.
This fixes any misaligned data and sanitizes the backed up metadata for the mailbox.
Backup Purge
What is the Backup Purge?
The Backup Purge is a cleanup operation that removes from the Backup Path any deleted item that exceeded the retention time defined by the Retention Policy.
How Does it Work?
The Purge engine scans the metadata of all the deleted items and when it finds an item marked for deletion whose last update is older than the retention time period, it erases it from the backup.
Note however, that if an item BLOB is still referenced by one or more valid metadata files, due to Zextras Backup’s built-in deduplication, the BLOB itself will not be deleted.
Customizations backed up by Zextras Backup also follow the Backup Path’s purge policies. This can be changed in the Zextras Backup section of the Administration Zimlet by unchecking the Purge old customizations checkbox.
When is a Backup Purge Executed?
Weekly, if the Scan Operation Scheduling is enabled in the Administration Zimlet
When manually started either via the Administration Console or the CLI
With infinite retention active (i.e., the Data Retention Policy is set to 0), the Backup Purge will immediately exit since no deleted item will ever exceed the retention time.
Running a Backup Purge
To start a BackupPurge via the Administration Zimlet:
Click the Zextras Backup tab (be sure to have a valid license).
Click the
Run Purgebutton in the top-right part of the UI.
To start a BackupPurge via the CLI, use the zxsuite backup doPurge command:
zxsuite backup doPurge [param VALUE[,VALUE]]
Checking the Status of a Running Backup Purge
To check the status of a running Purge via the CLI, use the zxsuite backup monitor command:
zxsuite backup monitor *operation_uuid* [param VALUE[,VALUE]]
Limitations and Corner Cases of the Backup
There are a few cases in which the backup is not working correctly. We discuss those cases here.
Restore of an active account on a new account should NOT be done using the latest state available. Suppose that a user by mistake deletes all of his emails or that for any reason (like e.g., a server failure) the emails in an account are lost. The user wants them back and asks the admin. If the admin restores the status of the account to the latest state available, the result is that the new account will contain the latest state available, which is an empty account, since in the latest state the email have already been deleted. Therefore, in order to correctly restore the account, it is necessary to restore it at a point in time which is antecedent the emails were deleted.
When using the POP3/POP3S protocol, if the email client is configured to download email messages and delete them immediately from the server, these messages may not be included in the backup. This does not happen if the Zextras Powerstore component is installed.
When sending an email directly through an SMTP connection (e.g., using a multipurpose device or connecting to the STMP server using telnet), then that email will not be part of the backup.
When sending email using an IMAP/SMTP client, the IMAP client must be configured to store the send email in a remote folder (using the IMAP STORE command) after the send operation, otherwise the email may not be included in the backup.
Note
The last two cases do not apply when using a browser to connect to the Mailbox. In this case is it the Mailbox that contacts the SMTP server to send the email and automatically passes the email to mailboxd.
Troubleshooting LDAP Backup
In some cases, when backing up a mailbox server, the backup of only the LDAP data may fail and completes with a warning:
Unable to backup LDAP config schema: missing `ldap_root_password` in localconfig.
In this section we provide some suggestions to tackle this problem.
Increase Log Verbosity
Depending on the mailbox server configuration, a number of log messages are saved in the log file. In case an LDAP backup fails and the log file does not report enough messages to identify the root cause of the failure, a first solution is to increase the verbosity of the log file.
zxsuite config server set $(zmhostname) attribute ZxCore_LogLevel value 0
Now, run a backup using the following command (that only backs up the LDAP data) and check again the log file.
zxsuite --json backup doBackupLDAP start
After the command completes and you have finished analysing the log file, remember to restore the verbosity to the previous level:
zxsuite config server set $(zmhostname) attribute ZxCore_LogLevel value 1
Hint
Increasing log verbosity can prove useful whenever troubleshooting a problem or searching for more information about a problem.
Missing root credentials
To be able to back up LDAP data, Zextras Suite needs to establish a remote connection to the LDAP server using LDAP root credentials.
In particular, the password is saved in the Zimbra localconfig, but on a mailbox server where the LDAP component is not installed, the LDAP root password is empty. Therefore, the LDAP connection fails with an invalid credentials error and the backup of the LDAP data is not produced.
This situation can be verified by using the following sequence of commands on a mailbox server:
su - zimbra
source bin/zmshutil
zmsetvars
ldapwhoami -x -D $zimbra_ldap_userdn -w $zimbra_ldap_password -H $ldap_master_url
The last command should complete with output
dn:uid=zimbra,cn=admins,cn=zimbra
Now, running the command
ldapwhoami -x -D "cn=config" -w $ldap_root_password -H $ldap_master_url
should output dn:cn=config. If this is not the case, then the
LDAP root password is either wrong or not stored in the local
configuration.
To fix the problem, follow this three step procedure.
Discover the ldap master server.
zmlocalconfig ldap_master_url
Obtain the root password.
Connect to the ldap master server and get the LDAP root password.
zmlocalconfig -s ldap_root_password
This command will print on the standard output the LDAP password,
that you need to store on all mailbox servers on which either
zxsuite is running, or LDAP backup is enabled, or both.
Save password on all mailstores.
Execute on every mailstore the following commands, in which $LDAPPASSWORD is the LDAP password obtained in the previous step.
su - zimbra
zmlocalconfig -e -f ldap_root_password="$LDAPPASSWORD"
Finally, restart the mailbox service to avoid cached credentials problems.
zmmailboxdctl restart
Disable LDAP Backup
In case you do not want to backup LDAP data together with Zextras suite, you can disable it entirely. On each mailbox server, to disable LDAP Backup, run this command.
zxsuite config set server $(zmhostname) ldapDumpEnabled false
Backup on external storage
As described in section Architecture of Zextras Backup, Zextras Backup is composed of metadata and blobs (compressed and deduplicated), saved by default on the same folder—or mounted volume—specified in the Backup Path. The real-time backup requires the Backup Path be fast enough to avoid queuing operations and/or risk data loss.
However, S3 buckets, NFS shares, and other storage mounted using Fuse can be very slow and might not be suited as storage mounted on the Backup Path.
Because the most important part of backups is the metadata, the idea behind Backup on External Storage is to use two different storages: one local (and typically fast) for metadata and cache and one external (local network or cloud) for the blobs and a copy of metadata.
If the external storage is remote, multiple changes will be bundled and sent together, while if it is local, larger but slower and cheaper storages can be employed.
How the Backup on external storage works
Metadata are saved locally in the Backup Path, BLOBs are momentarily cached on the local disk and uploaded to the remote storage as soon as possible.
The SmartScan locally updates the metadata for accounts that have been modified since the previous scan and archives them on the remote storage.
The remote metadata archiving can be also triggered manually by running
either of the following commands and adding the
remote_metadata_upload true parameter:
By splitting the I/O intensive metadata folder from the BLOBs one, it is also ensured that the backup works, even in case the remote storage is temporarily unavailable, for example because of network issues or ongoing maintenance tasks), granting a better reliability and backup resilience.
Goals and benefits
It is worth to highlight the two main advantages of the Backup on external storage:
Fast IOPS storage is needed only for metadata that are statistically less than 10% of the total backup size.
Backups are typically stored externally, away from the local infrastructure and are therefore accessible from disaster recovery sites
Important
When activating the Backup on External Storage, it is not possible to modify the Backup Path from the UI. Indeed, the corresponding input text area will only be shown, but can not be edited. Moreover, the following warning will be shown:
“The backup path cannot be managed using this UI since the Backup On External Storage is enabled. Please use the backup CLI commands”
In order to disable the External Storage, you can run the zxsuite backup setBackupVolume Default command.
zxsuite backup setBackupVolume Default start
Data stored in the external storage
Data is stored in external storage using a structure very similar to the one of the Backup Path:
|-- accounts
|-- items
|-- server
`-- backupstat
The external volume is used as a storage for the $BACKUP_PATH/items
only, while the metadata (which are in $BACKUP_PATH/accounts) will
still use the local volume like a working directory to store the changed
metadata.
There is a set of dedicated commands to download the metadata from the external storage and rebuild the structure and the content of the account in case of Disaster Recovery or to update/fix local metadata.
For example, this command downloads the latest metadata available in the remote storage to the Backup Path.
zxsuite backup retrieveMetadataFromArchive S3 *destination*
See documentation of zxsuite backup retrieveMetadataFromArchive S3 for more information.
External storages
Supported external volumes, i.e. shared volumes mounted either at the OS level, or object storage entirely managed by Zextras, are of two types: NFS or Fuse external volumes, which are described in the remainder of this section.
NFS/Fuse external storage
Before using the NFS/Fuse share, it is necessary to configure the new volume(s) that will store the backup, because no existent volume can be reused. Depending on what approach you choose, the steps to carry out are different. We describe here only the easier and most reliable one.
When NFS shares are used, you need to make them visible and accessible
to the OS and Zextras, a task that only requires to add a row in
/etc/fstab with the necessary information to mount the volume, for
example, to mount volume /media/mailserver/backup/ from a NAS located at
192.168.72.16 you can add to the bottom of /etc/fstab a line similar
to:
192.168.72.16:/media/mailserver/backup/ /media/external/ nfs rw,hard,intr, 0,0
You will now be able to mount the external storage by simply using
mount /media/external/ on the server.
In the case of a multiserver installation, the admin must ensure that each server writes on its own directory, and the destination share must be readable and writable by the zimbra user.
In a multiserver installation, consider a scenario in which the same NAS
located on 192.168.72.16 is involved, which exposes via NFS the share as
/media/externalStorage. We want to store our multiservers backups on
this NAS.
To do so, on each server you need to add one entry similar to the
following to /etc/fstab:
192.168.72.16:/externalStorage/Server1 /mnt/backup nfs rw,hard,intr 0 0

192.168.72.16:/externalStorage/Server2 /mnt/backup nfs rw,hard,intr  0 0

192.168.72.16:/externalStorage/Server3 /mnt/backup nfs rw,hard,intr  0 0
S3 external storage
Before using an ObjectStorage, a dedicated Zextras bucket must be created.
While similar in concept, Zextras Backup and Zextras Powerstore buckets are not compatible with each other. If Powerstore data is stored in a bucket it is not possible to store Backup data on the same bucket and vice-versa.
The zxsuite core listBuckets command reports the bucket usage, for example:
bucketName                                                  hsm
protocol                                                    HTTPS
storeType                                                   S3
accessKey                                                   xxxxx
region                                                      EU_WEST_1
uuid                                                        58fa4ca2-31dd-4209-aa23-48b33b116090
usage in powerstore volumes
                  server: server1                                   volume: centralized-s3
                  server: server2                                   volume: centralized-s3
usage in external backup                                    unused

bucketName                                                  backup
protocol                                                    HTTPS
storeType                                                   S3
accessKey                                                   xxxxxxx
region                                                      EU_WEST_1
destinationPath                                             server2
uuid                                                        5d32b50d-79fc-4591-86da-35bedca95de7
usage in powerstore volumes                                 unused
usage in external backup
                  server: server2
Since each Zextras Bucket is identified by a prefix, you can use the combination of S3 bucket credentials and Zextras bucket prefix to uniquely identify and store multiple Zextras Buckets within a single S3 Bucket.
In other words, the same Amazon S3 Bucket, you could define several Zextras Buckets, to be used both for Powerstore HSM and Backup
S3 Backup in a multi-mailbox environment
In multi-mailbox environments, it is not necessary to create multiple
buckets: You only enter the bucket configuration information when
enabling the remote backup on the first server. The
bucket_configuration_id and prefix parameters can then be used
to store other server’s data on a separate directory on the same
storage.
Activate backup on the external storage
Once that external storage has been set up, it is necessary to let Zextras Suite use the external storage. The procedure is slight different, depending if the new storage needs to be accessed from a newly installed server or if existing local backups must be migrated to the external storage.
If there the backup has not been initialized on the server, an Administrator can configure the external storage by running
zxsuite backup setBackupVolume S3 bucket_configuration_id VALUE
[param VALUE[,VALUE]].
Once the backup will be initialized, it will use the external storage.
Therefore, check for any missing blobs with doCheckBlobs in the Zimbra volumes to avoid integrity errors.
Before actually carrying out the migration, please perform the following important maintenance task. This procedure will minimise the risk of errors:
Double-check Zimbra permissions on the active backup path
Make sure that the Zextras cache folder is accessible by the Zimbra user (typically under
/opt/zimbra/cache)Check for table errors in the myslow.log and in the MariaDb integrity check report. If any error is found, consider running the
mysqlcheckcommand to verify the database integrity.Check for any missing blobs in the Zimbra volumes with zxsuite powerstore doCheckBlobs
Check for any missing digest in the backup with doSmartScan deep=true
Check for any orphaned digest or metadata in the Backup with zxsuite backup doCoherencyCheck
Optionally run a zxsuite backup doPurge to remove expired data from the Backup
You can now proceed to migrate the existing backup using the appropriate
zxsuite backup migrateBackupVolume [[
Default |
Local |
S3 ]] command.
Finally, once the migration has been completed you can run this final task:
Manually remove the old backup data. Indeed, the migration only copies the files of the backup to the new external storage and leaves them in the place.
There are unfortunate cases in which a remote ObjectStorage holding a Backup becomes completely unavailable, for example because of an hardware failure.
What happens in this situation is unfortunate in many points:
All the data saved in on the Bucket are already lost
The remote bucket still shows up when issuing the command zxsuite core listBuckets all
The Backup still tries to use that bucket
The defective Bucket can not be removed
Trying to redirect the backup to a new volume with the command
migrateBackupVolumeis fruitless, because the remote Bucket is unresponsive and unaccessible
The solution to this impasse is however quite simple, and indeed there are two alternatives:
You do not have another ObjectStorage available: use the command
# zxsuite backup setBackupVolume Default start
The Backup will now use the default, local path.
You already have another ObjectStorage available: create a new Backup Volume with the following command (we use a new S3 bucket as example)
# zxsuite backup setBackupVolume S3 bucket_configuration_id 58fa4ca2-31dd-4209-aa23-48b33b116090 volume_prefix new_backup
In both cases, at this point you can proceed to remove the volume that is no longer functional.
Zextras Backup CLI
This section contains the index of all zxsuite backup commands. Full
reference can be found in the dedicated
section ZxBackup CLI Commands.
doAccountScan doBackupAuthToken doBackupChat doBackupCluster doBackupLDAP doBackupServerCustomizations doCheckShares doCoherencyCheck doEnableDisableCOS doExport doExternalRestore doFixShares doItemRestore doItemSearch doPurge doRawRestore doRestartService doRestoreBlobs doRestoreOnNewAccount doSmartScan doStartService doStopAllOperations doStopOperation doStopService doUndelete getAccountInfo getAllOperations getAvailableAccounts getAvailableDomains getBackupInfo getCOSBackupStatus getItem getMap getProperty getServerConfig getServices migrateBackupVolume Default migrateBackupVolume Local migrateBackupVolume S3 monitor retrieveMetadataFromArchive Local retrieveMetadataFromArchive S3 setBackupVolume Default setBackupVolume Local setBackupVolume S3 setProperty updateBackupVolume S3