Zextras Team
What is Zextras Team
Zextras Team integrates a fully fledged corporate instant messaging platform inside the Zimbra WebClient, including Group and Corporate Messaging, File Sharing, Screen Sharing and informal Video Chat capabilities.
Warning
Zextras Team is not compatible with Zimbra version 8.8.11 and lower.
Warning
From Zextras Suite version 3.10.0 the use of instant meetings is allowed only if the infrastructure is equipped with a Video Server. User will not be able to make calls until the Video Server is not online.
Frontend Features
Zextras Team includes the following front-end features:
Message delivery and read awareness
1-to-1 Instant Messaging
Group Messaging
Corporate Messaging (Spaces and Channels)
Group Video Calls
Channel Video calls
File Sharing
Screen Sharing
Emojis
Mute conversations and notifications
Backend Features
Zextras Team includes the following backend features:
COS and User availability
Built-in TURN server compatibility
No core installation needed. Zimlet installation through a package manager.
No configuration needed
Peer-to-Peer WebRTC protocol to avoid server load
Dedicated audit log
Licensing
Zextras Team is licensed on a per-user basis.
Global Admins can enable its Advanced features for any number of users up to the limit allowed by the license, and only “advanced” users count towards any licensing limit.
The total number of users who have the Advanced features active can be
seen in the output of the zxsuite core getLicenseInfo command under
teamChatActiveCount:
zxsuite core getLicenseInfo

 dateStart                                           2019-06-11 00:00:00 UTC
 dateEnd                                             2019-12-31 17:00:00 UTC
 expired                                             false
 [...]
 teamchatActiveCount                                 999
 [...]
This count is updated every 15 minutes.
Zextras Team Zimlet installation
The com_zextras_Team Zimlet can be deployed from the “Core” section
of the Zextras Administration Zimlet.
No configuration on the mailboxd side is needed after the Zimlet has been deployed and enabled.
URLs and Ports
To build URLs and links (e.g. for External Shares) Zextras Team uses the
default Zimbra settings for the domain of the account in use - the
zimbraPublicServiceHostname property is used for the URL itself
while the zimbraPublicServicePort property is used for the port.
Should any of the two not be set up, the system will always fall back to
the zimbraServiceHostname and zimbraMailPort or
zimbraMailSSLPort server-level properties.
For Video Chats and Instant Meetings, the following rules apply:
Team will work through firewalls and NATs as long as the peers can communicate each with the other - either directly or through a TURN server (which together with proper network rules is usually the solution to any WebRTC connection problem).
When no TURN server is set up, a default STUN server is used so clients should be able to send outbound traffic to ports 19305/19307. The actual P2P connection is established between the clients on a random unreserved port between 1 and 65535 based on the client configuration and network.
The default handshake/negotiation port used by most TURN servers is 3478 (incoming, UDP), but a different port can be used as long as it is properly set up> on the Team side the port is specified when adding the TURN server and the clients clients will be instructed to connect through it. The default P2P connection range when using a TURN server is 49152-65535 (usually configurable on the TURN side) so clients should be able to send data to that port range to the TURN server.
Most TURN servers can also be configured to use TCP insted of UDP.
Zextras Team administration
Zextras Team features can be enabled and disabled from the “Team” section of Accounts and Classes of Service in the Zimbra Administration Console.
The same options are also available via the zxsuite config command
line utility:
Feature |
Property |
Available in |
|---|---|---|
Enable «Advanced» features |
|
COS, account |
Enable the chat history |
|
global, server, COS, account |
Enable Video Chat |
|
global, server, COS, account |
Enable user presence |
|
global, server, COS, account |
Enable read receipt for sent messages |
|
global, server, COS, account |
Browser compatibility
The following list shows which browsers are known to fully support all Zextras features.
Browser |
Version |
OS |
Supported |
|---|---|---|---|
Microsoft Edge (Chromium) |
Latest |
Windows |
Yes |
Microsoft Edge (Chromium) |
Others |
Windows |
Limited |
Microsoft Edge (EdgeHTML) |
Any |
Windows |
No |
Internet Explorer |
Any |
Windows |
No |
Mozilla Firefox |
Latest |
Windows/Linux/OSX |
Yes |
Mozilla Firefox |
ESR |
Windows/Linux/OSX |
Yes |
Mozilla Firefox |
Others |
Windows/Linux/OSX |
Limited |
Google Chrome |
Latest |
Windows/Linux/OSX |
Yes |
Google Chrome |
Others |
Windows/Linux/OSX |
Limited |
Safari |
Latest |
OSX |
Yes |
Safari |
Others |
OSX |
Limited |
Items marked as “ Limited” are only supported on the browser’s two previous stable releases.
Firefox users must be sure to be running at least version 66 of the browser to be able to use the Screen Sharing feature.
Mobile App
A dedicated Zextras Team mobile app is available for both Android and iOS.
Warning
In order for mobile message delivery to work, the Zimbra
server must be able to communicate with the
notifications.zextras.com service on port 443
Notifications on Android Devices
Several Android devices manufacturers have strict default settings on which apps can display notifications, sometimes causing the Zextras Team App not to be able to notify new messages.
To make sure that your device allows all required notifications, follow these steps:
Log out from the app;
Access the device’s Settings, then enter the “Apps & Notifications”1 menu;
Select the Team app from the list of all installed apps;
Enter the “Notifications”1 section;
Enable the notifications (first option on the top);
Enable the banner notification on the “Chat”, “Group” and “Spaces & Channels” subsections;
Log back in, notifications should now work;
Note
Entries marked as (1) might have a different name depending on your device’s manufacturer and UI.
User Interface
Team Tab
The Team Tab is a fully fledged Zimbra feature tab that can be accessed in the same way as all other feature tabs (e.g., Mail or Calendar). The Zextras Team UI is seamlessly integrated with the Zimbra Web Client.
The Team Tab is the full-sized Zextras Team UI, which contains all corporate instant messaging features such as Spaces and Channels. The tab itself is available for both Basic and Advanced users, but corporate features are only available to Advanced users. The tab appearance changes depending on which of the textual or video conversation feature is used.
Meetings on a New Browser Tab
Users can now start their meetings from a new browser tab or continue the call in the same tab.
When users start a call, the following modal appears.
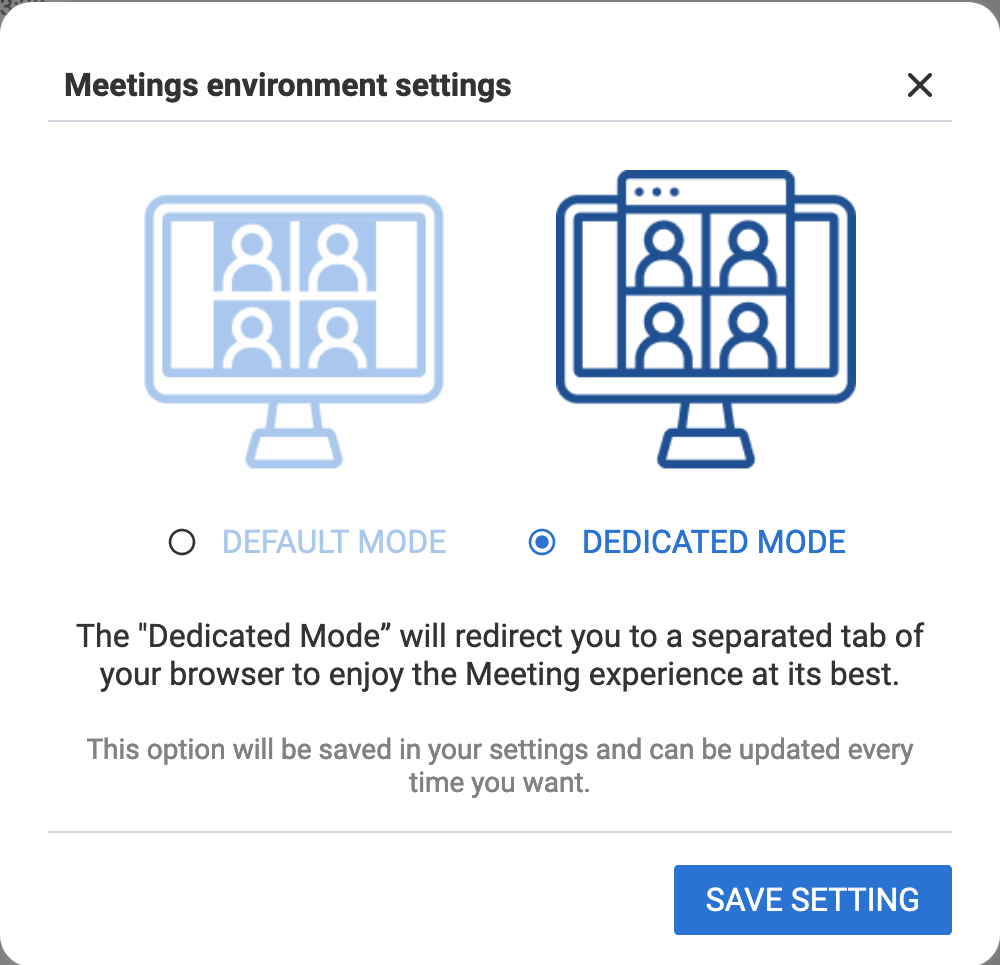
Fig. 11 Launch Team in a new browser tab
- Default Mode
The Team app starts within the Zimbra application under the same tab.
- Dedicated Mode
The team app starts in a new tab.
Select SAVE SETTING to set one of the above two modes as default for each meeting.
Changing the Selected Mode
The following steps help change the mode for future interactions.
Log in to Zimbra.
Select Teams from the app bar.
Select the gear icon from the left pane to open Settings.
Under Team Settings modal, scroll down to Meetings Environment Settings.
Select one of Default or Dedicated modes. The selection is automatically applied.
Textual Conversations (Chats) and Spaces
Team allows to communicate with single (1-to-1) or multiple users at once. Besides text, file sharing is also possible.
The Team tab is divided into three main parts:
The left-hand side column, which contains the list of conversations (both 1-to-1 chats and groups), spaces, and active instant meetings. It also allows to create new communication channels (chats, groups, spaces, instant meetings)
The central area, where the messages in conversation are shown, grouped by day. Moreover, in case a Video Conversation takes place between the users, also its start time and end time are shown in the flow of messages.
Hint
The time is reported according to the configured timezone on the user’s workstation.
The right column, which displays information about the current conversation or space and allows to either mute notifications or remove all the chat history.
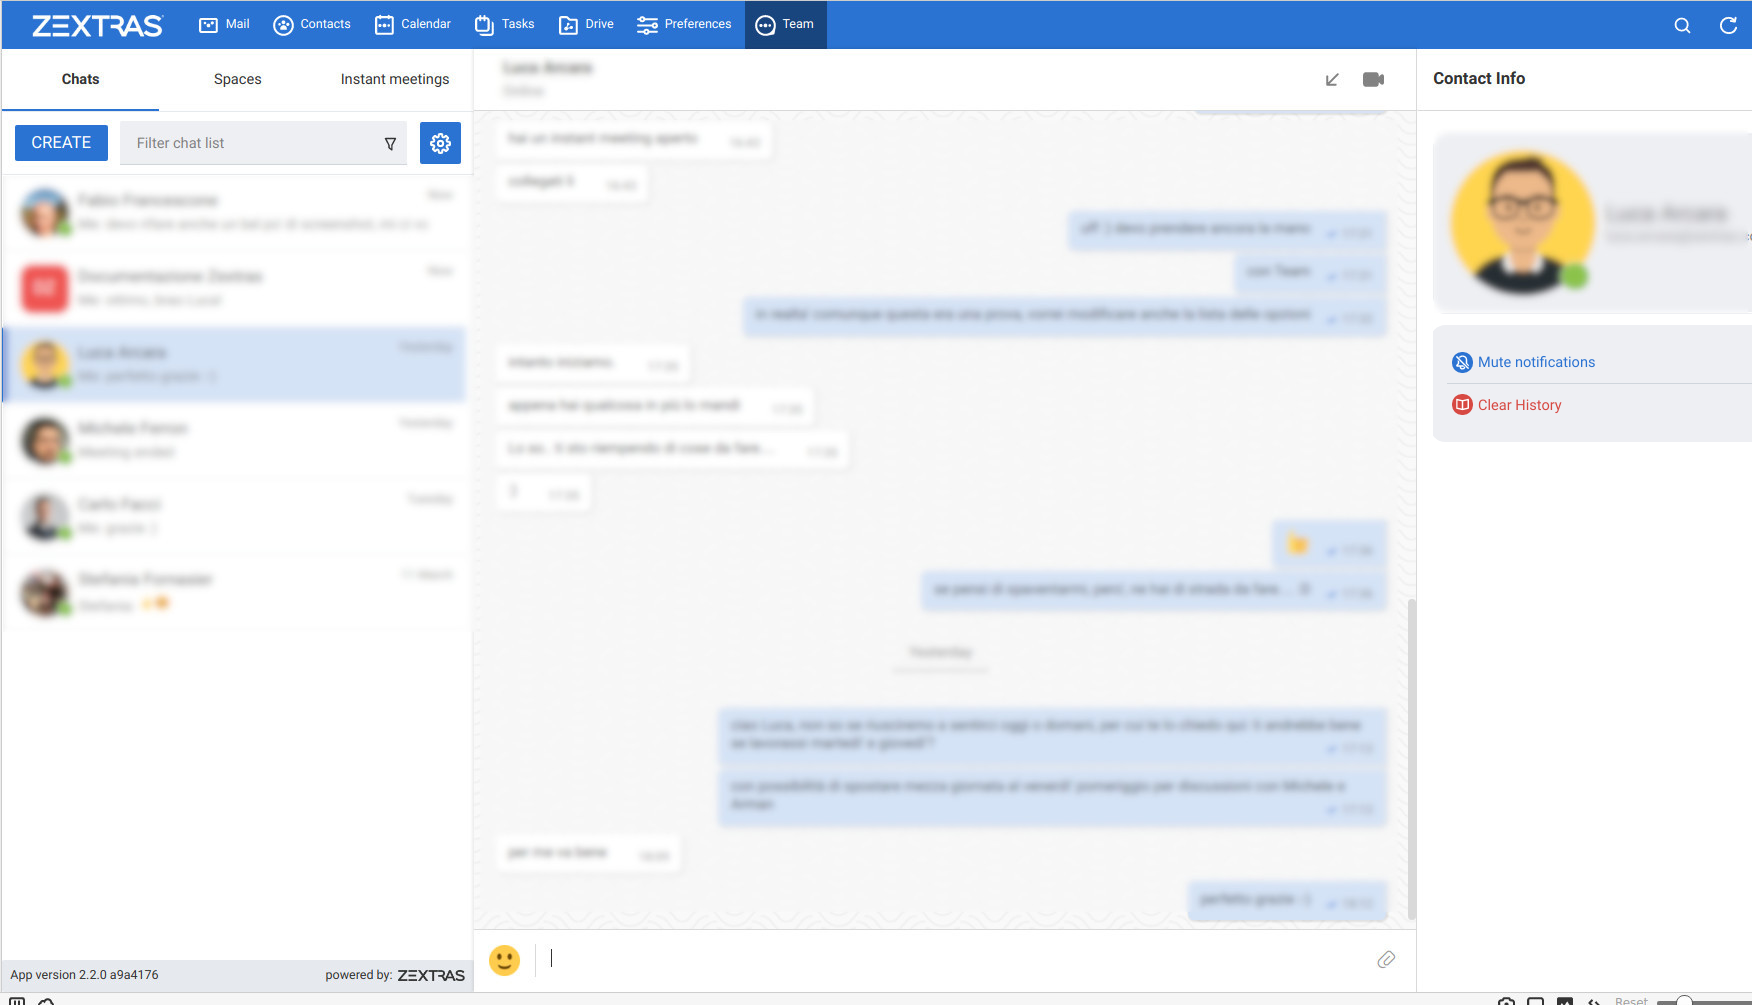
Fig. 12 The Team Tab Graphic User Interface.
When the Video Chat or Instant Meeting are used, the UI changes, see section Video Conversations (Video Chats) and Instant Meetings.
Minichats
Chats, as well as conversations in Spaces and Channels, can be minimised by clicking the arrow on the top right corner of the central area. This also causes the UI to go to the Mail tab, with the chats shown as small overlays on the Mail tab. They can be further minimised by clicking the title bar, restored to full browser-sized window by clicking or closed with a click on .
Moreover, Instant Meetings (if minichat is a chat) or Video Chats (if minichat is a Space or Channel conversation) can be started by clicking the icon.
Incoming Space or Channel conversation are automatically opened as Minichats in case the user is on tab different from the Team tab.
Video Conversations (Video Chats) and Instant Meetings
Video Conversations allow individuals or members of spaces and groups to join a video call for real time verbal communication. Any user can start a Video Conversation or Instant Meeting with other users; the receiving users will be notified by a modal window in the browser and by an audio signal, that will last at most 10 seconds.
During video chats and instant meetings, the Team tab is composed of four parts. However, there are slight differences when using Video Chat (i.e., a call between two persons) or the Instant Meeting (i.e., a video call among three or more users). The latter also features two alternative UIs, namely Cinema Mode, which is similar to Video Chats, and Grid Layout.
The UI parts common to Video Chat and Instant meetings, are:
The left column, which contains the text chat
The central area, which contains the video stream
The right column, which contains a miniature of the other participant (or participants in an Instant Meeting). This column is called Carousel.
The bottom bar, which is a self-hiding bar that allows to control the video call and the UI itself. From the bottom bar you can hide the chat, maximise the central area to full screen, disable microphone or webcam, share the screen, or close the call.
Additionally, the first participant to access a Video Chat or an Instant Meeting will hear a sound and see a visual animation until another user joins.
Screen Sharing
Screen sharing is an additional feature of chats, that allows participants to show either a single window, one screen, or all the screens of their workstation. Multiple persons can share their screen at the same time and the screen of the last person will automatically become active and shown in the central area. When a screen share is stopped, the central area will switch to either the previous active screen share (if there are any), or to the previous view, Cinema mode or Grid Layout (if no more screen shares are active).
Moreover, when a user in a video chat or instant meeting shares a window or the whole screen, in the right column both the video of the user and the screen share will be shown. This happens because the stream sent by the webcam and the stream of the screen share are distinct and treated as separate users.
When using the Instant Meeting in Cinema Mode (see Fig. 13), the central area contains the stream of the person who is taking, although at any time it is possible to pin the video of another participant. These additional features are available in cinema mode:
A miniature for every participant is shown in the right column
A button to hide the list of participants is added to the right of the bottom bar
Another button to switch between Grid Layout and Cinema Mode is added to the center of the bottom bar
If the video stream of a person is pinned and another participant talks for more than two seconds, the latter’s stream is shown in the right-hand Carousel, framed in green
An icon shows whether the microphone or the webcam of the participant is turned off
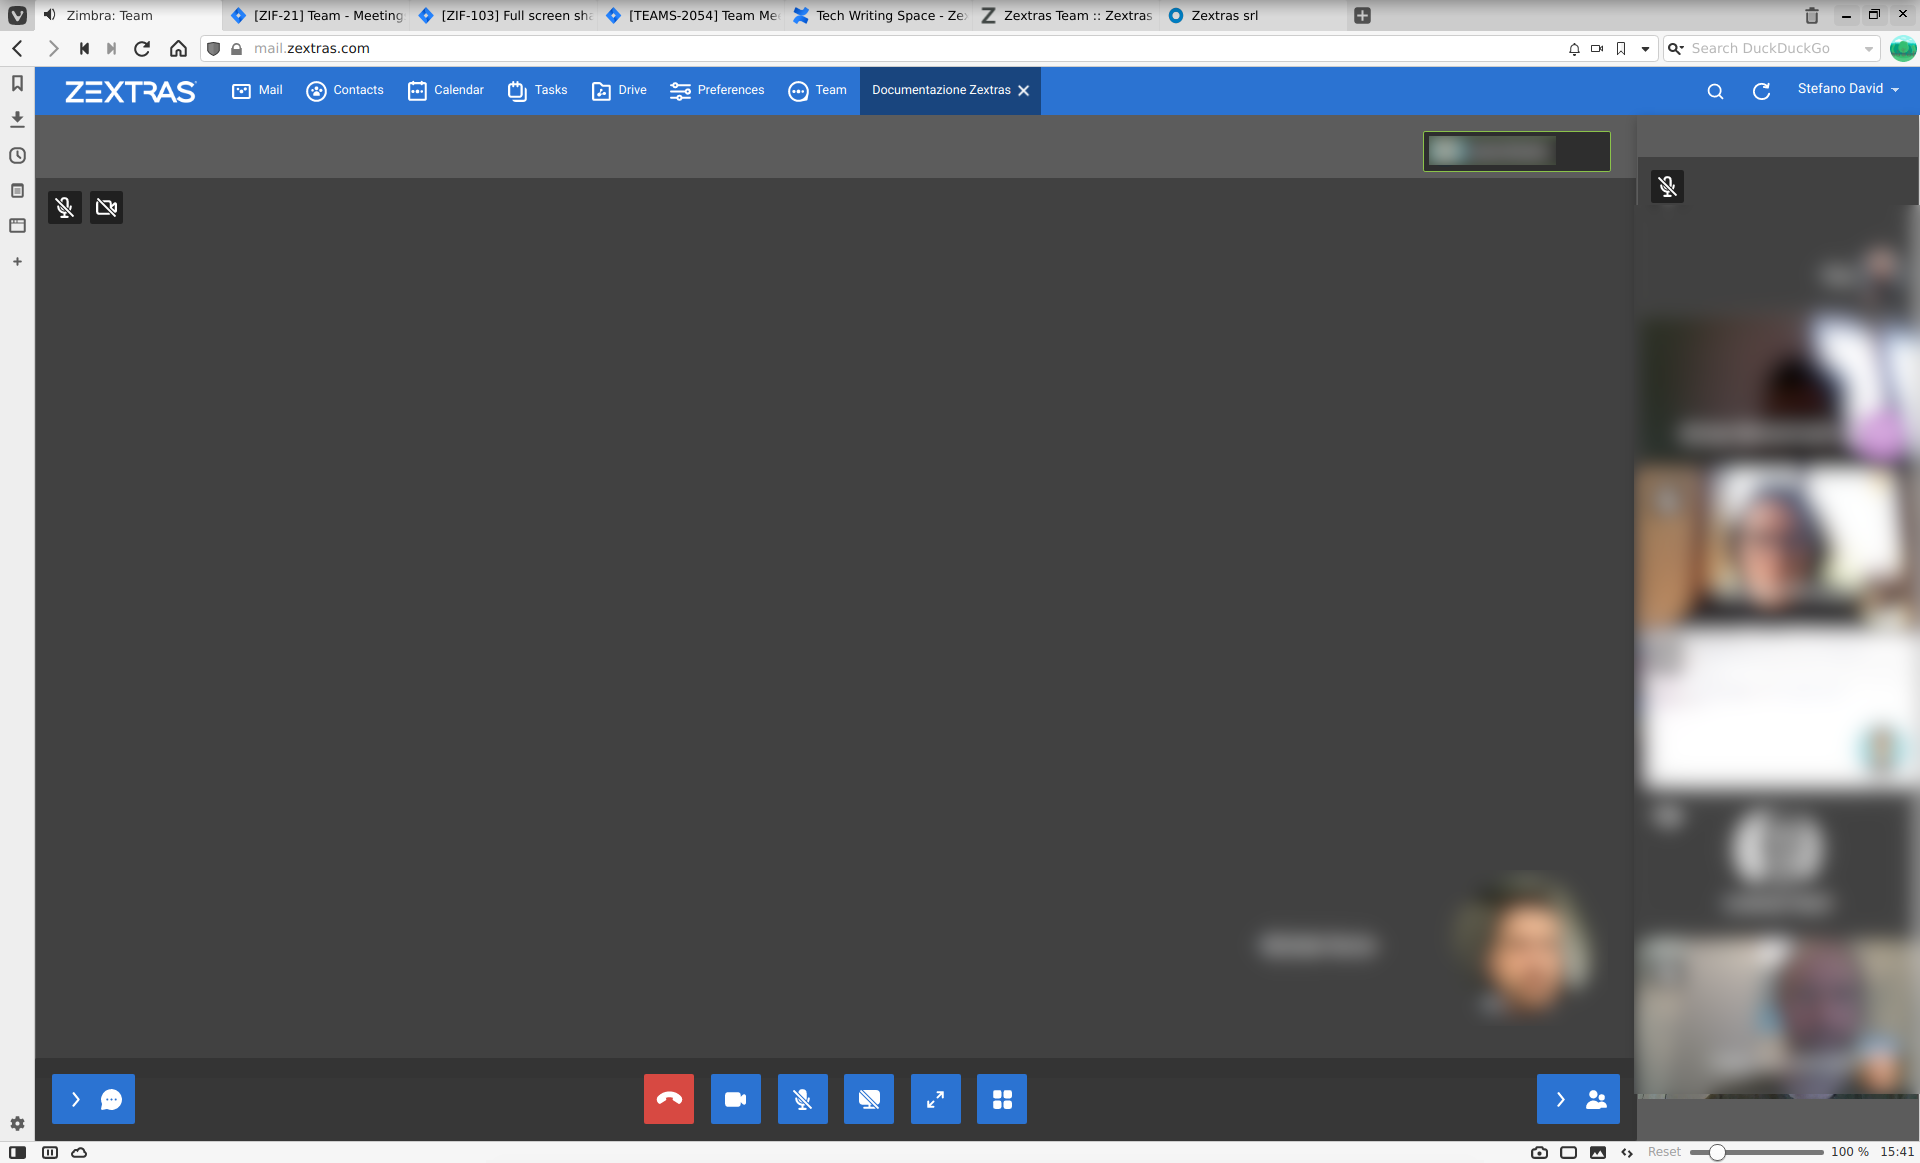
Fig. 13 Video Conversation in Cinema Mode.
The Grid Layout of an Instant Meeting (see Fig. 14) allows to show all the participants in the central area. The differences with the Cinema Mode are:
There is no left column as it is part of the central area
In the bottom bar the button to hide the list of participant disappears
The stream of the person who is talking has a green frame
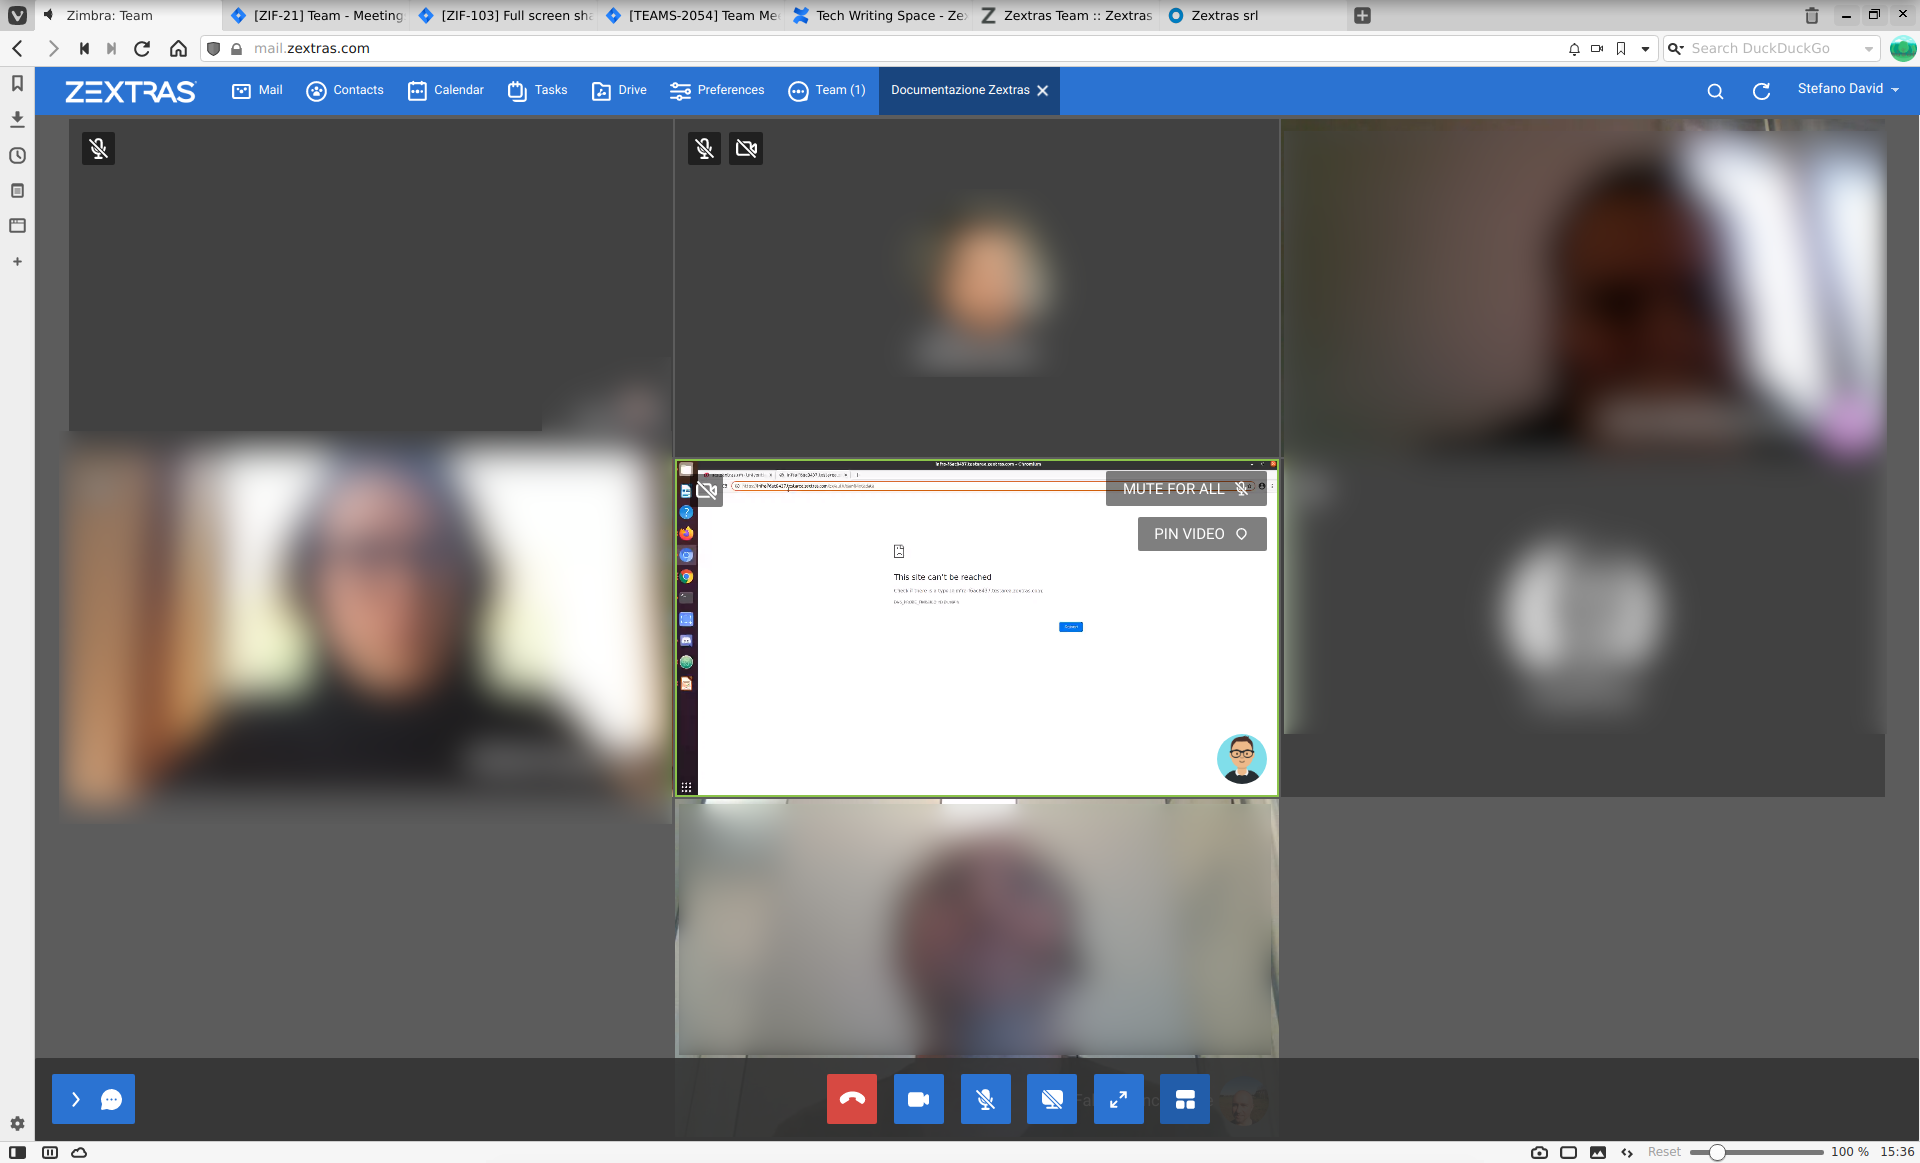
Fig. 14 Video Conversation in Grid Layout.
Instant Messaging and Corporate Communication
In the left-hand side column it is possible to create new instances of Chats and Group Chats, Spaces and Instant Meetings. The User Experience has been improved and now the process of setting up a new instance is the same: First, click on the Chats, Spaces, or Instant Meetings, then on CREATE. In Chats (See Fig. 15), choose whether this is a 1-to-1 or group chat, then simply add participants from the dialog window that appears. For Spaces and Instant Meetings, you can also add a title or topic.
In the case of Instant Meetings, only logged in users can join. External users can join, but they need to provide a nickname and a valid email address.
Note
Instant Meetings can have two or more participants, Chats exactly two, Video Chats at least three persons (one host and two more participants), while Spaces can be empty, i.e., they can be created without inviting any user.
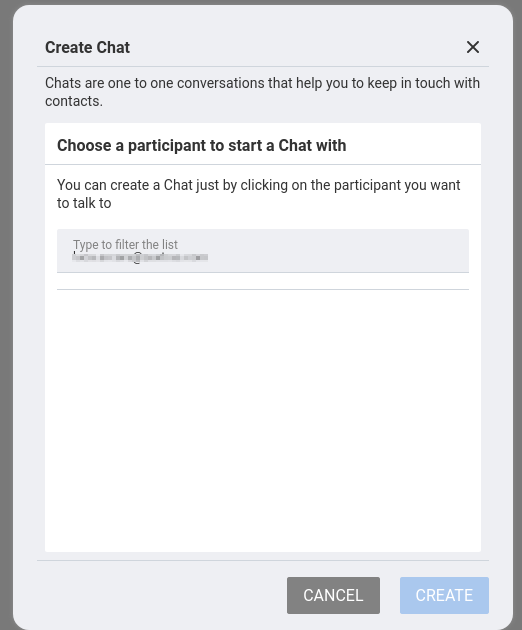
Fig. 15 Dialog window to create a chat.
The process to create a Channel is a bit different, as this is a feature internal to spaces. So, to create a Channel it is necessary to set up a Space, then click on the Add Channel button in the right column. Now. you’ll see a window similar to the one above, where you can add a title and a topic. The Channel will appear underneath the space name, indented, to underline that it is tight to the space.
Note
You can not select the users in a channel, because participation to channels is optional and open to all members of the space.
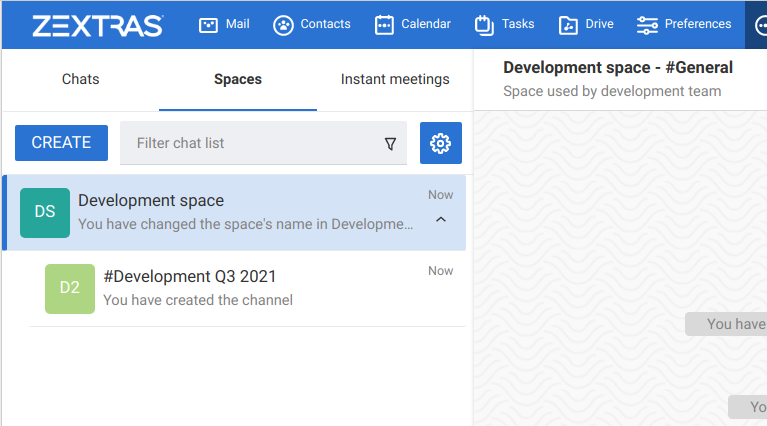
Fig. 16 A space with a channel.
Once you have set up an instance, you can immediately start a textual chat with all the participants or start a video call by clicking on the camera icon on the top right corner of the central area. Next to that icon, an arrow icon allows to minimise the Zextras Team tab.
Recent conversation appear in the left column, for a quick access.
The main features of the various communication means are described in the remainder of this section.
Moderators in Rooms
The user that creates a room (we call room either a Channel, a Space, or a Group) becomes automatically the Room Moderator and can manage the room’s textual and video conversations. In particular, the Mute For All and Add new members functionalities are reserved for Moderators only.
A moderator can promote any user as moderator and can leave the room only if either no other users are present in the room or another moderator is present in the room.
Note
In groups created before the moderator role has been introduced, all members are automatically promoted as moderators.
The moderator status can be set either using the icons from the GUI, next to each room participant, or from the CLI, using the zxsuite team addOwner command. For example, to make user2@example.com owner of the rooms with conversation_id aced5e2e-f457-4d30-a3fb-9b18fac486a6@example.com this command can be issued from the CLI:
zxsuite team addOwner aced5e2e-f457-4d30-a3fb-9b18fac486a6@example.com user2@example.com
Groups
Groups are used to communicate with multiple people at the same time (by default up to 5 in total). Those are non-persistent entities not tied to any specific space. Any user can create a group inviting people, and any group member can invite more people in the same way. When all users leave a group, the group itself ceases to exist.
Groups Features
A user in a Group can add more users to the Group itself up to the allowed limit and share the whole chat history with them
A user in a Group can chat with all of the others. All members of that Group can view all messages sent to the Group.
A user in a Group can send files to all of the others. Files sent in a Group are available to all members of that Group.
An user in a Group can start a video chat with all of the others. Group video chats can be joined at any time by all members of the Group.
Global Administrators can change the allowed maximum number of group members in the Zextras Team section of the Global settings in the Admin Console.
Spaces
Spaces are a themed container that can hold any number of Channels. Think of a Space as a community center where people gather to discuss different topics in dedicated areas (named Channels).
Spaces Features
Each space has a unique name and topic. You may change both the name and the Topic by clicking on the relevant field in the Space’s settings.
Members can leave a space at any time.
Space Administrators can create new channels and invite new people to the space using the appropriate buttons.
Members can upload, share, and forward messages and attachments in Spaces
Space Settings
Its General Channel Info defines a Space’s settings (see below).
The Space’s creator is also the first Space Administrator and can grant the same rights to any other user by clicking on the crown icon in the appropriate entry of the participant list.
Only Space Administrators can invite new participants, create new channels, kick people, and delete channels within the space.
Channels
Channels are topic-defined areas inside of the same space. Those can contain any number of users, and unlike Groups, users can autonomously join any Channel in a Space they are in instead of being invited to it by a member.
Each new Space has a “General” channel automatically created within it, which defines the space’s properties (e.g., Title and Topic) and which all users automatically join when they join the Space.
Channels Features
A user in a Channel can chat with all of the others. All members of that channel can view all messages sent on the Channel.
A user in a Channel can start a video chat with all of the others. Channel video chats can be joined at any time by all members of the Channel.
A user in a Channel can upload, share, and forward messages and attachments
Mute Notifications and Conversations
When receiving a message or attachment in a 1-to-1 Chat, in a Channel, or Space, notifications like sounds, mini-chats or other pop-us are used in case the browser with Teams, the Android app, or the iOS app are in the background.
This standard behaviour can be changed to mute all or some of the
notifications, even if users that are communicating are on different
server. This mute or active status is stored and maintained in
the properties of each Chat, Channel, or Space and is kept even in case
a Mailbox is moved to a new server.
In 1-to-1 chats, if there is feedback or background noise, users can mute other participant’s microphones. Muted participants see a toast notification on the screen. Participants can reactivate their microphone by clicking Unmute or the notification.
In Video Chats, users can selectively mute other participants; a moderator, however, can mute everyone at the same time.
Note
Notifications for Instant meetings can not be muted.
File sharing
Users can easily share files via Team to Chats and Groups by dragging and dropping the files directly into the chat interface (both in the minichat and in the Teamtab) or by clicking the “paperclip” icon on the right of the message input field. Multiple files can be uploaded at once, and image files will show a preview of the file while other common filetypes will display a custom icon.
Clicking on a file within a chat window will download it to the local client using the browser’s own download interface.
Files shared via Team will be stored inside a protected root folder in
the sender’s Drive called Team sent files, thus counting towards
the sender’s mailbox quota, and will remain available for download in
the chat window for all participants until deleted from Drive by the
sender.
Autocomplete
Autocomplete in Team is split in two different categories: Internal Autocomplete and External autocomplete.
Internal Autocomplete kicks in when selecting a target for 1-1 Chats, Group Chats, Spaces, and Channels, while External Autocomplete is only used for Instant Meeting attendees.
This can be changed by setting the teamCrossDomainSearchMode COS
property to either local, extended or global using the
zxsuite config [get/set/empty] CLI toolset.
- Local mode (Default)
In which Internal Autocomplete will draw its information from the GAL, while External autocomplete will draw its information from the user’s Contacts and GAL.
- Extended mode
It is a superset of local that also matches full email addresses of any user in the same infrastructure as internal users.
This allows to initiate a 1-1 Chat with or to add to a Group/Space/Channel any user that is on the same infrastructure but out of the GAL as long as the exact email address is entered.
- Global mode
A superset of extended mode that does not require an exact match on the email address to autocomplete users in the same infrastructure.
This allows to autocomplete any user in the infrastructure as opposed to the strict email addres match required in extended mode.
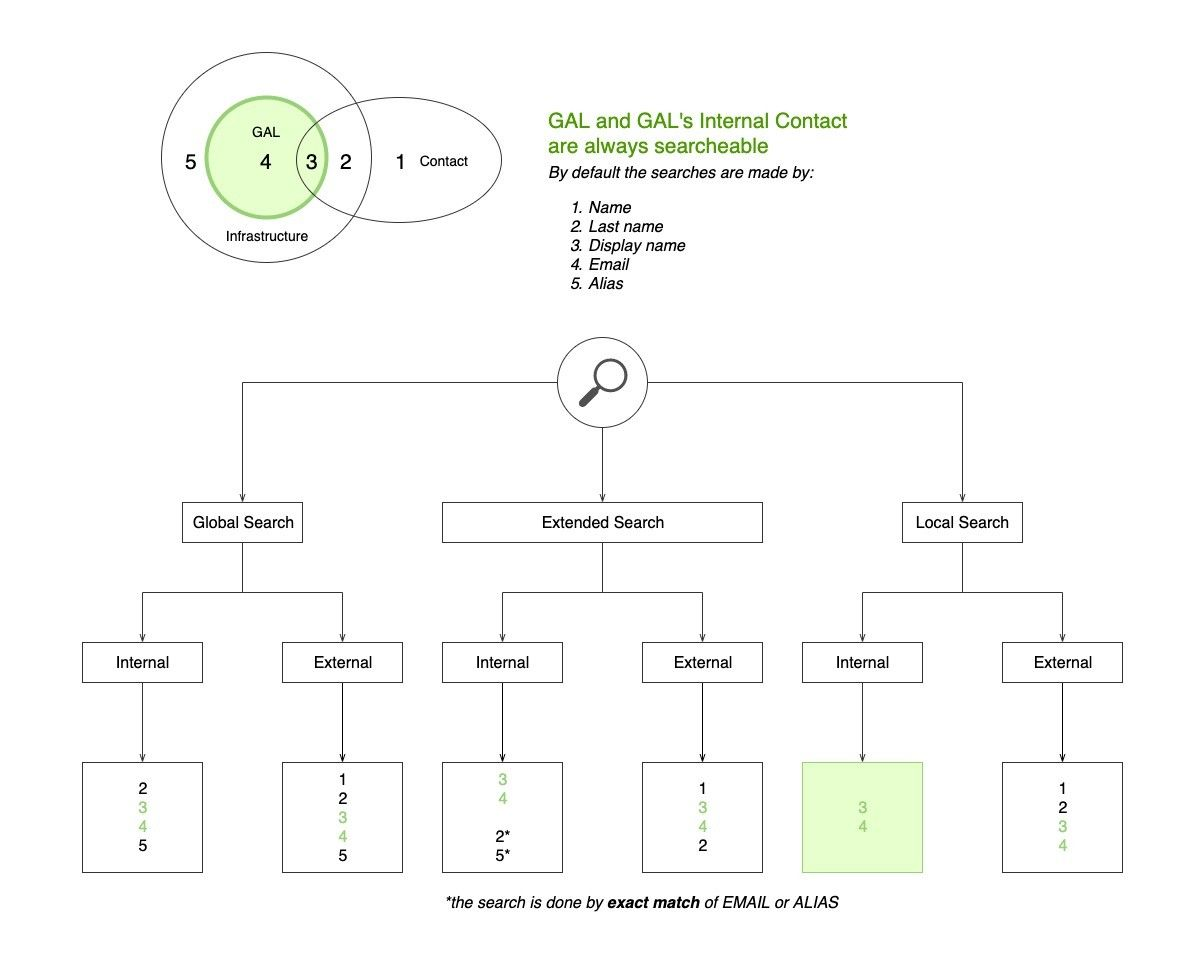
Fig. 17 Overview of autocomplete management
Presence
Presence is managed automatically in Zextras Team: whenever a user logs in, regardless of whether the Team Tab has the focus, they appear as online.
As part of the user presence system, all messages get displayed with a variable number of check symbols:

0 grey checks, message not delivered to the server
1 grey check, message delivered to the server
2 blue checks, message viewed by all users
When sending a text message, if privacy is enabled, then only one gray check is shown, meaning that the server has received the message. No acknowledgement will be sent back by the receiving user.
Unread Messages
The number of unread messages in any conversation (Group, Channel, space, instant meeting) appears on the right side of both the Chats, Spaces, Instant Meetings label from where the message originated, and in the list of conversions underneath, next to the actual chat generating the message.
Edit, Reply, Forward and Delete Messages
Right clicking on a message or hovering on a message and clicking on the arrowhead that appears on the right side of the message bubble displays a context menu that shows the available actions:
Edit: change the message’s content. The “edited” string will appear next to the message delivery icon.
Reply: reply to a message. The reply will be in the same chat and will not be private
Forward: forward a message to another chat, group or channel.
Delete: delete a message. The message bubble’s color will change to gray and the “Deleted Message” string will appear instead of the original text.
The following table recaps all message interactions:
Type |
Edit |
Delete |
Forward |
|---|---|---|---|
Text Message |
(Only own messages) |
||
File Attachment message |
(Only if description already exists) |
||
Conversation Status message |
|||
Edited message |
|||
Forwarded message |
|||
Deleted message |
Chat History
Chat History for each 1-to-1 Chat, Group, and Channel is available in the very same window (e.g., enter a Channel to see all of that channel’s history) and messages delivered to offline users appear in the appropriate IM conversation, Group or Channel.
STUN/TURN Server
Since WebRTC is a peer-to-peer protocol, all users in a video chat must be able to reach each other’s client for the connections to get established.
Should this not be possible, because of NAT rules on the network or because of a Service Provider’s policy, using a TURN server ensures proper communication between all peers. Zextras Team is designed to allow using a STUN/TURN server out of the box by simply adding the TURN server’s URL and login information in the zimlet configuration.
Setting up Zextras Team to use a TURN server
A dedicated set of TURN configuration tools is available via CLI
through the zxsuite team iceServer's [ add | get | remove ] commands
Multiple TURN servers can be added to handle different users or Classes
of Service (defined through the user and cos optional parameters
of the command above).
On the TURN server side, it is strongly recommended to have a single user, authenticated with a username and secret key, for ease-of-use reasons as a 1:1 correspondence between Zimbra users and TURN users is not necessary.
Zextras Team CLI
This section contains the index of all zxsuite team commands. Full
reference can be found in the dedicated section
ZxTeam CLI Commands.
addOwner clusterStatus doClearChatDB doConversationsMessagesCleanup doDeployTeamZimlet doImportChannels doMoveAllRooms doMoveRoom doRestartService doRoomsCleanup doStartService doStopService doUsersCleanup dumpSessions flushConversationsCache getServices iceServer add iceServer get iceServer remove monitor rooms space get video-server add video-server remove