

Working with Appointments#
Appointments serve as pivotal tools for organizing schedules, enabling the creation of both one-time and recurring events, meetings, and engagements.
This feature facilitates efficient planning by allowing users to check the availability of attendees before extending invitations, reserve necessary resources such as meeting rooms and equipment, and append personalized messages to invitations.
Such features enhance communication and coordination, fostering a productive work environment where employees can effectively manage their time and collaborate seamlessly.
Creating an Appointment#
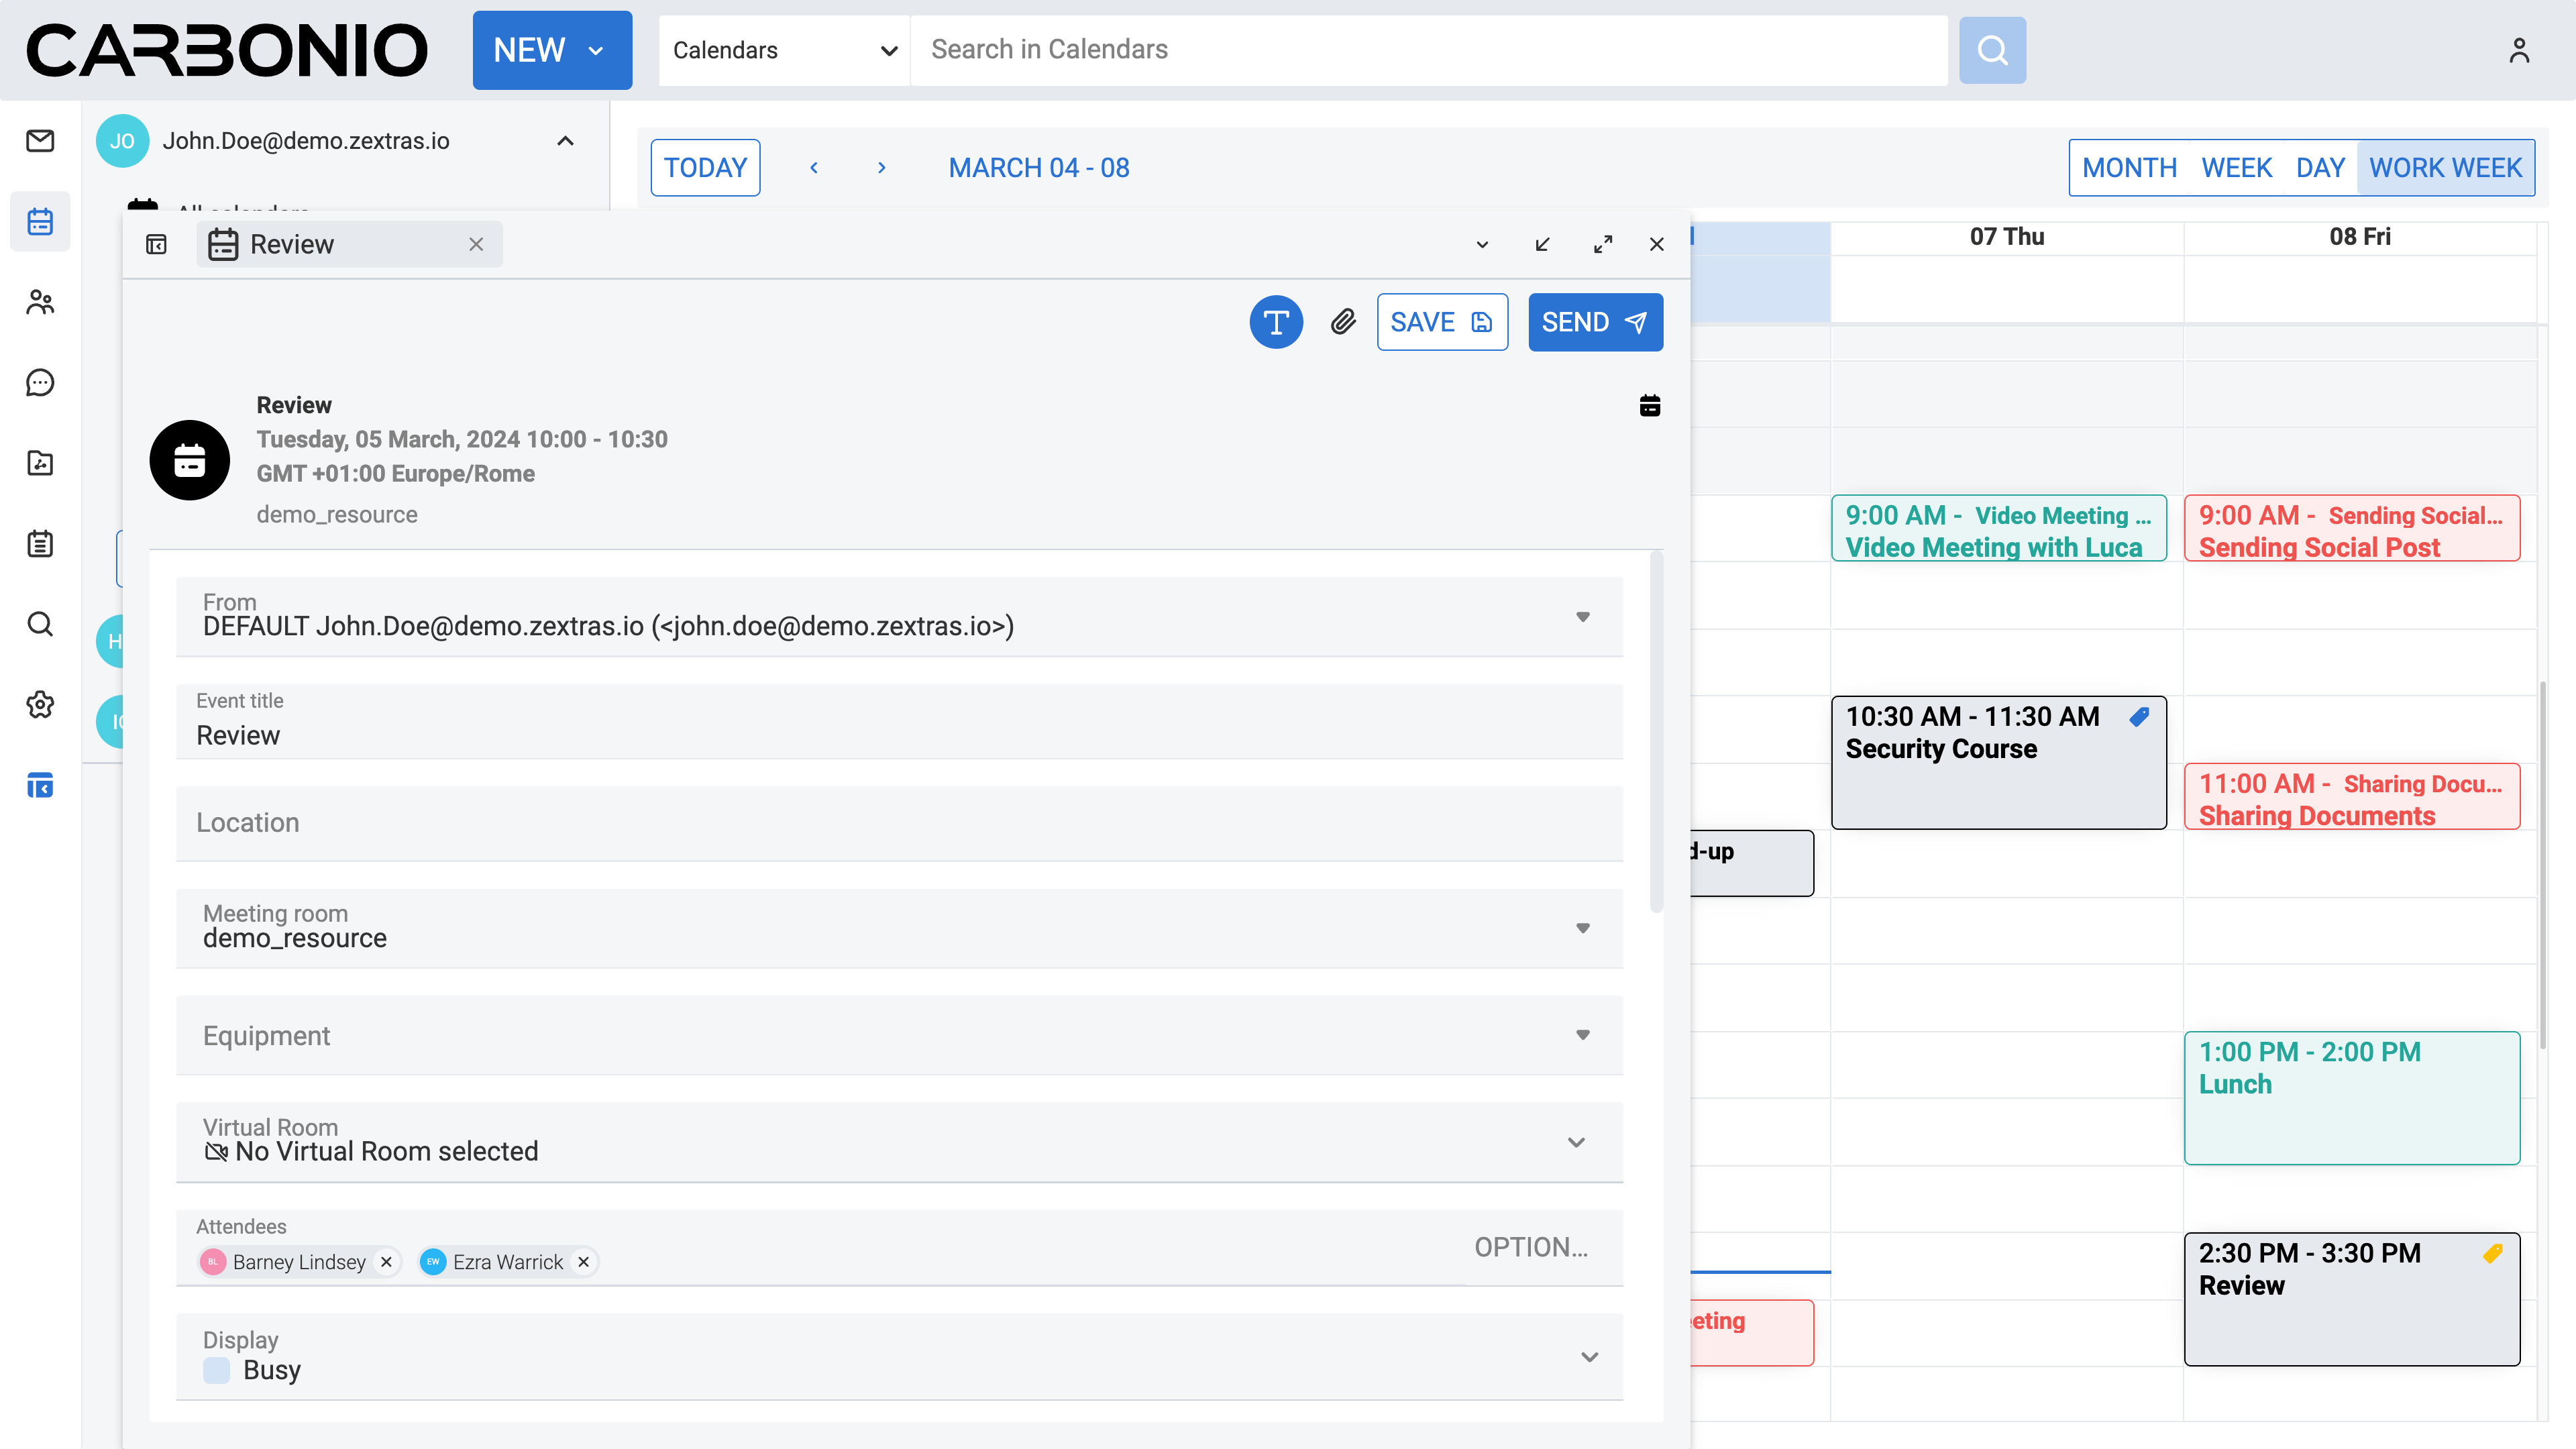
To create a new appointment:
Select the Calendars from your left sidebar.
Click on the NEW button located on the top bar. A new board will appear.
In the From field, select the identity you want to use to schedule and send the appointment invitation.
Enter a title for the appointment in the Event title field.
Specify a location for the appointment to occur in the Location field. If applicable, you may include details such as Room Number 2.
Choose a meeting room from the available options in the Meeting room field. Please note that these meeting rooms are configured by your system administrator. If you do not see the desired room listed, kindly contact your system administrator to ensure all relevant meeting rooms in your office are included.
If you prefer to host a virtual meeting using Carbonio Chats’ video meeting feature in one of your virtual rooms, you can select the desired virtual room from the Virtual Room field. If you have not set up any virtual rooms yet, you can easily create them by clicking the button “CREATE NEW VIRTUAL ROOM”.
Enter the email addresses of the attendees into the Attendees field. You can leave this field empty if you are creating a personal appointment for yourself.
Choose whether you would like Carbonio to mark this time slot for the appointment as busy or free from the Display field. This will inform your colleagues of your availability when they attempt to schedule another appointment during the same time slot.
Choose the calendar in which you want to create the appointment from the Calendar field.
Tick the Private checkbox if you wish to conceal the details of this appointment, such as its title, from your colleagues. Even if you have shared your calendar with them, your colleagues will still see the appointment listed on your calendar, but without the specific details like the title.
Choose the time slot for the appointment by specifying the start date and time in the Start date and time field, and the end date and time in the End date and time field. Alternatively, you can tick the checkbox labeled All day if the appointment spans the entire day.
Choose a reminder for the appointment from the Reminder field to ensure you are informed beforehand. Carbonio will display a warning window in the Carbonio client at the specified time to remind you of the appointment.
Tick the repeat recurrence of the appointment if you want to use any of the pre-defined recurrences (every day, week, month, or year) or define a custom one, that may end after a date or a number of occurrences.
Choose the time zone, if different from the default one. You need to enable this option in the Calendar’s module settings, in Creating Appointment Section.
Add any notes about this appointment in the text box.
If you are creating the appointment solely for yourself, click SAVE. If your appointment includes attendees, as specified in step 8, click SEND to notify them via an automatic email.
How Equipment Resources work#
Equipment resources (such as projectors, cameras, displays, company laptops, etc.) are managed centrally by your system administrator. Each piece of equipment is represented in Carbonio as a resource account that can be added to appointments, similar to a meeting room.
Assigning Equipment to an Appointment#
When creating an appointment, users can choose one or more equipment resources from the Equipment field (if enabled and configured by the system administrator). Selecting equipment means that the resource is reserved for the duration of the appointment, preventing overlapping bookings. If a specific piece of equipment does not appear in the list, users must contact their system administrator so it can be added as a resource.
Approval workflow for Equipment Requests#
Equipment resources can operate in multiple modes:
Auto-accept enabled: the resource automatically accepts the booking if it is available.
Auto-accept disabled: the resource does not automatically accept requests.
Booking disabled: the administrator can prevent any scheduled booking for the equipment resource, including the ability to create recurring appointments for that resource.
When auto-acceptance is disabled, the system administrator can configure the resource to forward booking requests to one or more designated users. These users act as approvers and can manually accept or decline each equipment request. Their decision determines whether the equipment is reserved for the appointment.
Checking on attendees’ availability with organizer tool#
When scheduling a new meeting, with expected other attendees, you will also have the option to check on other attendees availability by simply opening the organizer tool. Once you open the editor to create the appointment, after selecting all participants (both mandatory and optional), simply scroll down and click the “Show organizer tool” button. A new section will open, displaying a timeline chart for the selected time range, showing the availability of each participant in the meeting. This will make it easier to select the most convenient time for everyone. This section is particularly useful when there are many participants, eliminating the need to check each individual calendar before choosing the time.
Editing an Existing Appointment#
To edit an existing appointment:
Select the Calendars from your left sidebar.
Right-click on the appointment you wish to edit, which is displayed on your timetable.
Select Edit from the drop-down menu.
Make changes.
If you have created the appointment solely for yourself, click SAVE. If your appointment includes attendees, click SEND to notify them about the changes via an automatic email.
Forwarding an Existing Appointment#
To forward an existing appointment:
Select the Calendars from your left sidebar.
Right-click on the appointment you wish to edit, which is displayed on your timetable.
Select Forward from the drop-down menu.
Enter the email address of the person you wish to forward the appointment to.
Click FORWARD to send the appointment to the specified email address.
Canceling an Appointment#
To cancel an existing appointment:
Select the Calendars from your left sidebar.
Right-click on the appointment displayed on your timetable.
Select Delete from the drop-down menu.
Click the SEND CANCELATION or DELETE button to confirm.
If there are attendees for this appointment, a notification email will automatically be sent to the attendees to inform them about the cancellation.
Moving an Existing Appointment to a Different Time#
To reschedule an appointment to a different time, you can simply click and hold on to the appointment in your timetable and drag it to another time slot.
Alternatively:
Select the Calendars from your left sidebar.
Right-click on the appointment displayed on your timetable.
Select Edit from the drop-down menu.
Make changes.
If you have created the appointment solely for yourself, click SAVE. If your appointment includes attendees, click SEND to notify them about the changes via an automatic email.
Adding / Removing Attendees to an Existing Appointment#
To add or remove attendees to an appointment:
Select the Calendars from your left sidebar.
Right-click on the appointment displayed on your timetable.
Select Edit from the drop-down menu.
To add attendees, enter the email addresses of new attendees into the Attendees field. To remove attendees, click the cross button next to the attendees’ email addresses.
If you have created the appointment solely for yourself, click SAVE. If your appointment includes attendees, click SEND to notify them about the changes via an automatic email.
Adding a Meeting Room to an Existing Appointment#
To add a meeting room to an existing appointment:
Select the Calendars from your left sidebar.
Right-click on the appointment displayed on your timetable.
Select Edit from the drop-down menu.
Choose a meeting room from the available options in the Meeting room field. Alternatively, if you prefer to host a virtual meeting using Carbonio Chats’ video meeting feature in one of your virtual rooms, you can select the desired virtual room from the Virtual Room field.
If you have created the appointment solely for yourself, click SAVE. If your appointment includes attendees, click SEND to notify them about the changes via an automatic email.
Please note that these meeting rooms are configured by your system administrator. If you do not see the desired room listed, kindly contact your system administrator to ensure all relevant meeting rooms in your office are included. Similarly, if you have not set up any virtual rooms yet, you can easily create them through the Chats section on the Carbonio web client.
Creating a Recurring Appointment#
A recurring appointment is an event scheduled to occur repeatedly at specified intervals, such as daily, weekly, monthly, or yearly. Rather than creating separate appointments for each occurrence, a recurring appointment allows you to set up a single event that repeats according to your chosen pattern.
To create a recurring new appointment:
Select the Calendars from your left sidebar.
Click on the NEW button located on the top bar. A new board will appear.
In the From field, select the identity you want to use to schedule and send the appointment invitation.
Enter a title for the appointment in the Event title field.
Specify a location for the appointment to occur in the Location field. If applicable, you may include details such as Room Number 2.
Choose a meeting room from the available options in the Meeting room field. Please note that these meeting rooms are configured by your system administrator. If you do not see the desired room listed, kindly contact your system administrator to ensure all relevant meeting rooms in your office are included.
Choose the required equipment from the available options under the Equipment field. Please note that the equipment is configured by your system administrator. If you do not see the desired equipment listed, kindly contact your system administrator to ensure all relevant equipment such as cameras, displays, etc. in your office are included.
If you prefer to host a virtual meeting using Carbonio Chats’ video meeting feature in one of your virtual rooms, you can select the desired virtual room from the Virtual Room field. If you have not set up any virtual rooms yet, you can easily create them through the Chats section on the Carbonio web client.
Enter the email addresses of the attendees into the Attendees field. You can leave this field empty if you are creating a personal appointment for yourself.
Choose whether you would like Carbonio to mark this time slot for the appointment as busy or free from the Display field. This will inform your colleagues of your availability when they attempt to schedule another appointment during the same time slot.
Choose the calendar in which you want to create the appointment from the Calendar field.
Tick the Private checkbox if you wish to conceal the details of this appointment, such as its title, from your colleagues. Even if you have shared your calendar with them, your colleagues will still see the appointment listed on your calendar, but without the specific details like the title.
Choose the time slot for the appointment by specifying the start date and time in the Start date and time field, and the end date and time in the End date and time field. Alternatively, you can tick the checkbox labeled All day if the appointment spans the entire day.
Choose a reminder for the appointment from the Reminder field to ensure you are informed beforehand. Carbonio will display a warning window in the Carbonio client at the specified time to remind you of the appointment.
Add any notes about this appointment in the text box.
Choose your preferred option (Every Day, Every Week, Every Month, Every Year) from the Repeat field to establish the recurring pattern.
If you are creating the appointment solely for yourself, click SAVE. If your appointment includes attendees, as specified in step 8, click SEND to notify them via an automatic email.
Canceling a Recurring Appointment#
To cancel a recurring appointment:
Select the Calendars from your left sidebar.
Right-click on the appointment you wish to cancel, which is displayed on your timetable.
Go to the Series from the drop-down menu and select Delete.
In this step, you can choose whether to delete all occurrences or only this and future occurrences by selecting the appropriate option.
Click DELETE to confirm. If prompted, click SEND CANCELATION as well.
If there are attendees for this appointment, a notification email will be automatically sent to the attendees to inform them about the cancellation.
Canceling a Single Instance of a Recurring Appointment#
To cancel a single instance of a recurring appointment:
Select the Calendars from your left sidebar.
Right-click on the appointment you wish to cancel, which is displayed on your timetable.
Go to the Instance from the drop-down menu and select Delete.
Click DELETE to confirm. If prompted, click SEND CANCELATION as well.
If there are attendees for this appointment, a notification email will be automatically sent to the attendees to inform them about the cancellation.
Responding to an Appointment Invitation#
When a colleague sends you an invitation for an appointment, you will receive an automatic email indicating that you are invited. Inside the email, you have four options to choose from:
YES: Confirm your attendance for the appointment.
MAYBE: Indicate that you are unsure about attending the appointment.
NO: Decline the invitation and indicate that you will not attend the appointment.
PROPOSE NEW TIME: Suggest an alternative time for the appointment if the proposed time is not suitable for you.
Before selecting YES, you can also choose the calendar in which you want to save the appointment from the Calendar field.
If you choose PROPOSE NEW TIME, a new window will appear where you can select a new time slot for the appointment and then click the SEND button.
Furthermore, you have the option to enable or disable the Notify organizer checkbox based on whether you wish to send an automatic email notification to them or not.
After selecting one of the four buttons, the invitation email will automatically be moved to your Trash folder.
If you don’t choose any of the four options, the appointment will be automatically saved in your calendar as a tentative appointment with an icon indicating that you are not yet confirmed for the appointment. You can later choose one of the four options by double-clicking on the appointment in your calendar and selecting Accept, Tentative, Decline or Propose new time from the drop-down menu. You can also choose to Delete the appointment from your calendar without responding to the invitation.