

Working with Calendars#

You can utilize the Carbonio Calendar feature to effectively manage your appointments, meetings, and events. Additionally, Carbonio enables you to share your calendars with colleagues or friends.
To access the Calendar function, simply click on the Calendars section from the left sidebar.
Setting Default Calendar View#
In Carbonio, the default view when opening your calendar is the Work Week View. However, you have the option to customize this and choose a different view to display upon opening.
To change the default calendar view:
Click on the Settings (gear icon) in the left sidebar.
Select Calendars.
Under General, click on the Default view field.
Select the desired view from the drop-down menu.
Click SAVE from the top right corner.
You have these options to choose from:
Month View: See the entire month’s schedule at a glance.
Week View: Focus on a single week’s schedule.
Day View: Detailed view of events for a single day.
Work Week View: Shows only workdays (Monday to Friday – can be changed from the settings), ideal for work-focused scheduling.
Changing Calendar View#
To change the calendar view:
Select the Calendars from your left sidebar.
From the top right corner select your desired view.
You have these options to choose from:
MONTH: See the entire month’s schedule at a glance.
WEEK: Focus on a single week’s schedule.
DAY: Detailed view of events for a single day.
WORK WEEK: Shows only workdays (Monday to Friday – can be changed from the settings), ideal for work-focused scheduling.
This view will revert to the default settings upon reloading the web client.
Creating a Calendar#
In Carbonio, a default calendar is created for you. However, you can create additional calendars to organize different types of appointments. For instance, you can establish separate calendars for work-related events, personal appointments, and company activities, enabling you to manage each aspect of your schedule efficiently.
To create a calendar:
Select the Calendars from your left sidebar.
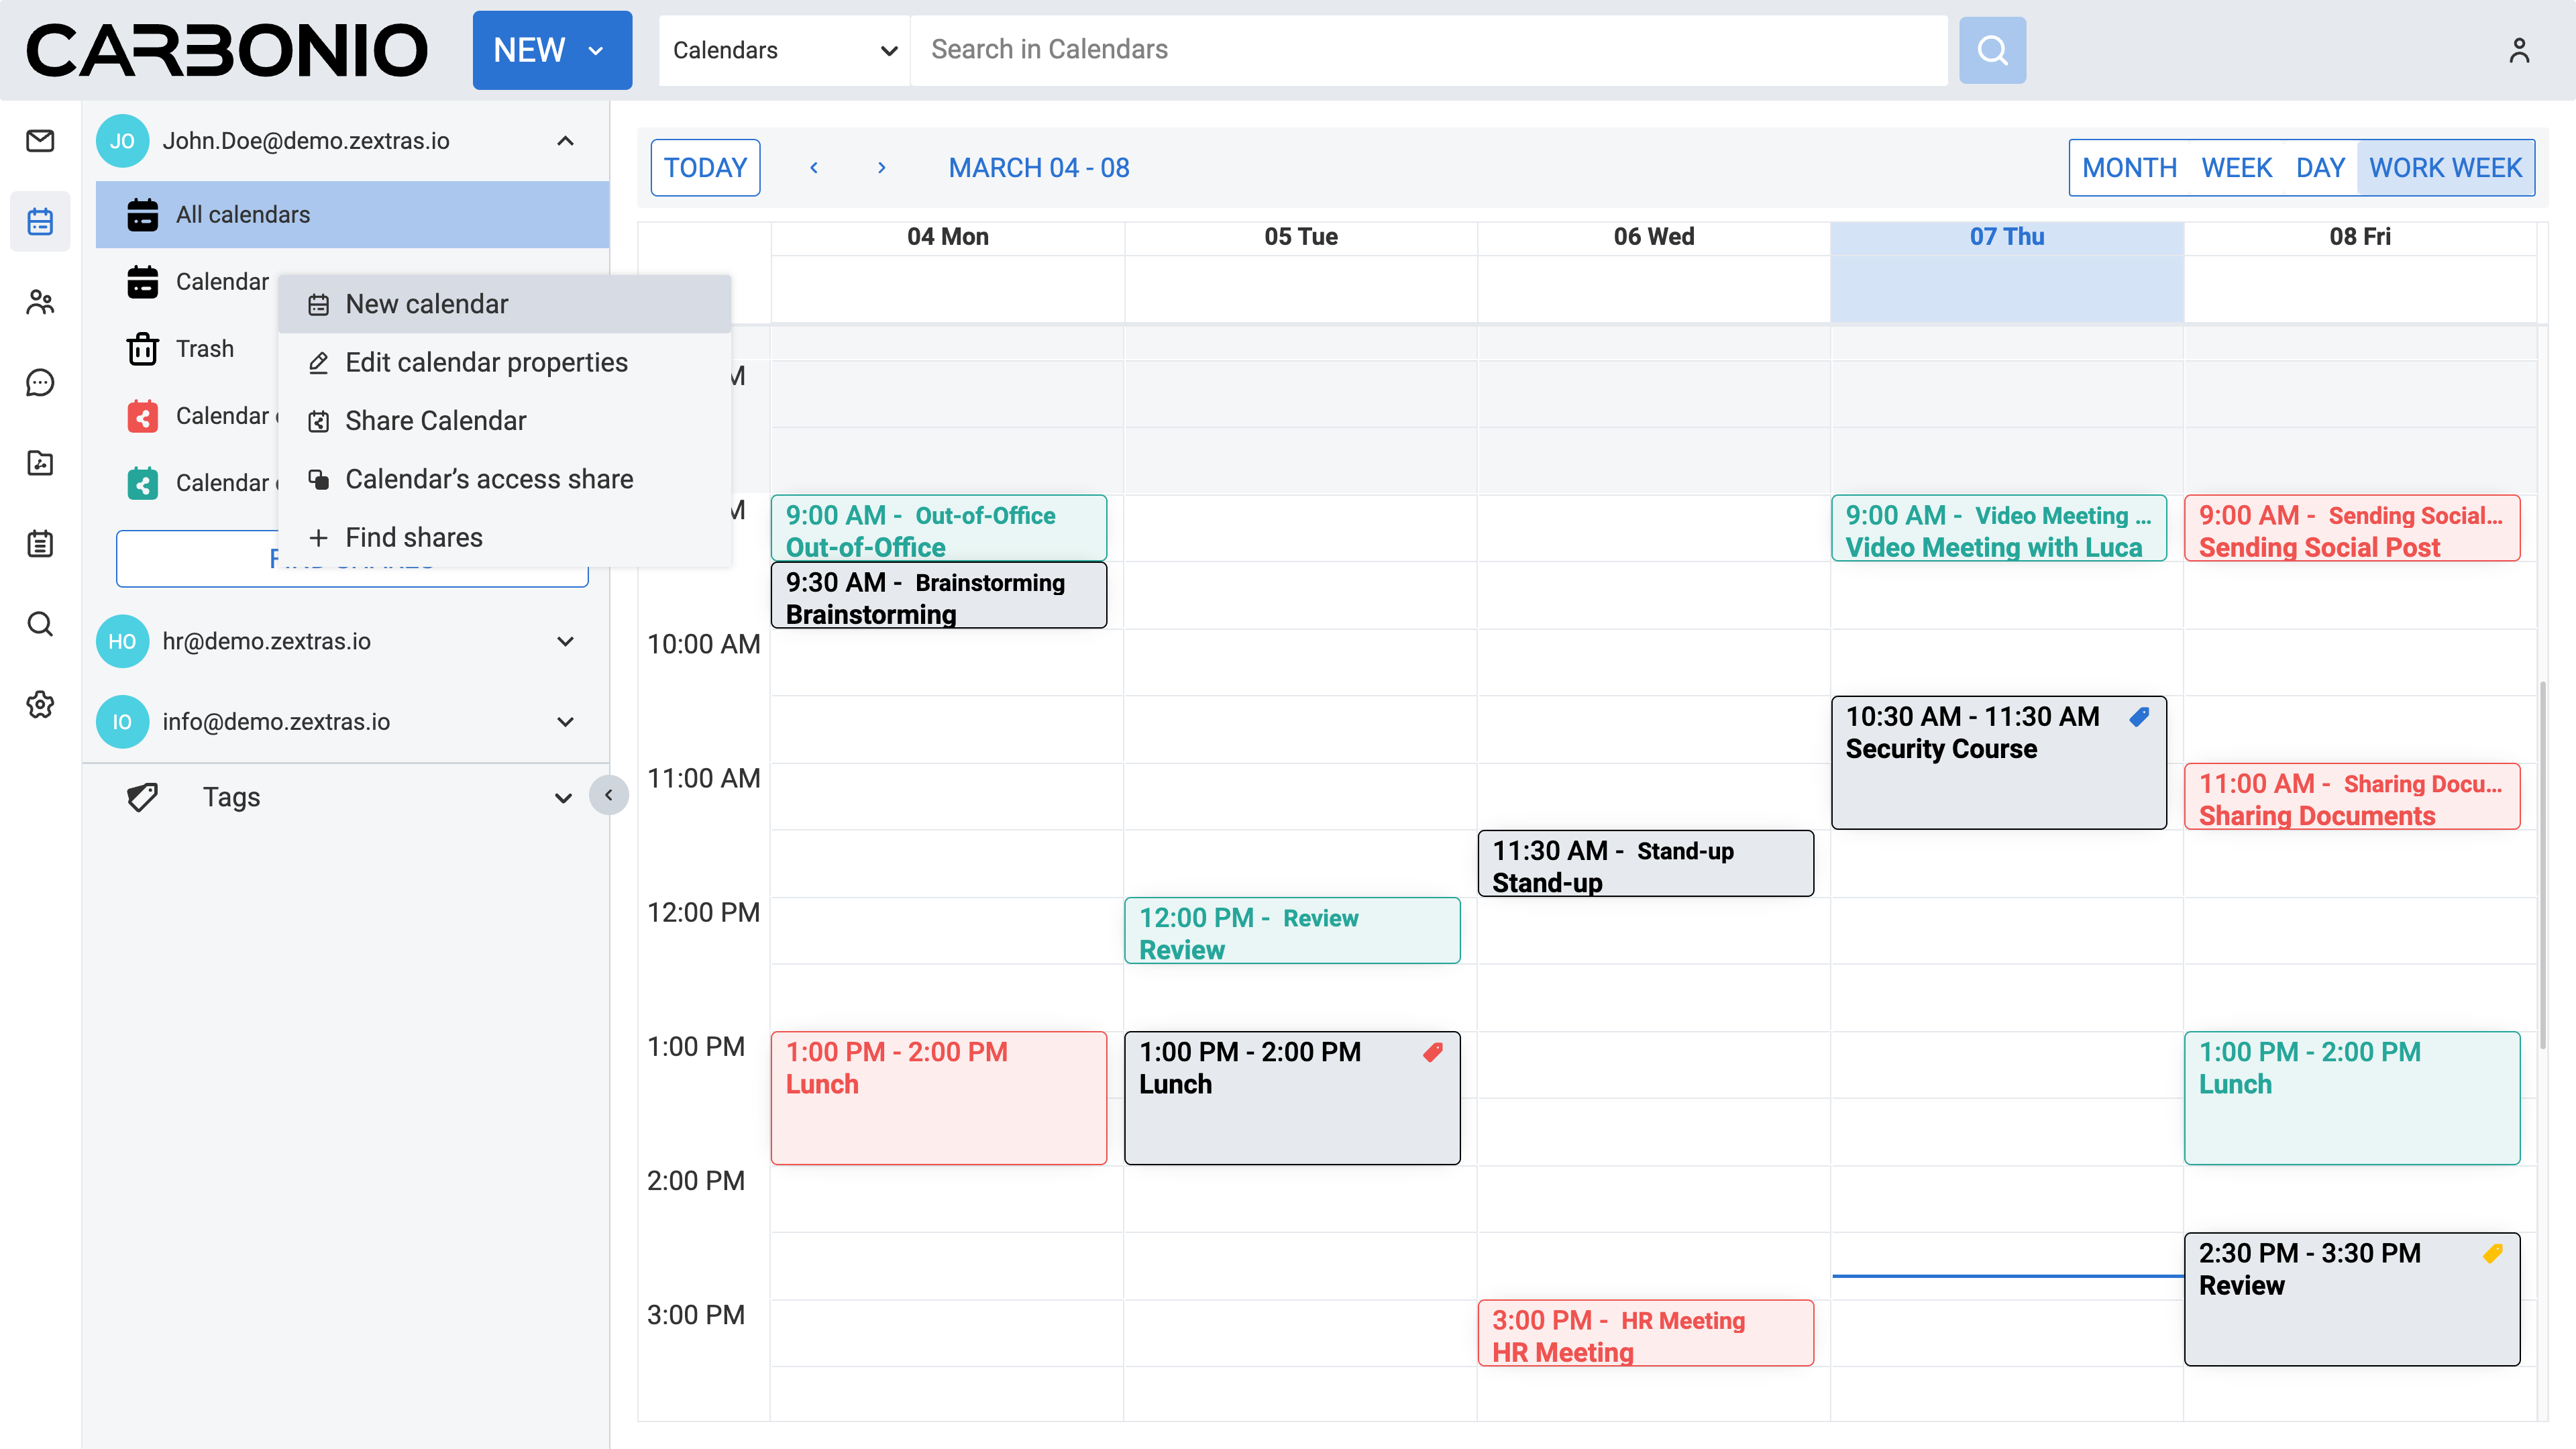
In the Navigation Panel, right-click on the Calendar.
Select New calendar from the drop-down menu. A new window appears.
Insert a calendar name for your new calendar.
Set the color of the calendar.
Click the CREATE button.
You can utilize the checkbox labeled Exclude this calendar when reporting the free/busy times when creating the calendar if you prefer not to include events from this specific calendar when Carbonio reports your availability to colleagues. This feature is particularly useful when creating calendars for personal use, ensuring that your availability for meetings is accurately reflected without disclosing details of events from this calendar.
Setting a Color for a Calendar#
To optimize your experience with Carbonio’s multiple calendar feature, it is advisable to assign distinct colors to each calendar. This ensures clarity when viewing them collectively on the same timetable.
To set a color for a calendar:
Select the Calendars from your left sidebar.
In the Navigation Panel, right-click on the calendar for which you want to assign a color.
Select Edit calendar properties from the drop-down menu.
Choose a color from the Calendar color field.
Click the OK button.
Editing a Calendar#
To delete a calendar:
Select the Calendars from your left sidebar.
In the Navigation Panel, right-click on the calendar you wish to edit.
Select Edit calendar properties from the drop-down menu.
Make your changes.
Click the OK button.
Deleting a Calendar#
To delete a calendar:
Select the Calendars from your left sidebar.
In the Navigation Panel, right-click on the calendar you wish to edit.
Select Delete calendar from the drop-down menu (this option is unavailable for your main calendar).
Click the DELETE button to confirm.
This calendar will be moved to the Trash folder and can be deleted permanently from this folder.
Restoring a Trashed Calendar#
To restore a trashed calendar:
Select the Calendars from your left sidebar.
In the Navigation Panel, click on the downward arrow next to the Trash folder. (if there is no downward arrow, your trash folder is empty)
Right-click on the calendar you wish to restore.
Click Restore calendar from the drop-down menu.
This calendar will be moved into your calendar list.
Viewing Multiple Calendars#
To view multiple calendars in your timetable:
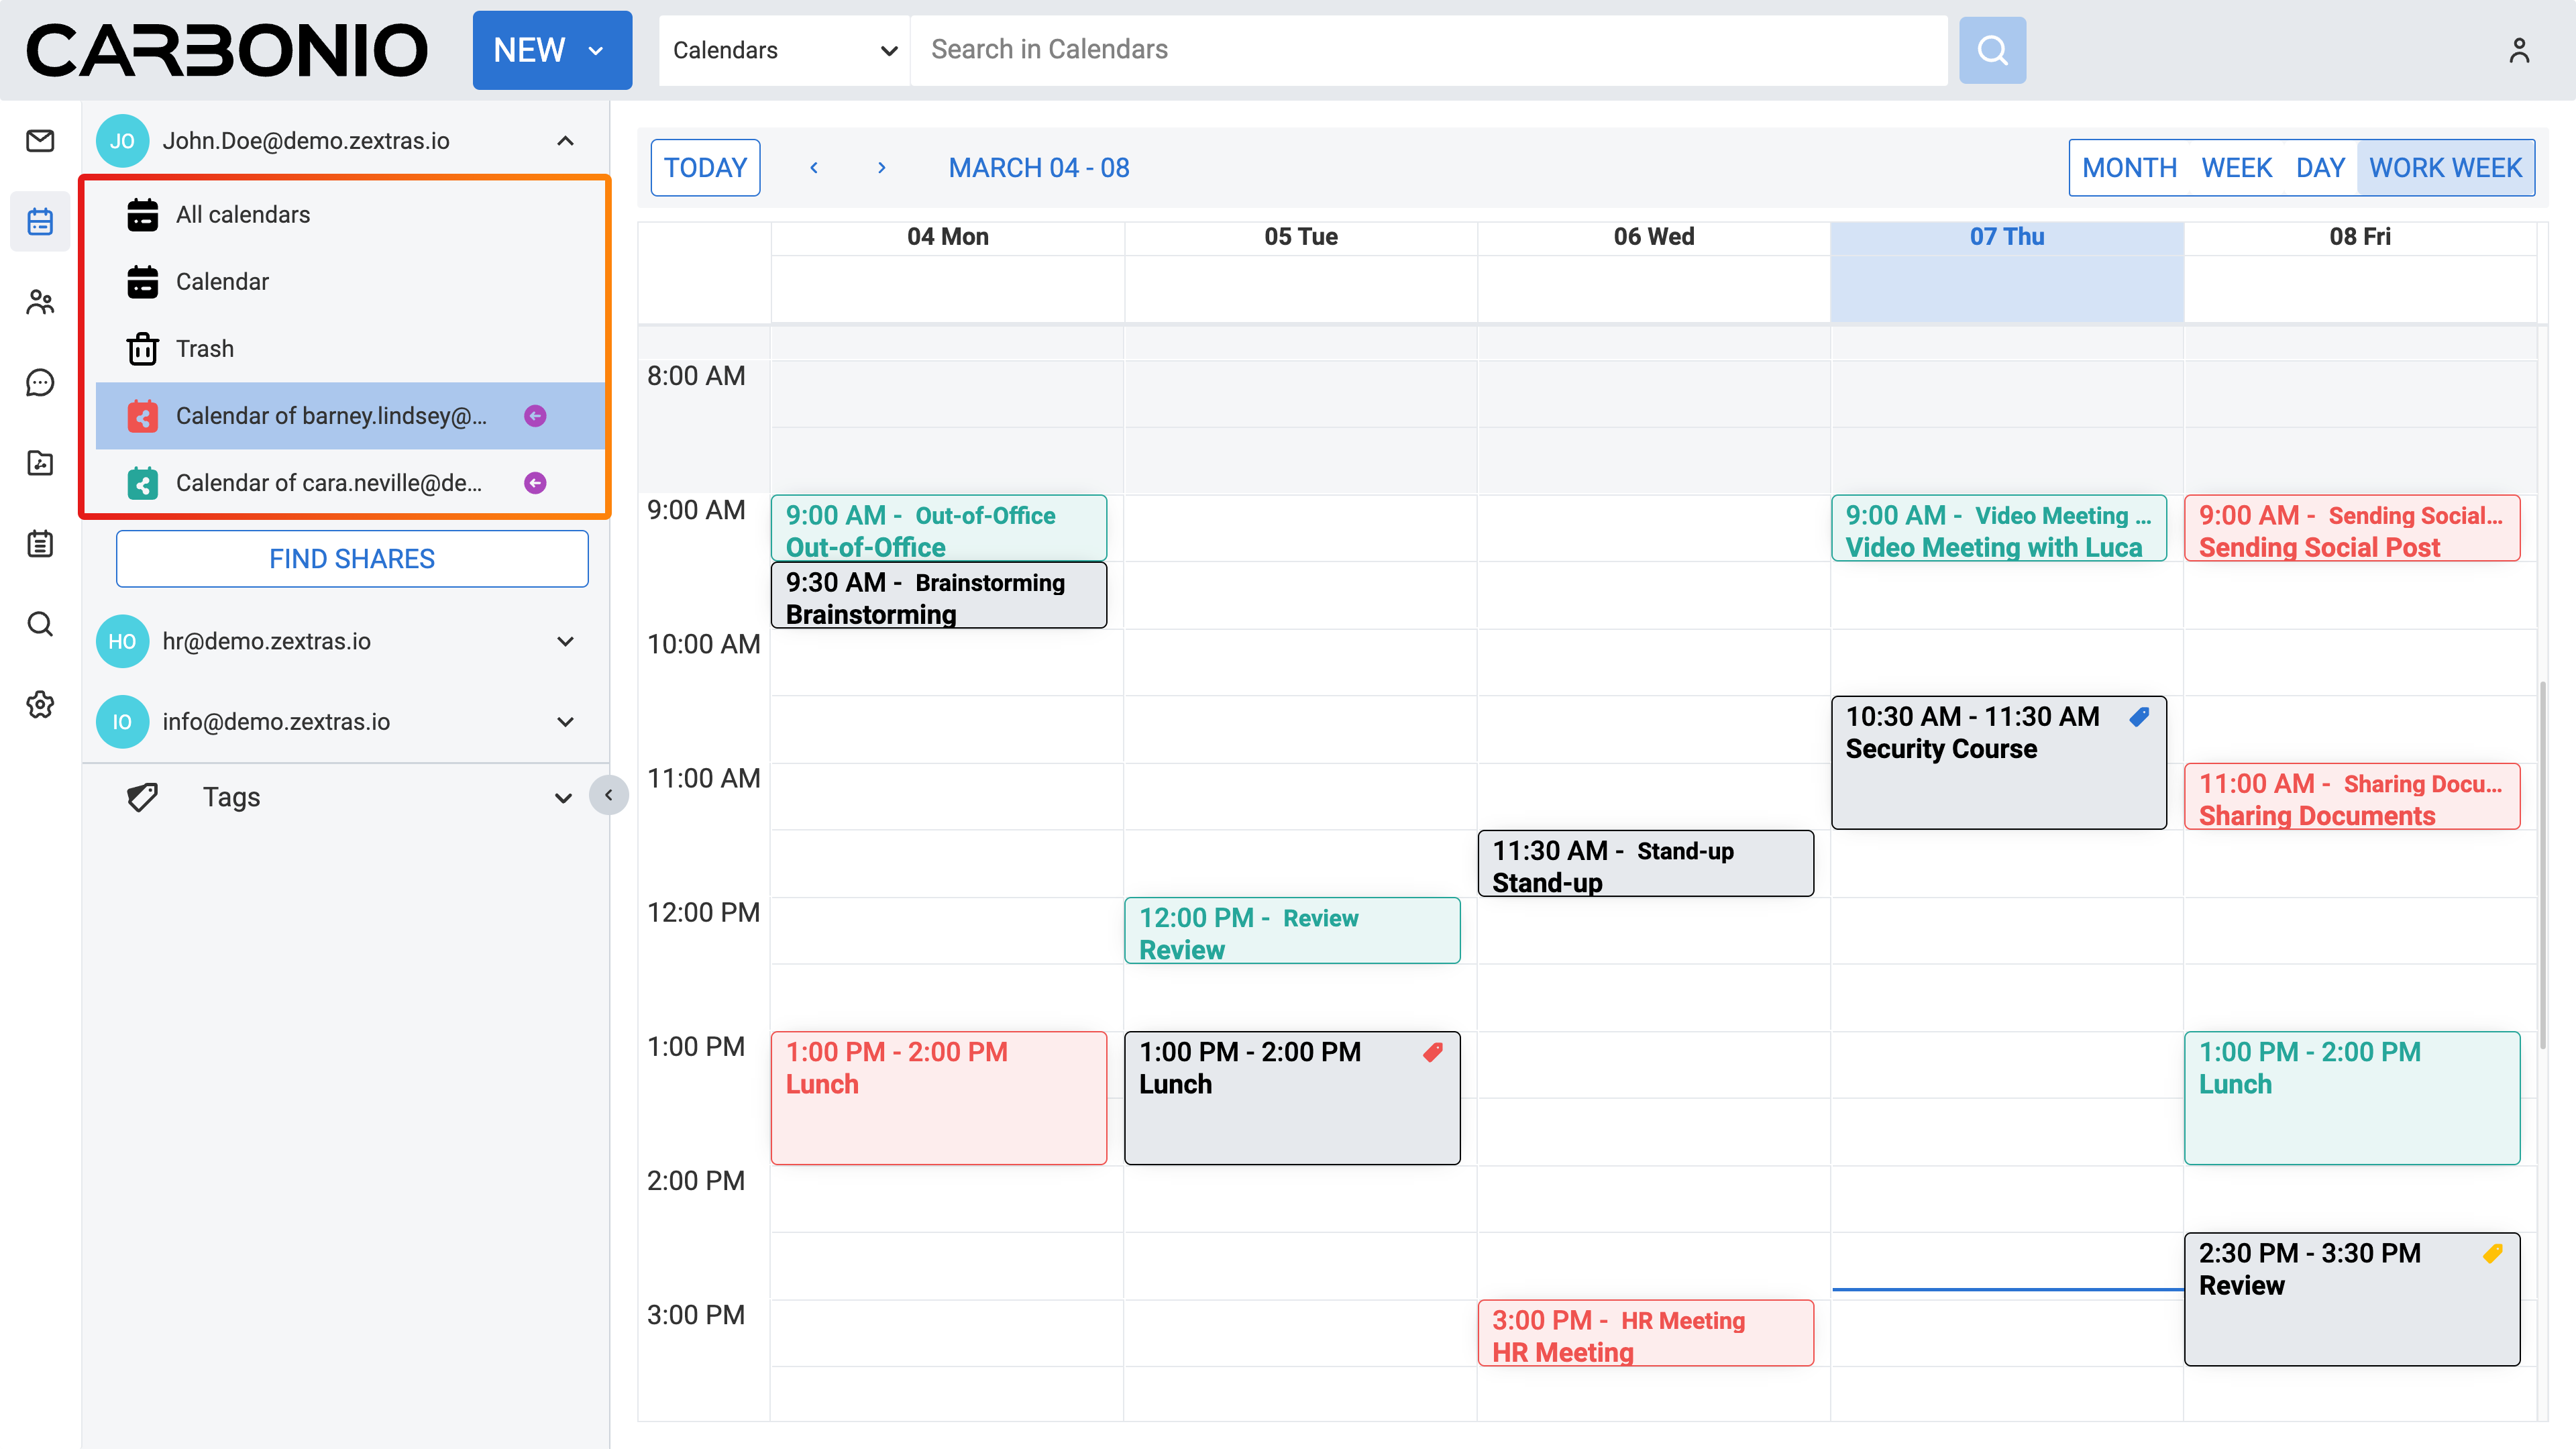
Select the Calendars from your left sidebar.
In the Navigation Panel, click on the calendars you wish to display on your timetable to toggle their visibility on or off.
Setting Start of the Week#
The default start of the week is Sunday. However, if you reside in a region where the week commences with a different day, you can adjust it from the settings. To modify the start of the week:
Click on the Settings (gear icon) in the left sidebar.
Select Calendars.
Under General, click on the Start week on field.
Select the desired day from the drop-down menu.
Click SAVE from the top right corner.
Now, you will observe that the start of the week has been updated accordingly in your calendar timetable.
Allowing Users to See Your Free/Busy Status#
The free/busy feature enables others to view the scheduled meeting times on your calendars. By default, this feature is turned on, allowing others to see your availability. However, you have the option to disable it or restrict who can access this information.
To modify the free/busy visibility settings:
Click on the Settings (gear icon) in the left sidebar.
Select Calendars.
Under Permissions, select the desired option from the Free/Busy list section.
Click SAVE from the top right corner.
Adding Received Appointments to Your Calendar Automatically#
To automatically add received appointments to your calendar:
Click on the Settings (gear icon) in the left sidebar.
Select Calendars.
Under the General section, select the checkbox Automatically add received appointments to the calendar.
Click SAVE from the top right corner.
Now, if a colleague sends you an invitation for a meeting or appointment, it will be automatically added to your calendar.
Subscribe to an external calendar using an ICS URL#
Carbonio Webmail allows you to subscribe to external calendars by using an ICS URL. Once subscribed, the calendar is synchronized automatically, ensuring that the latest updates from the source calendar are reflected in Carbonio Webmail.
Subscribed calendars are read-only and are suitable for users who need ongoing access to an external calendar without performing repeated imports.
How to subscribe using a URL#
Access Carbonio Webmail → Calendars.
Right-click Calendar, then select Add external calendars.
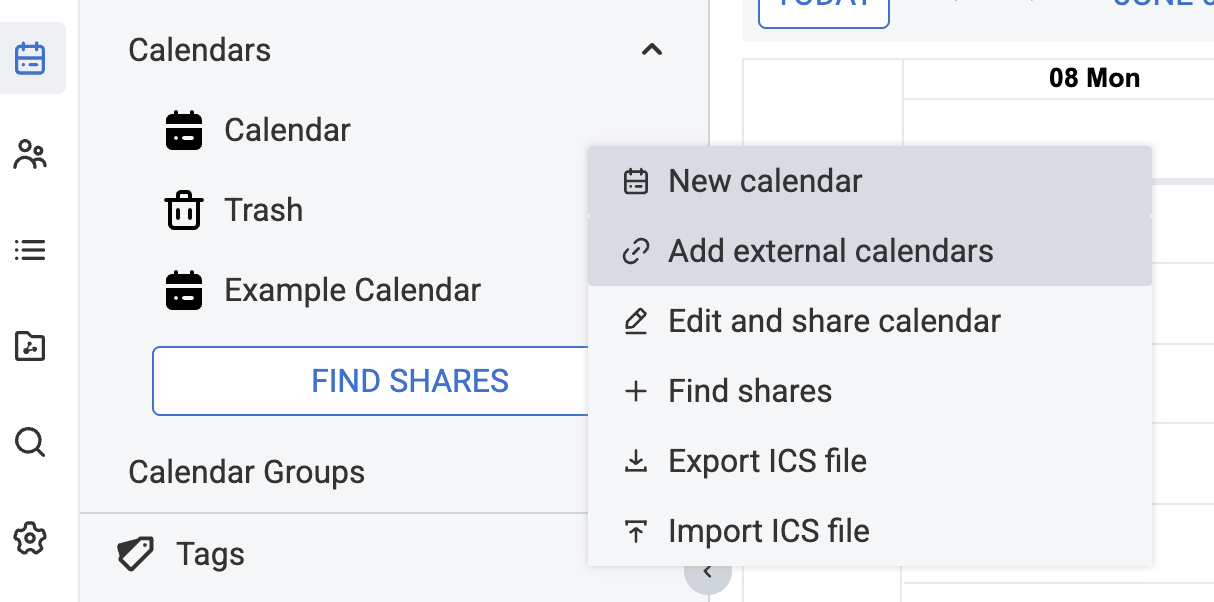
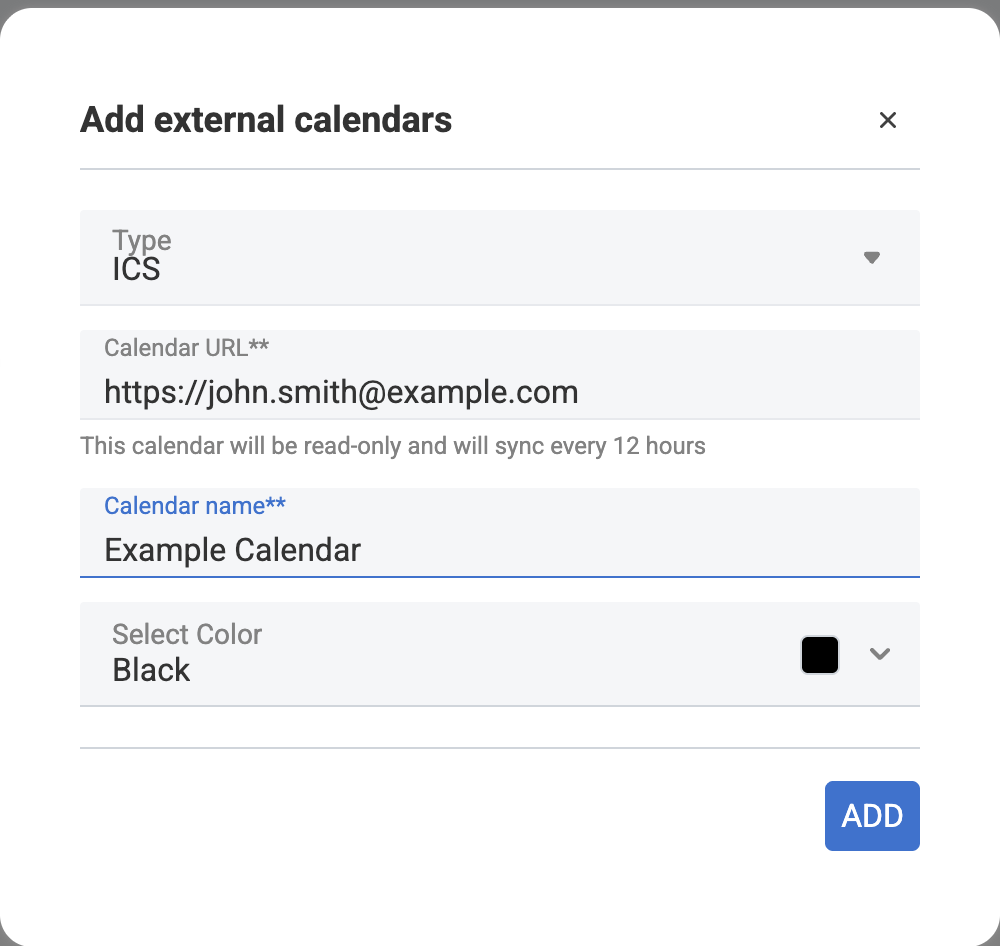
In Type, select ICS from the drop-down list.
-
In Calendar URL, enter the ICS URL of the calendar you want to subscribe to.
Note
Enter a valid URL that links directly to an
.icscalendar file. Enter the calendar name.
Choose a color in Select Color.
Click Add.
If the URL is valid, the calendar appears in your list as a subscribed calendar.
Subscribed calendar vs. ICS import#
A subscribed calendar differs from a traditional ICS import:
Subscribed calendar
Connects to an external ICS source via URL.
Stays synchronized with the source over time.
Updates automatically without repeated imports.
ICS import
Adds calendar data as a one-time import.
Does not stay connected to the external source.
Changes to the source calendar do not update automatically.
Use a subscription for ongoing updates. Use import for a static copy.
Synchronization behavior#
Subscribed calendars synchronize automatically every 12 hours.
Changes made to the external ICS calendar are periodically fetched and shown in your subscribed calendar.
Manual synchronization#
You can also trigger synchronization manually:
Locate the subscribed calendar in your list.
Right-click the calendar and select Sync.
This forces an immediate update from the external ICS source.
Delete a calendar#
If you remove a calendar and want to add another calendar with the same name, you must first permanently delete the original calendar.
Visual indicators#
Subscribed calendars and their events are visually distinct from other calendar items.
Subscribed calendars have a dedicated indicator in the calendar list.
Events from subscribed calendars display a visual marker, indicating that they come from an external subscription.
These indicators help distinguish subscribed content from personal or imported calendars.
Read-only behavior#
Subscribed calendars are read-only. This means:
You cannot create new events in a subscribed calendar.
You cannot edit or delete events in the subscribed calendar.
Make changes only in the original external calendar source.
URL validation and duplicate subscriptions#
The system validates the URL when you subscribe to an external calendar.
URL requirements#
The URL must be a valid ICS feed URL.
Invalid or unsupported URLs cannot be subscribed to.
Duplicate subscription restrictions#
You cannot subscribe to the same external calendar URL more than once.
If a calendar is already subscribed, the system prevents duplicate subscriptions.
Availability#
This feature is available without administrative configuration. No setup is required to enable subscribed ICS calendars for users.
Add a CalDAV external calendar#
The Add external calendars feature allows you to connect a calendar from an external CalDAV service to Zextras. Once added, the external calendar appears alongside your existing calendars, making it easier to view and manage all your events in one place. Added calendars are read-only and sync automatically at regular intervals. You can add a calendar from an external CalDAV service to view it alongside your other calendars.
To add an external calendar:#
Open Calendar.
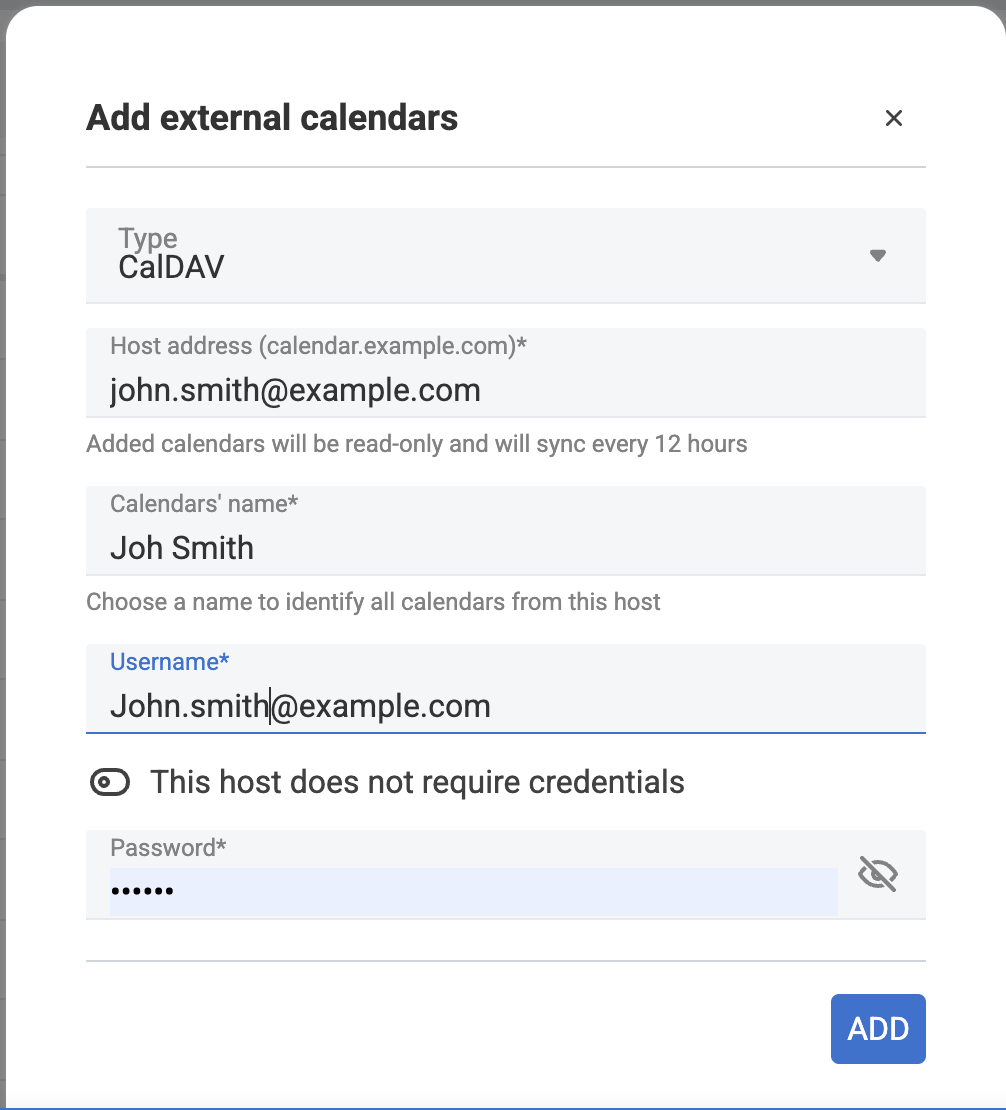
Click Add external calendars.
In Type, select CalDAV.
-
In Host address, enter the CalDAV server address provided by your calendar service.
Example: calendar.example.com
In some cases, you may need to enter the full CalDAV URL.
In Calendars’ name, enter a name to help you identify the calendar source.
Enter your Username.
Enter your Password.
If the server does not require login credentials, enable This host does not require credentials.
Click Add.
Note
Added calendars are read-only.
Calendars sync automatically every 12 hours.
Creating Calendar Groups#
You also have the option to create calendar groups, making it easier to search for certain shared calendars. To do this, simply:
Select the Calendars from your left sidebar.
Click on Create New Group button.
Enter the name of the group in the proper field of the new modal that appears.
Select the calendars you wish to add to the group from the list, by simply searching for them.
Click the + button, to add them all.
Click the REMOVE button, if you have to remove some of them.
Click the CREATE GROUP button.
Now you can switch on and off the group everytime you need to see all the calendars of the users in that group.
Editing Calendar Groups#
To edit a calendar group, follow these steps:
Right-click on the group you want to edit.
Select Edit Group option.
Make the necessary changes to the group name or the calendars included in the group.
Click the SAVE CHANGES button.
Deleting Calendar Groups#
To delete a calendar group, simply:
Right-click on the group you want to delete.
Select Delete permanently option.
Confirm that you want to delete the group, by clicking on the red button DELETE PERMANENTLY
The group will be permanently deleted.
Import an ICS File as New Calendar#
You can import a calendar in .ics format directly to your Carbonio web client calendar. To do so:
Select the Calendars from your left sidebar.
In the Navigation Panel, right-click on “Calendar” and select the voice “New Calendar”: this step is not mandatory, but recommended to avoid mixing existing calendars with the imported one.
Choose the name and settings of the new calendar that will contain the imported data and save it.
Right-click on the new calendar and select the “Import ICS file” option.
Select the .ics file containing the calendar, stored on your computer.
Click Open and Import.
Refresh the page to get the updated calendar view.
Export an ICS File as New Calendar#
You can also export a calendar in .ics format directly from your Carbonio web client calendar. To do so:
Select the Calendars from your left sidebar.
In the Navigation Panel, right-click on “Calendar” you want to export.
Select the “Export ICS file” option.
The download will start in a while, find you .ics file in your download folder.
Configure a CalDAV Client#
Adding a Carbonio calendar to your favourite CalDAV client is straightforward and requires only a few steps. The procedure is almost identical on any client; in the box at the end of this section we mention which are the differences.
In this scenario, the user john.smith@example.com wants to configure in Mozilla’s Thunderbird a calendar called Calendar on the domain mail.example.com. In the remainder, replace these values with suitable ones.
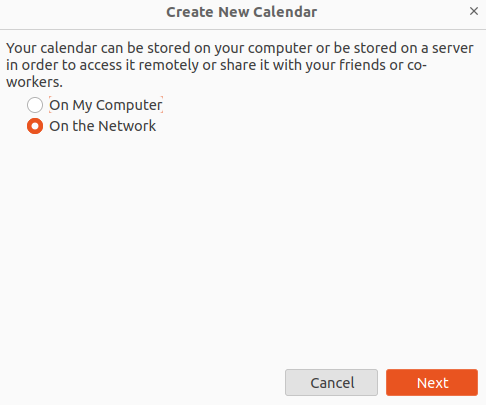
On your client, go to the Calendar and select New Calendar…. Choose On the Network
Provide the Username and the Location, which has format
https://<domain>/dav/username, so
https://mail.example.com/dav/john.smith@example.com

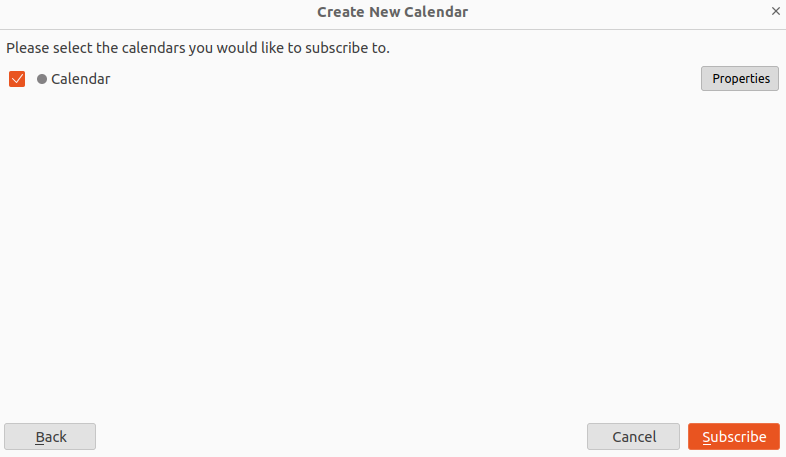
You will be then presented a list, from which to choose Calendar.
You are now done! the calendar will show up in the list of your client.
CalDAV is a standard protocol and therefore the data required to set up a client are a username, an URL, and the name of a calendar. The only difference is that some client requires that the calendar’s name be part of the URL, so you might need to provide https://mail.example.com/dav/john.smith@example.com/Calendar as the URL.