

Working with Video Meetings#
In Carbonio, video meetings are an essential tool for enabling smooth virtual collaboration. Whether for individual conversations or group sessions, they offer a space for face-to-face interactions, promoting real-time communication and strengthening teamwork. Users can effortlessly start or join meetings, share screens, and record sessions, ensuring effective and streamlined collaboration.
Creating New Virtual Room#
Every person with an account on Carbonio can create virtual rooms. Virtual rooms are shared spaces where you can hold video meetings and engage in conversations via chat. You can create them based on different topics you want to discuss so that the attendees are informed about the meeting agenda.
To create a new room:
Select the Chats feature from your left sidebar.
Click YOUR VIRTUAL ROOMS located at the bottom left corner beneath the list of chats. A new window appears.
Click on New Virtual Room’s name*.
Insert a name for the room in the field and click on the checkmark icon.
Choose the room’s moderators, who will have the ability to manage the room.
Your room has been successfully created and will be accessible through the same YOUR VIRTUAL ROOMS button.
You can use the link icon beside your room’s name to copy the room’s link. Upon clicking the button, the link will be copied to your clipboard. You can paste it anywhere (such as in a chat) by right-clicking and selecting Paste, or by using the keyboard shortcut CTRL+V on Windows or command+V on macOS. You can use the Arrow icon beside your room’s name to enter the room.
Managing Virtual Rooms#
Every person with an account on Carbonio can create virtual rooms. You can use your room to invite others to meetings, whether they are colleagues with accounts on the same system or external users. In the list of participants in the video meeting, you will be able to distinguish which of them are internal and which are external, marked as “Guest”.
To access and enter your virtual room, follow these steps:
Select the Chats feature from your left sidebar.
Click YOUR VIRTUAL ROOMS located at the bottom left corner beneath the list of chats to open your list of rooms.
You can use the Arrow icon beside the room’s name to enter it.
Guest Entry Experience#
Guests now access meetings through a single, professional landing page that brings together everything they need in one place. Before joining, they can enter their name, configure their audio and video devices, and proceed directly to the waiting room with a single click.
Benefits#
Clear professional context Guests immediately understand that they are entering a business meeting environment.
Simplified flow Guests complete all required steps—name input and device setup—on one page, reducing effort and saving time.
Smoother transition After clicking Ready to participate, guests are seamlessly taken to the waiting room, where a clear message informs them that the moderator will admit them shortly.
Editing Room Details#
To edit the details of a room:
Select the Chats feature from your left sidebar.
Click YOUR VIRTUAL ROOMS located at the bottom left corner beneath the list of chats to open your list of rooms.
Click the three dots icon beside the room’s name.
Choose EDIT.
Edit the room’s name and moderators.
Click the button EDIT to save the changes.
Entering A Virtual Room#
To enter a specific room, you need to have its link. To obtain the URL of a room, you can:
Select the Chats feature from your left sidebar.
Click YOUR VIRTUAL ROOMS located at the bottom left corner beneath the list of chats to open your list of rooms.
You can use the Arrow icon beside the room’s name to enter it.
Alternatively, you can copy the link to access the room to your clipboard using the link icon beside the room’s name in the list. You can paste it into the address bar of a new browser tab and press Enter. This will direct you to the room.
Inviting Members to A Virtual Room#
To invite other members to a room, you need to have its link. To obtain the URL of a room, you can:
Select the Chats feature from your left sidebar.
Click YOUR VIRTUAL ROOMS located at the bottom left corner beneath the list of chats to open your list of rooms.
Click the link icon beside your room’s name to copy the room’s link.
This will copy the link to access the room to your clipboard. You can paste it anywhere (such as in a chat) by right-clicking and selecting Paste, or by using the keyboard shortcut CTRL+V on Windows or command+V on macOS. Alternatively, you can enter your room and copy the URL of the page from the address bar of your browser, then send it to your colleagues.
Holding A Video Call with A Member#
To invite a colleague to a video call:
Select the Chats feature from your left sidebar.
From the list of chats, choose the colleague with whom you want to have the video call.
Click on the START MEETING button on top of the chat area.
Holding A Video Meeting with Multiple Members#
You can use your personal room to invite others for a video meeting. To do so, you need to send them the link to your personal room. To obtain your room’s link:
Select the Chats feature from your left sidebar.
Click YOUR VIRTUAL ROOMS located at the bottom left corner beneath the list of chats to open your list of rooms.
Click the link icon beside your room’s name to copy the room’s link.
This will copy the link to access the room to your clipboard. You can paste it anywhere (such as in a chat) by right-clicking and selecting Paste, or by using the keyboard shortcut CTRL+V on Windows or command+V on macOS. Alternatively, you can enter your room and copy the URL of the page from the address bar of your browser, then send it to your colleagues.
Select Webcam and Microphone#
Before entering a video meeting, you will be prompted to select a webcam and microphone from the available options on your computer. You can also choose to turn the webcam and microphone on or off before joining the room. Once your selections are made, press ENTER to join the meeting.
Enable Webcam and Microphone#
When you are in a video meeting, you can also turn your webcam or microphone on or off. Here is how: Toggle the microphone or camera icon on the bottom bar inside the meeting room. If you do not see the bottom bar, simply move your mouse cursor to the bottom of the screen, and it will appear.
During a video meeting, you have the chance to blur your background. Simply click on the arrow icon in the camera button, and then choose the option Apply Blur Effect.
You also have the chance to choose a specific background image. Click on the arrow icon in the camera button, and then choose the option Apply Background Image. You can upload your own image or choose one from the available options.
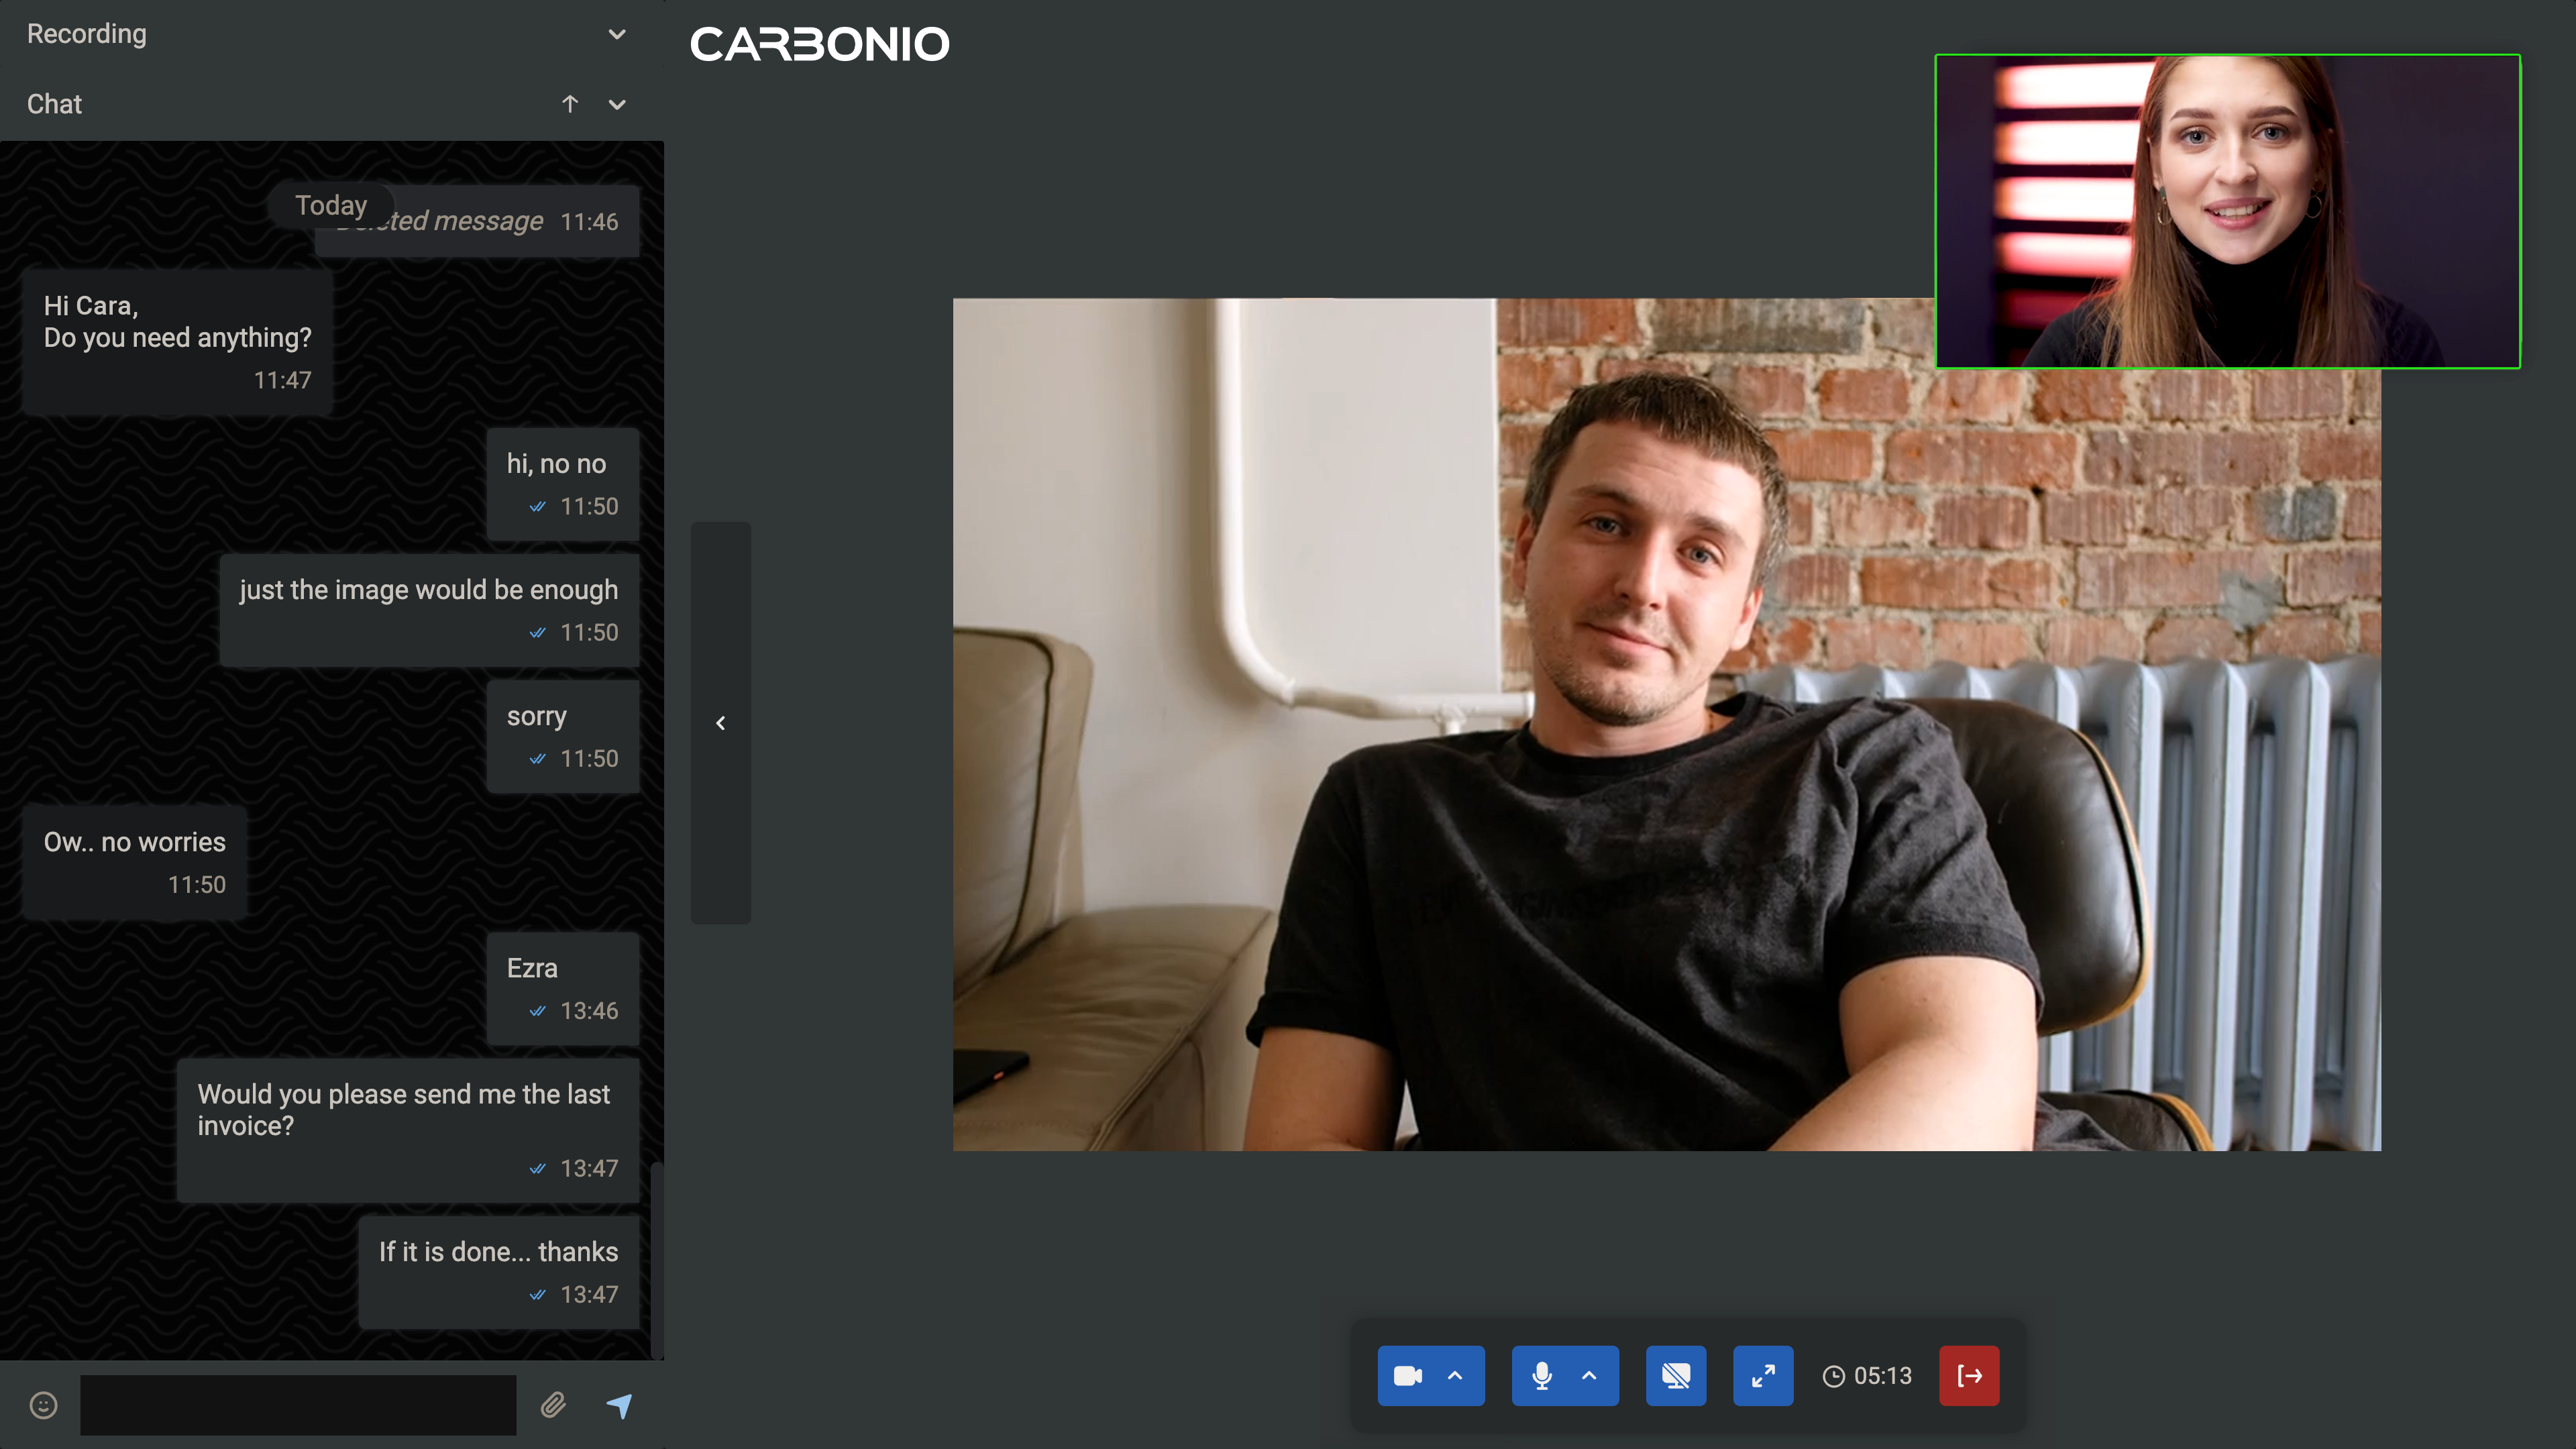
Recording a Video Meeting#
When you are in a video meeting and want to record it:
Click the arrow button on the left side to open the chat box.
In the chat box, click the downward arrow next to the Recording section at the top.
Click START RECORDING to begin recording.
-
To stop the recording, click STOP RECORDING.
Whether the recording is stopped by the person who started it or by another moderator, the file will always be saved into the Files of the person who started the recording.
A popup will appear asking you to enter a name for the recording file.
Note
If all meeting participants (including the person who started the recording) leave the meeting, the system will automatically stop the recording and save the file in the Files of the person who clicked START RECORDING.
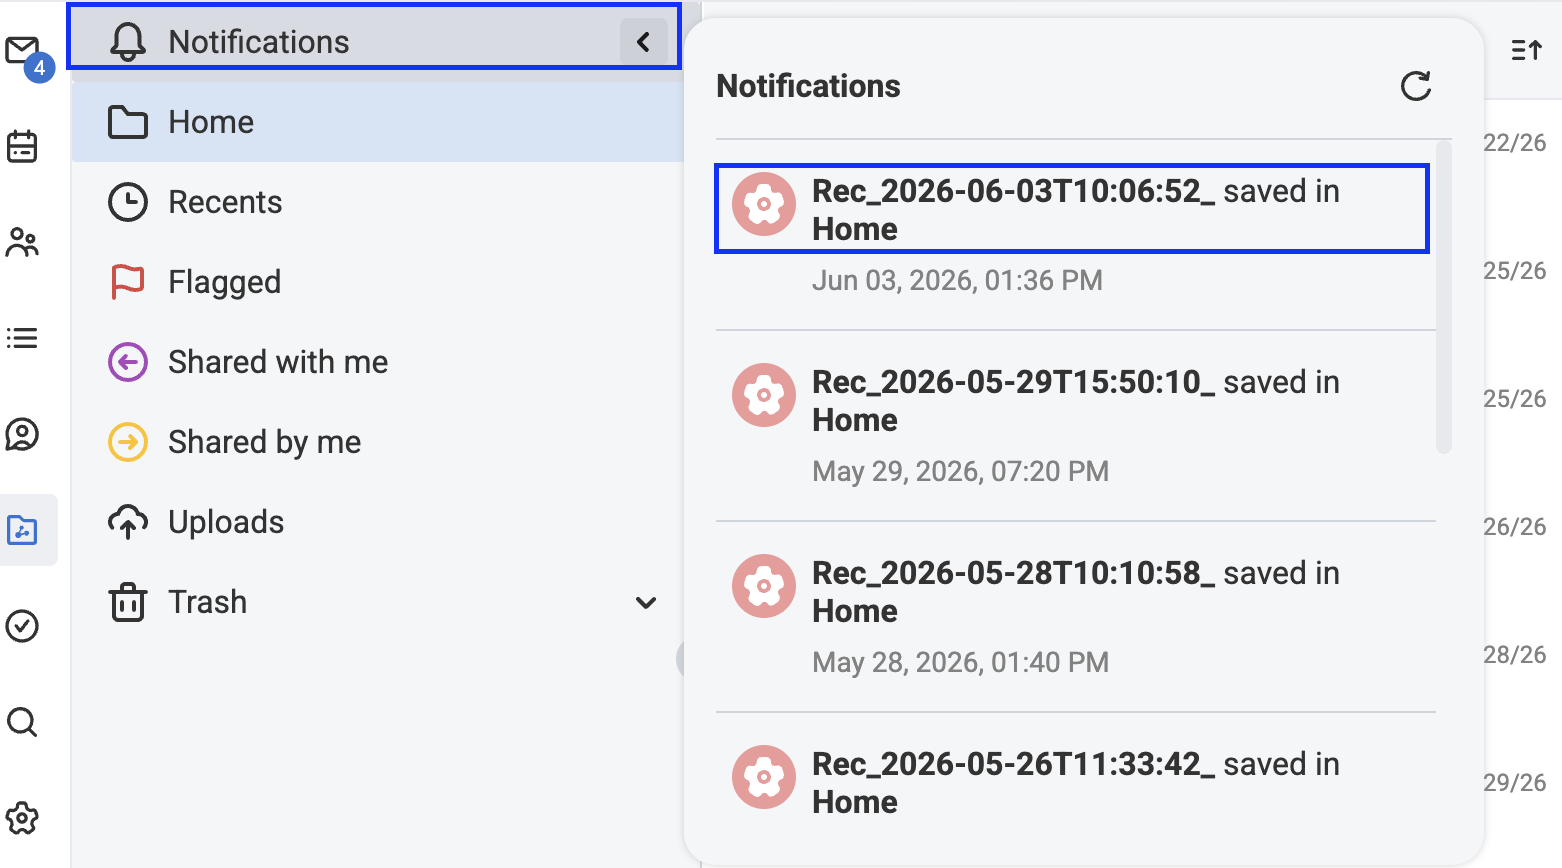
Recording Saved Notifications#
When a Chats meeting recording is successfully saved to Files, the recording initiator receives an automatic notification in the Files Notifications widget. The notification is displayed as “<recording name> saved in <folder name>” and includes the destination folder path, so the recording can be found quickly in Files.
This notification is system-generated and uses the system avatar (settings icon) to distinguish it from user activity. The feature is enabled by default and requires no administrative configuration.
Adding New Members to a Video Meeting#
To add new members to an ongoing video meeting, you need to send them the link to access the room. Here is how:
Make sure you are in the meeting.
Copy the URL of the page from the address bar of your browser.
This will copy the link to access your room to your clipboard. You can paste it anywhere (such as in a chat) by right-clicking and selecting Paste, or by using the keyboard shortcut CTRL+V on Windows or command+V on macOS.
Accessing Chat History During a Video Meeting#
To access the chat box of the room where you are having the video meeting, simply click the arrow button on the left side to open the chat box.
Maximizing Video Meeting Screen#
To maximize the video meeting screen, click on the icon with arrows inside located on the bottom bar. If you do not see the bottom bar inside the meeting room, simply move your mouse cursor to the bottom of the screen, and it will appear.
Cinema Mode Fullscreen Feature#
Cinema Mode provides an optimized viewing experience during meetings, allowing you to focus on shared content or participants with an immersive fullscreen display.
This feature enables you to: * View meetings in Cinema Mode for a more engaging experience * Activate fullscreen mode to eliminate interface distractions * Optimize display during presentations or collaborative sessions
To use the Cinema Mode and fullscreen features, follow these steps: * Join a meeting: Enter an existing meeting * Switch to Cinema view: In the view options, select “Cinema” mode to optimize the display layout * Enable fullscreen: Activate fullscreen mode to maximize the viewing area and remove interface elements
The full-screen mode now automatically hides the sidebar and carousel in cinema view, and hides the sidebar in other views. When full screen is activated in cinema view, left panel and carousel will be closed.
Raise Hand Feature#
The Raise Hand feature allows meeting participants to signal their desire to speak through a structured queue system, promoting organized discussions and better meeting flow.
How It Works for Participants:
Raise hand to join speaking queue
View real-time queue showing order, avatars, and usernames
Receive audio notifications when others raise hands
Hand automatically lowers when speaking begins
Moderators
Access dedicated queue management panel
Lower individual hands or clear entire queue
Actions sync across all moderators in real-time
This feature streamlines meeting participation by providing clear speaking order while giving moderators effective queue management tools.
To activate the Raise Hand feature during a video meeting:
Click the hand icon on the bottom bar inside the meeting room.
When you will start speaking, your hand will be automatically lowered.
If you want to lower your hand manually, simply click the hand icon again.
If you are a moderator, you can also lower the hands of other participants by clicking on the hand icon next to their name in the Participants section of the chat box.
Muting Participants During a Video Meeting#
As the moderator of a meeting room, you can mute an attendee’s microphone individually. To do so, simply hover your cursor over the video feed of the attendee and click on the microphone icon located at the corner of their video feed.
Click the arrow button on the left side to open the chat box.
Click the downward arrow next to the Participants section located at the top of the chat box.
Click the microphone icon next to the participant’s name.
Click MUTE FOR ALL to confirm.
Deleting a Meeting Room#
To delete a meeting room:
Select the Chats feature from your left sidebar.
Click YOUR VIRTUAL ROOMS located at the bottom left corner beneath the list of chats to open your list of rooms.
Click the trash icon beside the name of the room you want to delete.
Click DELETE to confirm.
Adding Moderators to a Room#
To add a moderator to a meeting room:
Click the arrow button on the left side to open the chat box.
Click the downward arrow next to the Participants section located at the top of the chat box.
Click the crown icon next to the participant’s name.