

Advanced Email Management#
This section delves into more advanced email management techniques that offer significant long-term benefits. For Carbonio enthusiasts, we strongly advise taking note of these strategies. Techniques include effectively handling spam emails, utilizing email filters, and email signatures, etc.
Email Check Frequency#
You can customize how frequently you receive emails by adjusting your settings. Here is how:
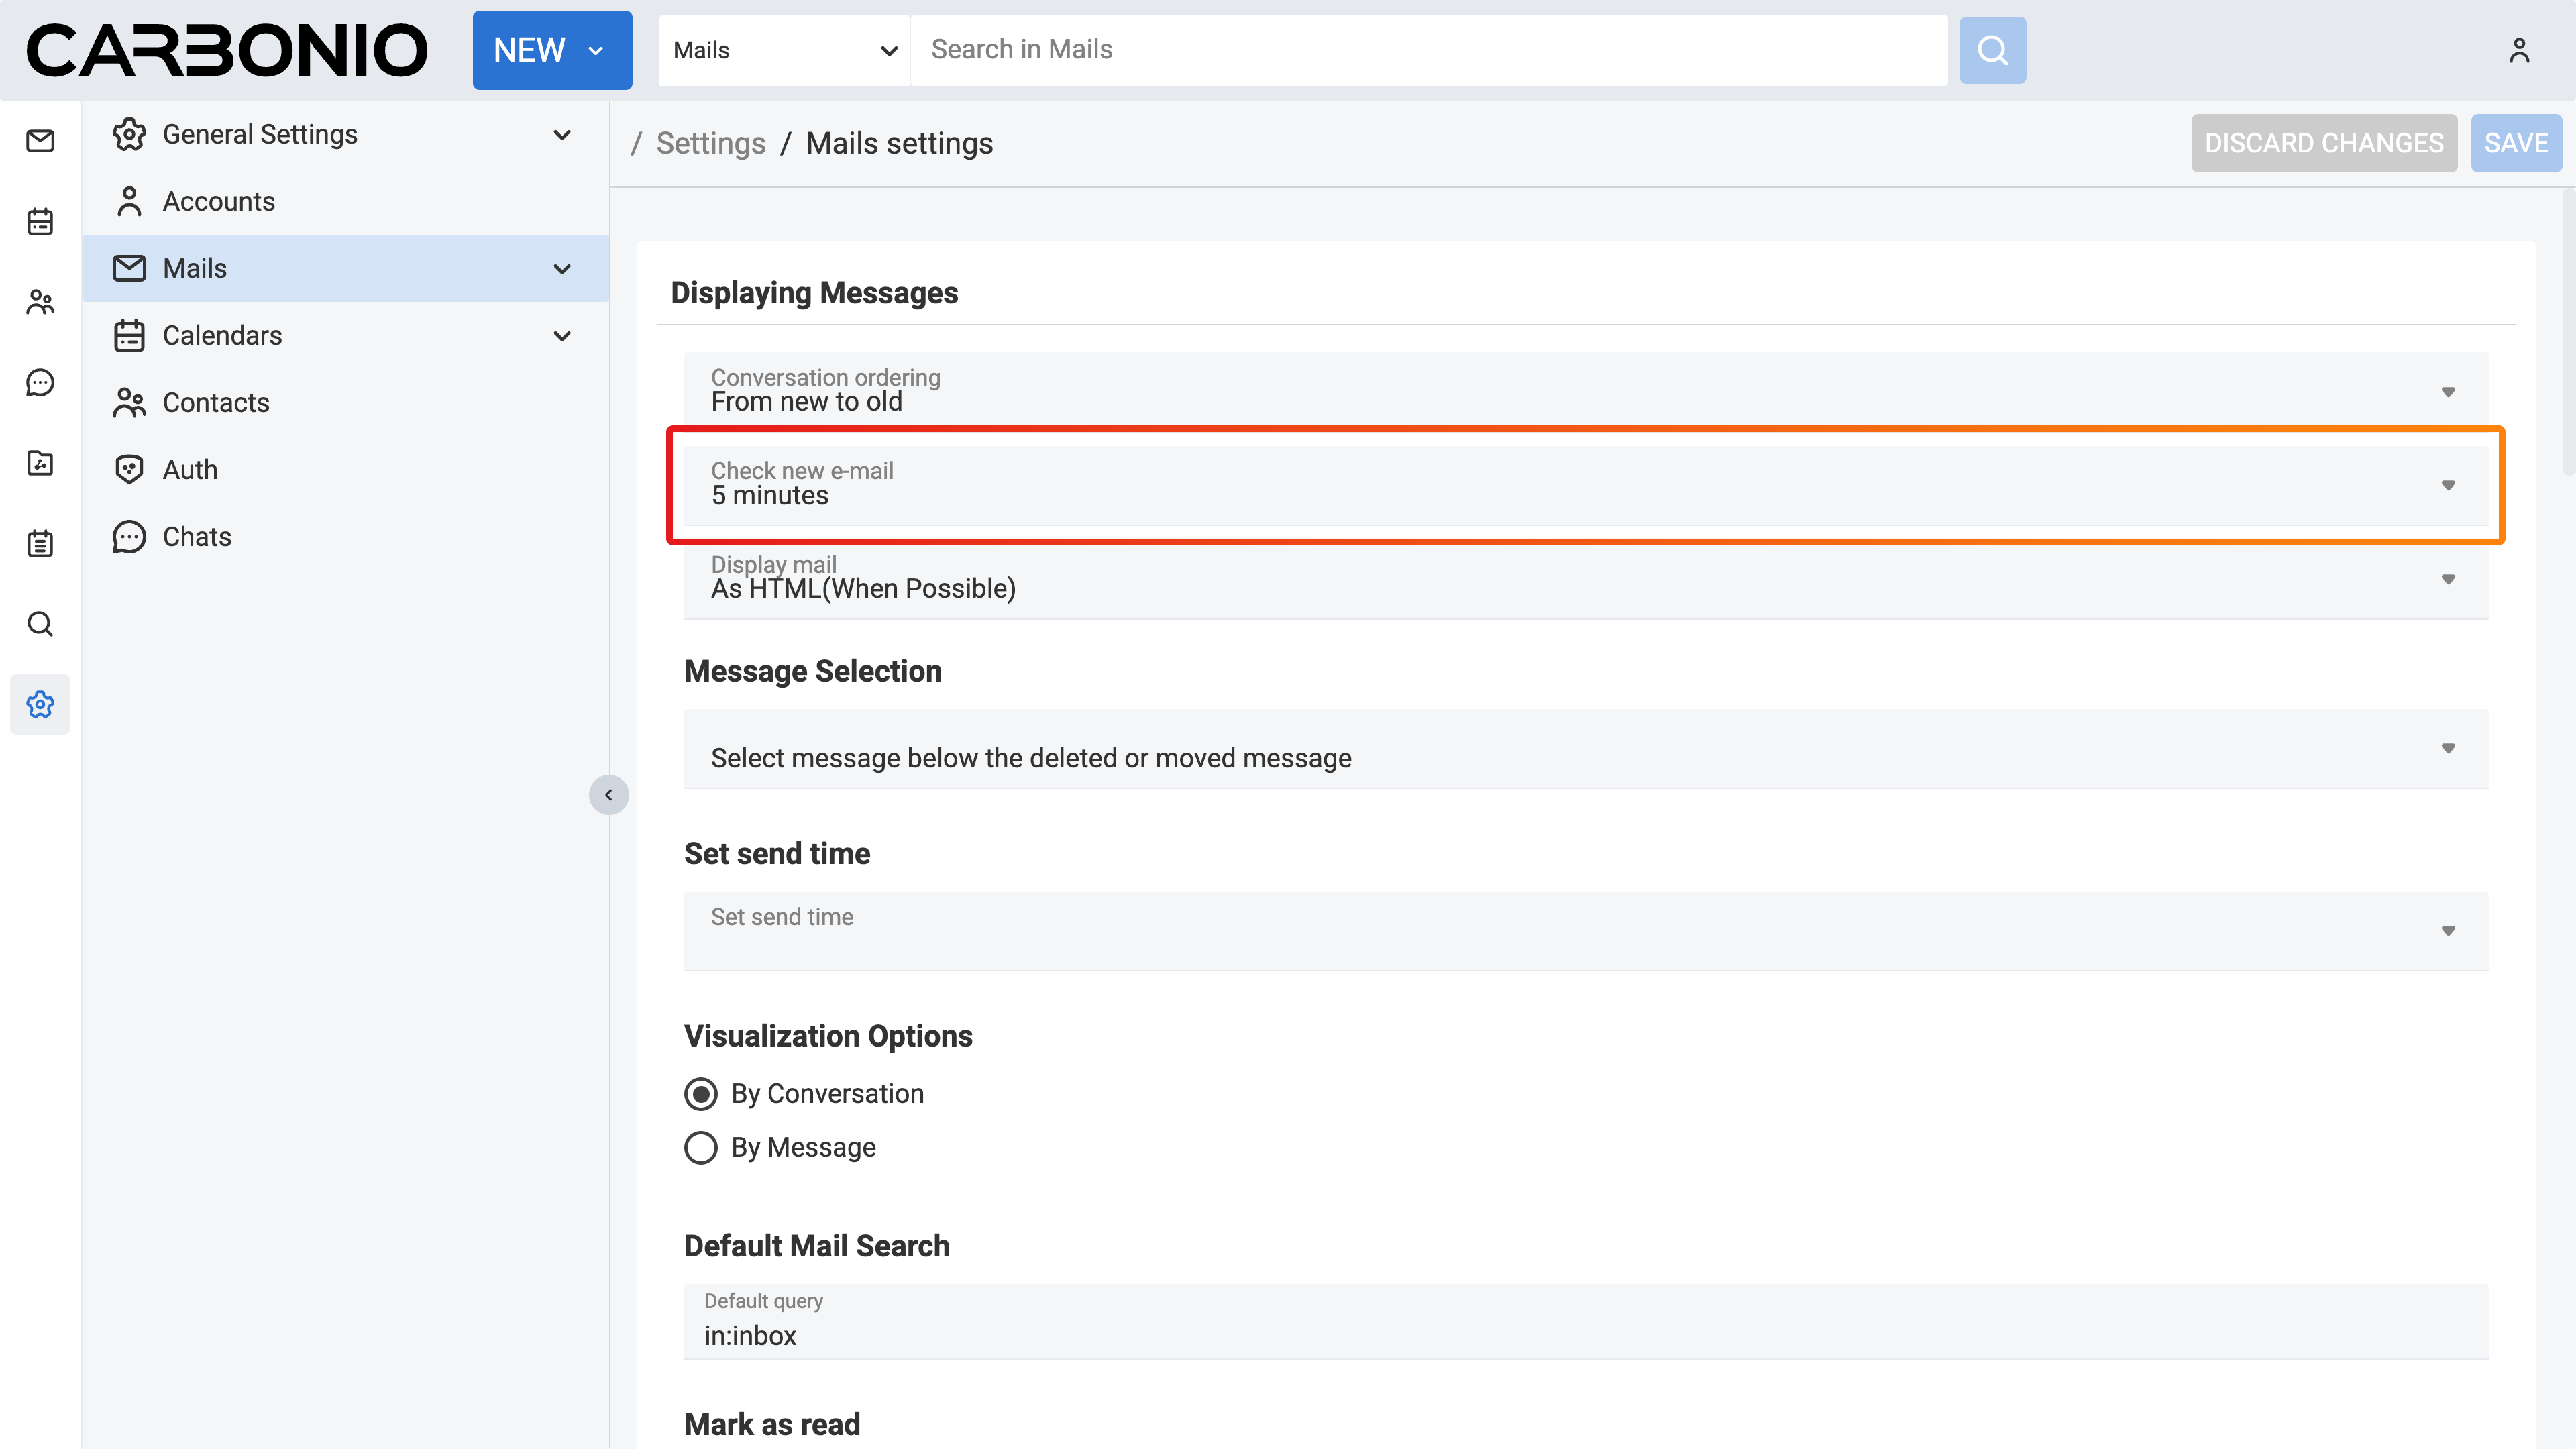
Click on the Settings (gear icon) in the left sidebar.
Select Mails.
Under Displaying Messages, click on Check new e-mail.
From the drop-down menu, choose how often you would like to check for new mail.
Click the SAVE button in the top right corner.
If you select Manually, you will need to click the reload icon to fetch new emails. If you choose As new email arrives, your inbox will refresh automatically upon receiving a new email.
Email Notification#
You can customize whether you are notified when you receive new emails. To enable desktop alerts for new email notifications, ensure that your web client is open on your browser.
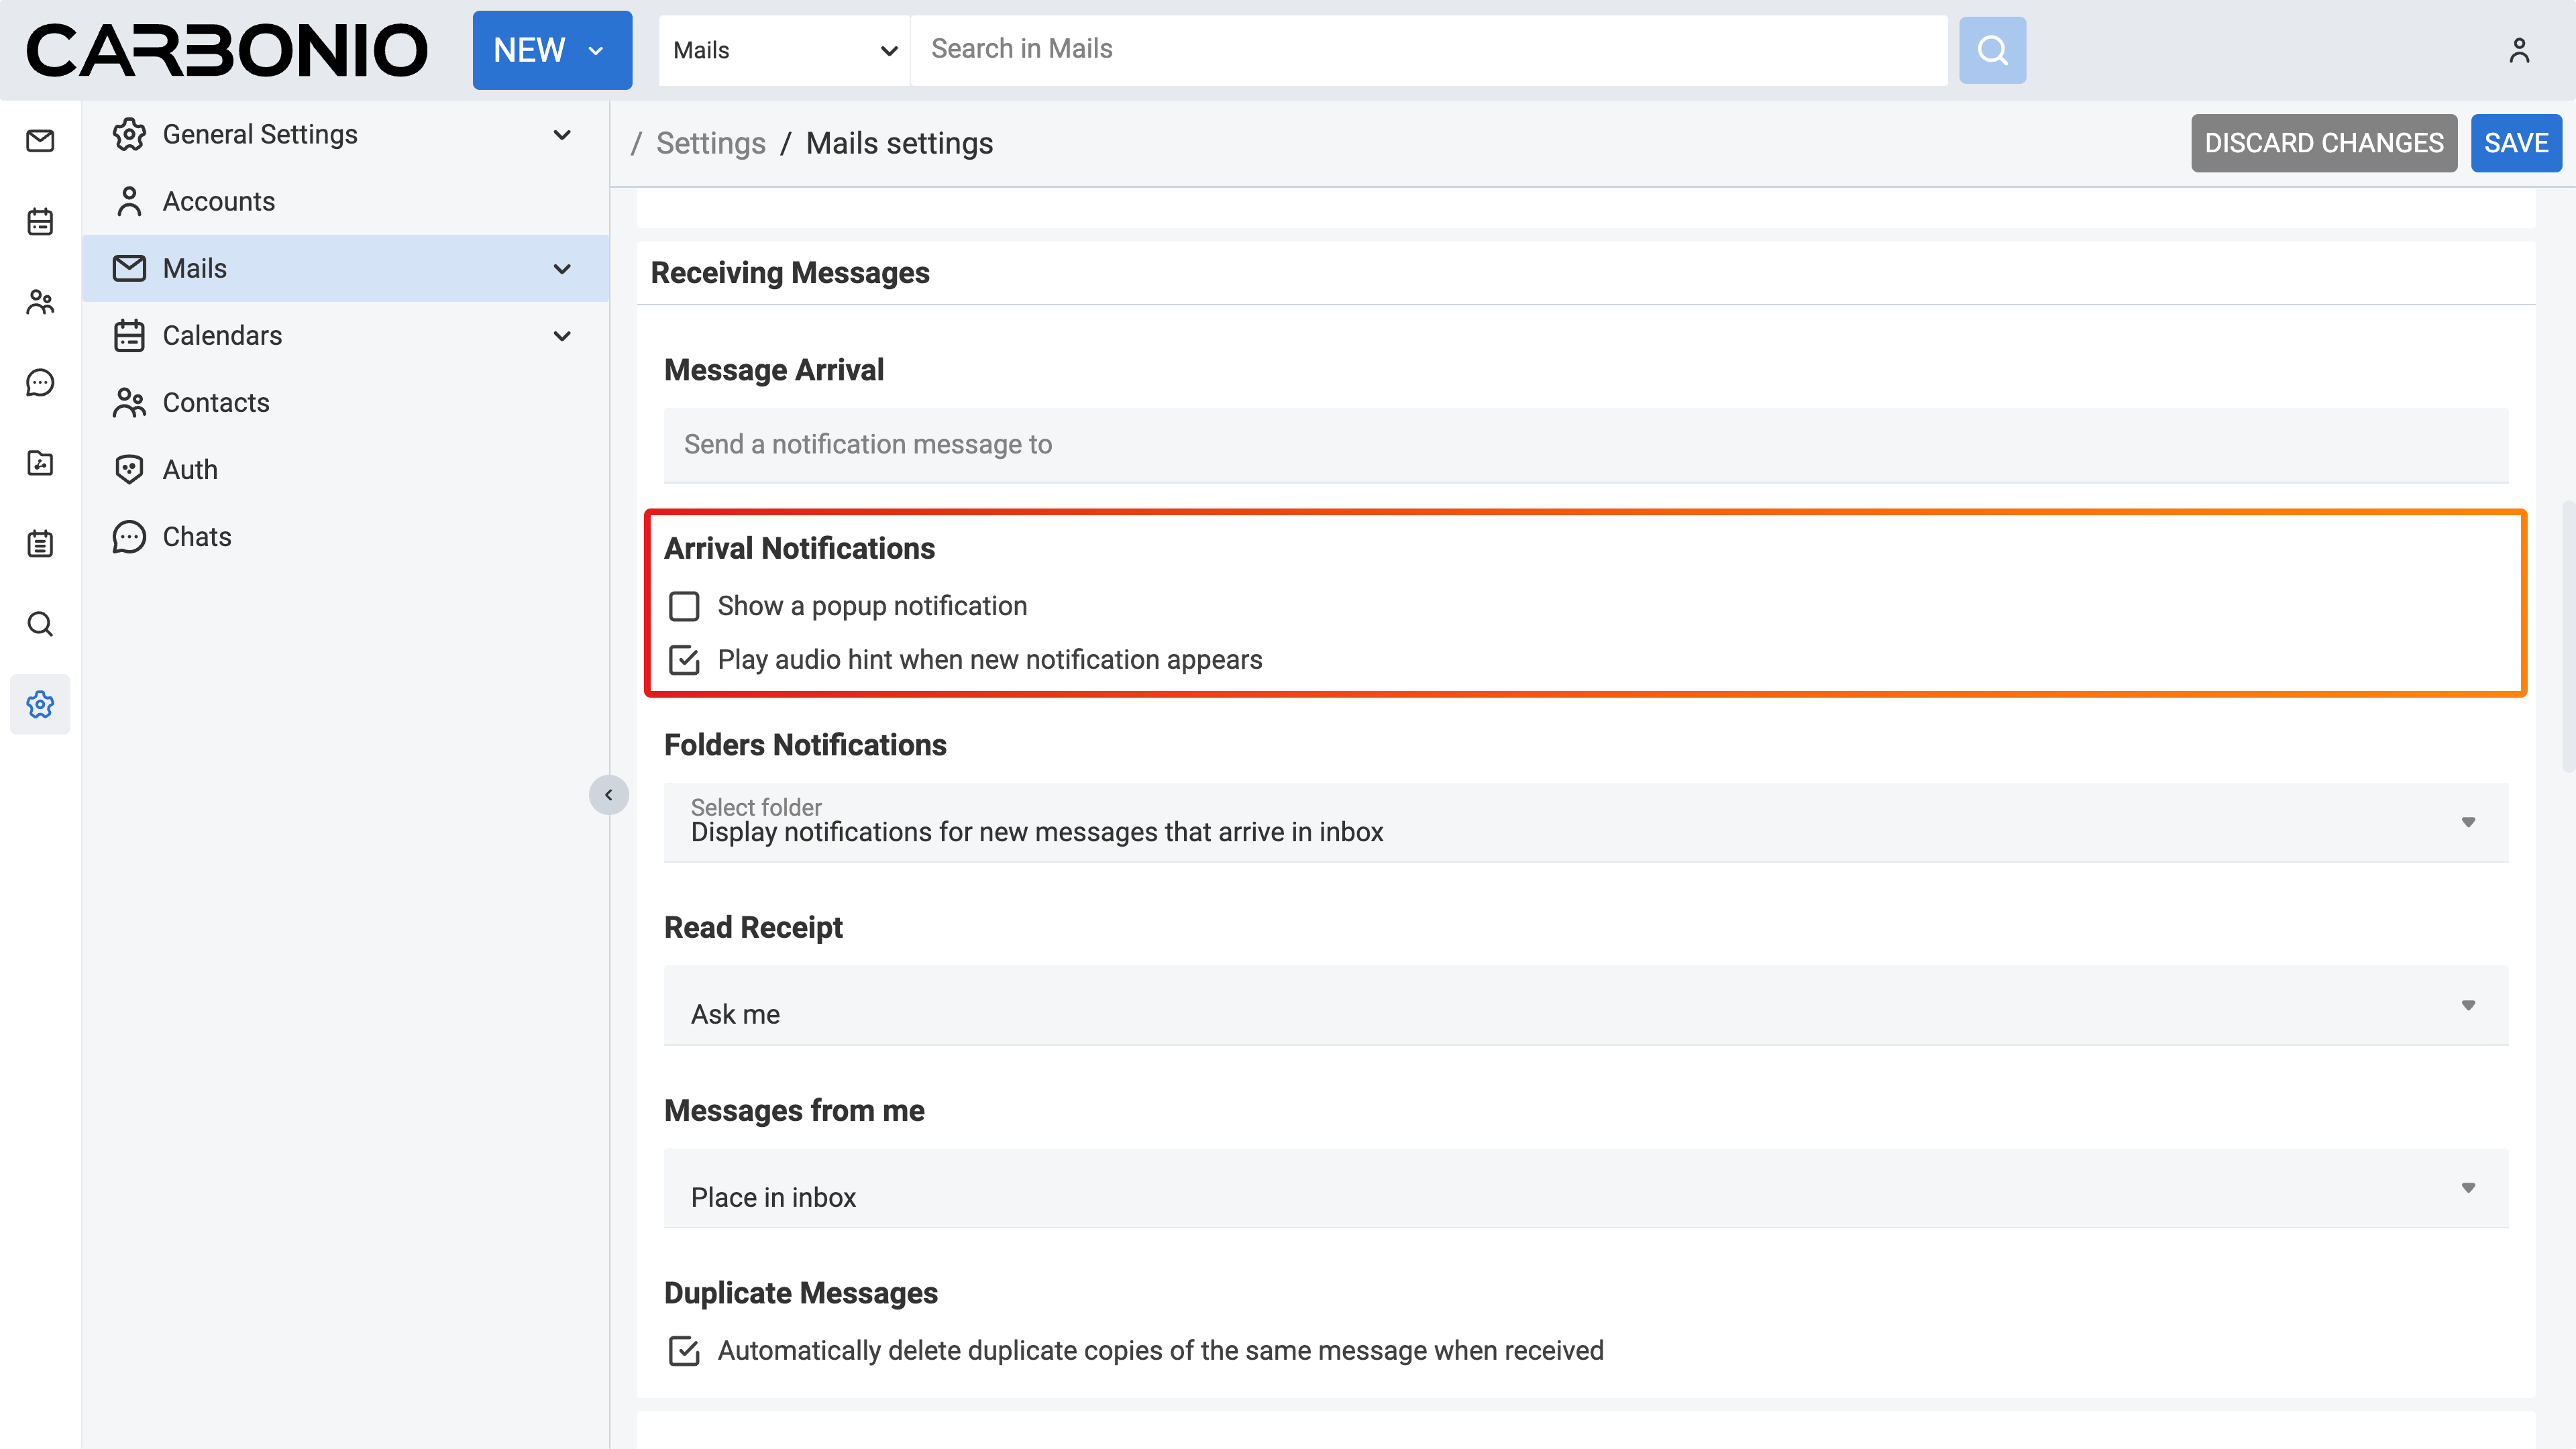
Click on the Settings (gear icon) in the left sidebar.
Select Mails.
Under Arrival Notifications, you will see different notification options.
Check the box for Show a popup notification if you prefer a window pop-up when receiving a new email.
Check the box for the Play audio hint when new notification appears if you prefer an audible notification for incoming emails.
Click the SAVE button in the top right corner.
Receiving Notifications via Another Email Address#
You can customize your email preferences to receive notifications at another email address when you receive an email in your Carbonio inbox. This option can be particularly beneficial if you do not receive a high volume of emails to this account, but those you do receive require prompt attention. Unlike the email notifications mentioned in the previous section, for this feature, you do not need to keep your Carbonio webmail open.
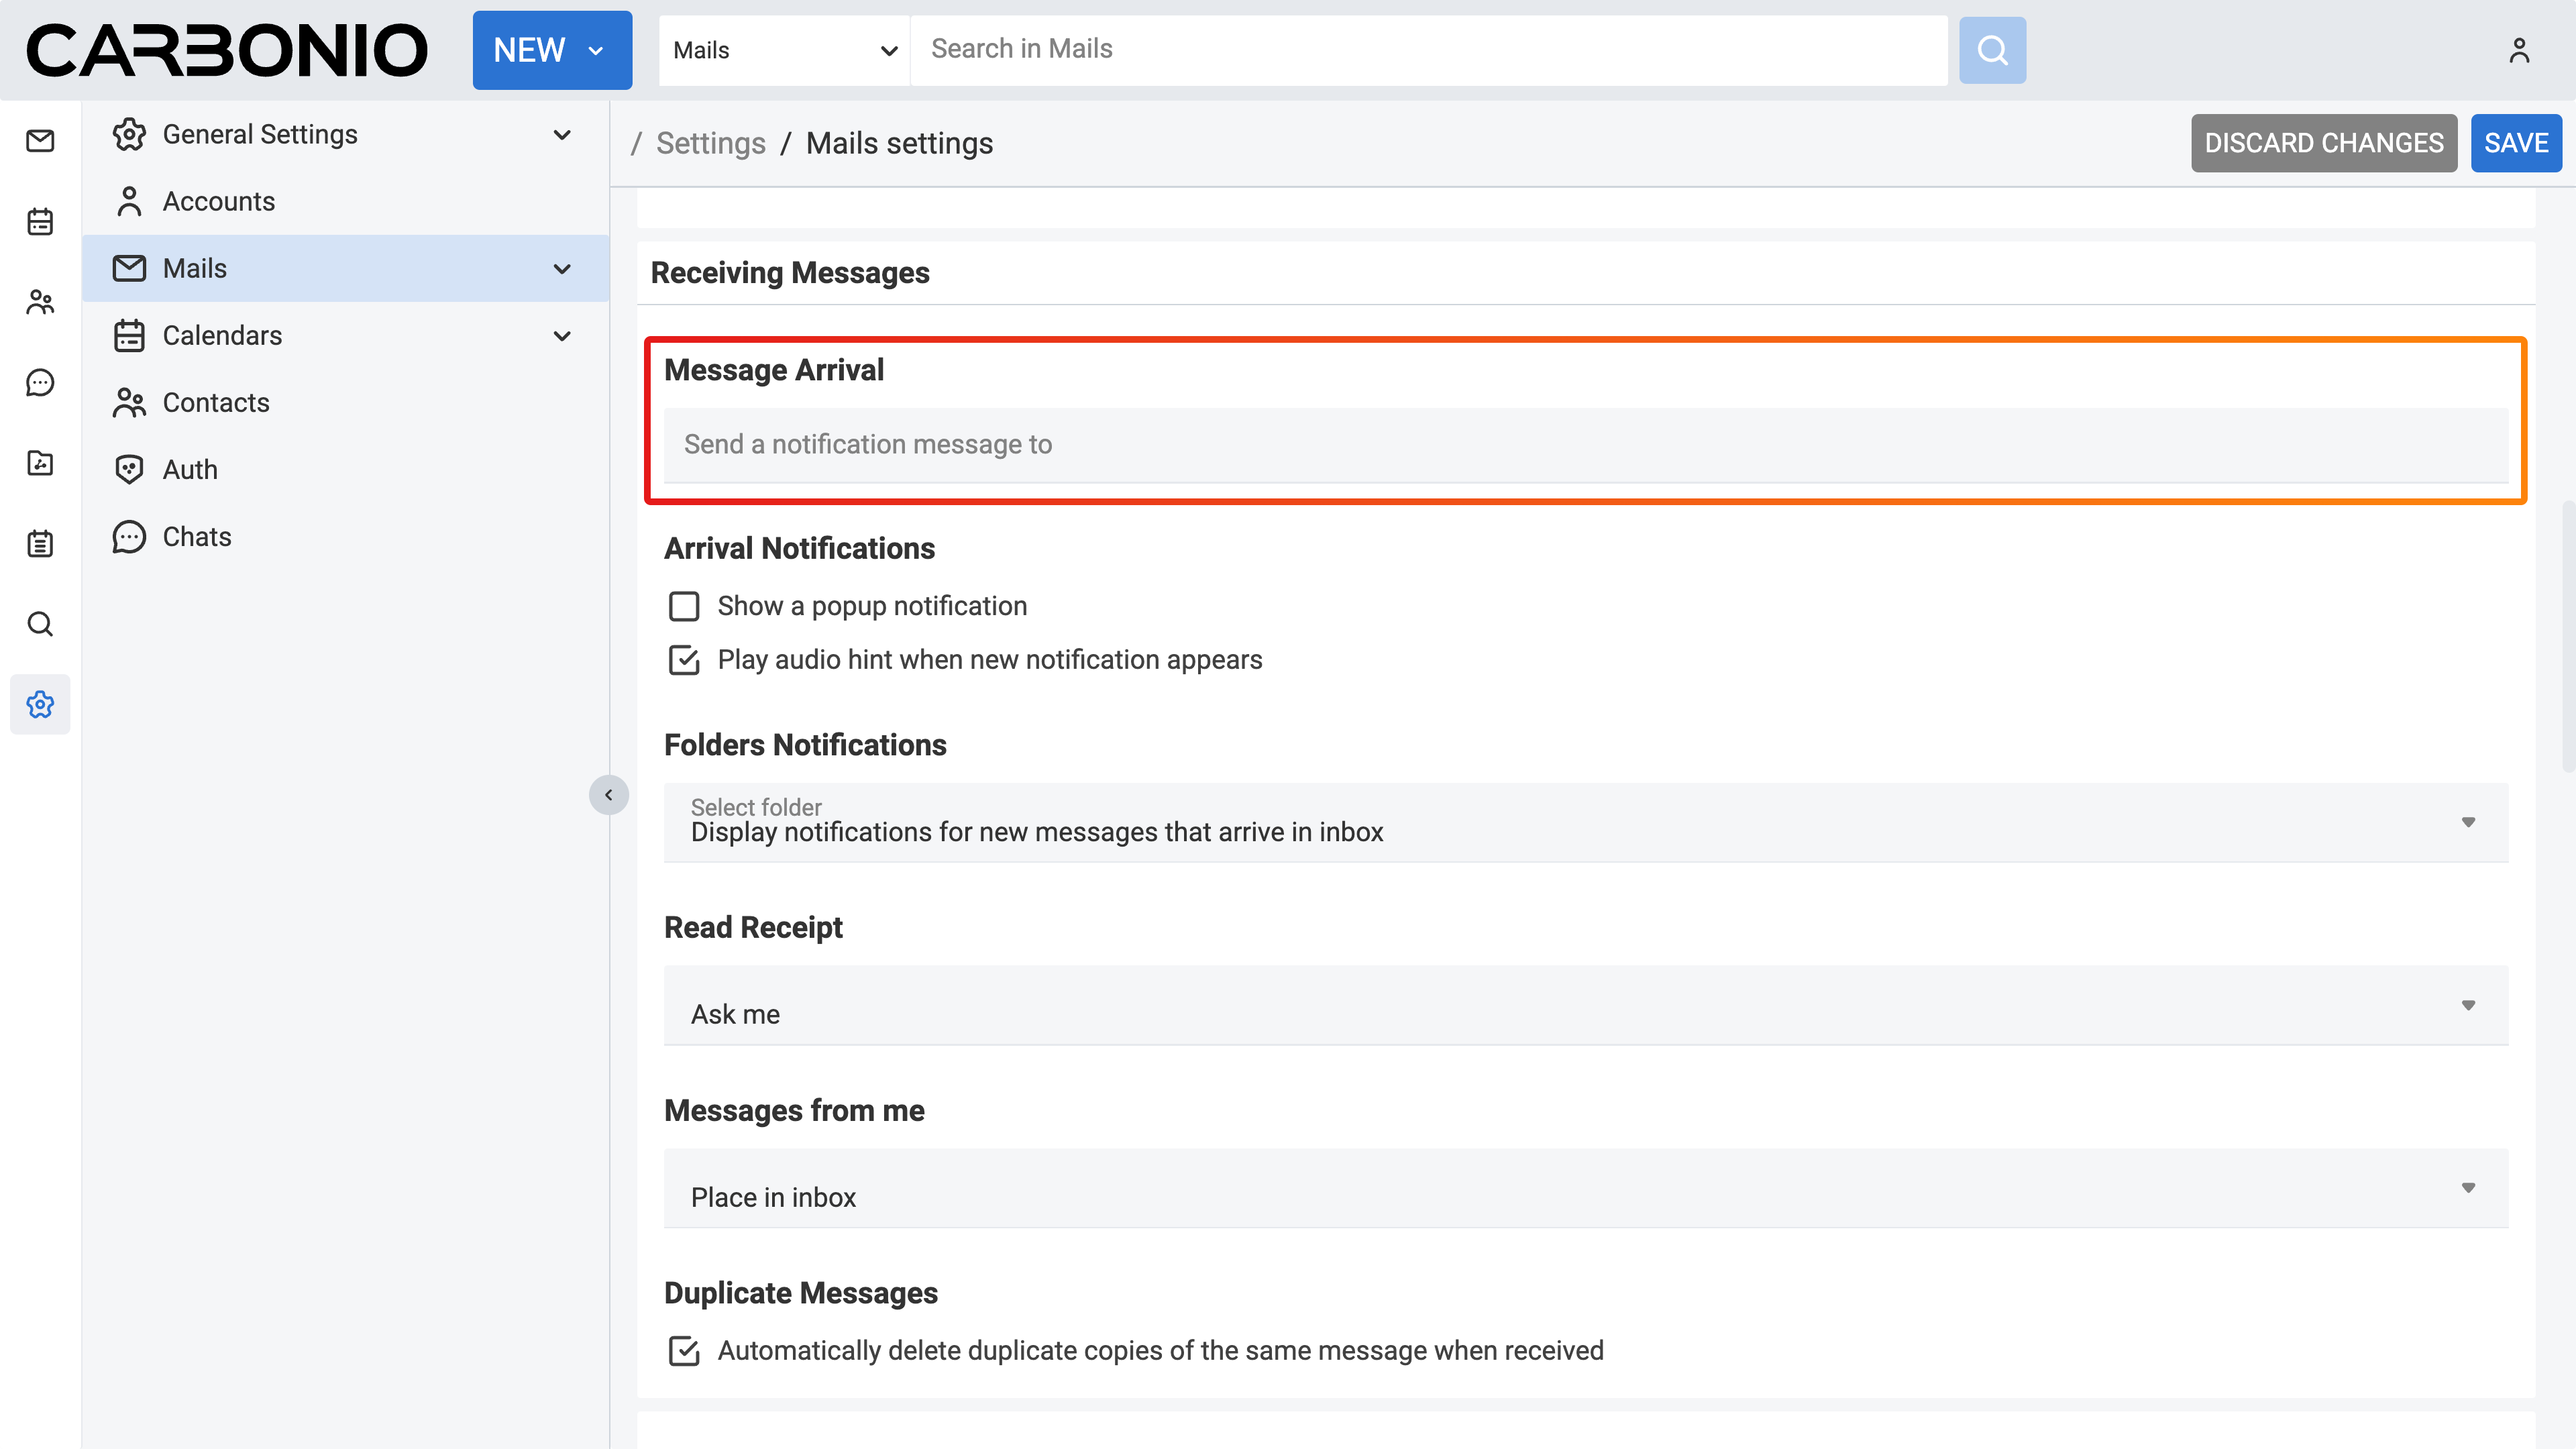
Click on the Settings (gear icon) in the left sidebar.
Select Mails.
Under Message Arrival, insert another email address (e.g., your Gmail address).
Click the SAVE button in the top right corner.
Going forward, you will receive an email notification on your Gmail account whenever a new email arrives in your Carbonio inbox.
Marking an Email as Spam#
Most unsolicited automated emails, commonly referred to as spam or junk mail, are filtered by a spam filter before they reach your Inbox. Emails that are potentially junk but not definitively identified as such are directed to your Junk folder. You have the option to review these messages and either move them out of the Junk folder or delete them. If left untouched, these messages are automatically removed after a certain number of days, as determined by your system administrator. If you find yourself inundated with a significant volume of unwanted emails, it is advisable to reach out to your system administrator. Marking such emails as spam automatically helps Carbonio in refining the spam filtering process.
Right-click on the email you wish to mark as spam.
From the menu that appears, select Mark as spam.
Your email will be automatically moved to your Junk Folder.
Removing Spam Emails#
If you do not take action to remove your spam emails, they will be automatically purged after a certain period, as determined by your system administrator. To remove your spam emails:
Click on the Mails in the left sidebar.
Right-click on the Junk folder.
Select Wipe Folder from the menu.
If you need to remove a specific spam email, you can easily right-click on the email and select Delete.
Marking Email as Not Spam#
Occasionally, emails that are not junk may end up in the Junk folder. In such cases, you can manually move these emails to the appropriate folder.
Go to your Junk folder.
Right-click on the email you wish to mark as not spam.
From the menu that appears, select Not spam.
Your email will be automatically moved to the intended folder.
Finding the Origin of an Email#
The transportation history of emails serves various purposes, including verifying authenticity, investigating delivery issues, detecting phishing attempts, debugging email server configurations, ensuring compliance, and fulfilling legal requirements. This information is typically displayed on a text page, including the email header (also called envelope information) and the email body. The email header contains vital details about the email’s journey, such as sender and recipient IP addresses, timestamps, and any spam detection information.
To trace the email’s origin, follow these steps:
Right-click on the email.
Select Show original.
A new window will open, displaying the relevant information.
Setting Up Trusted Addresses#
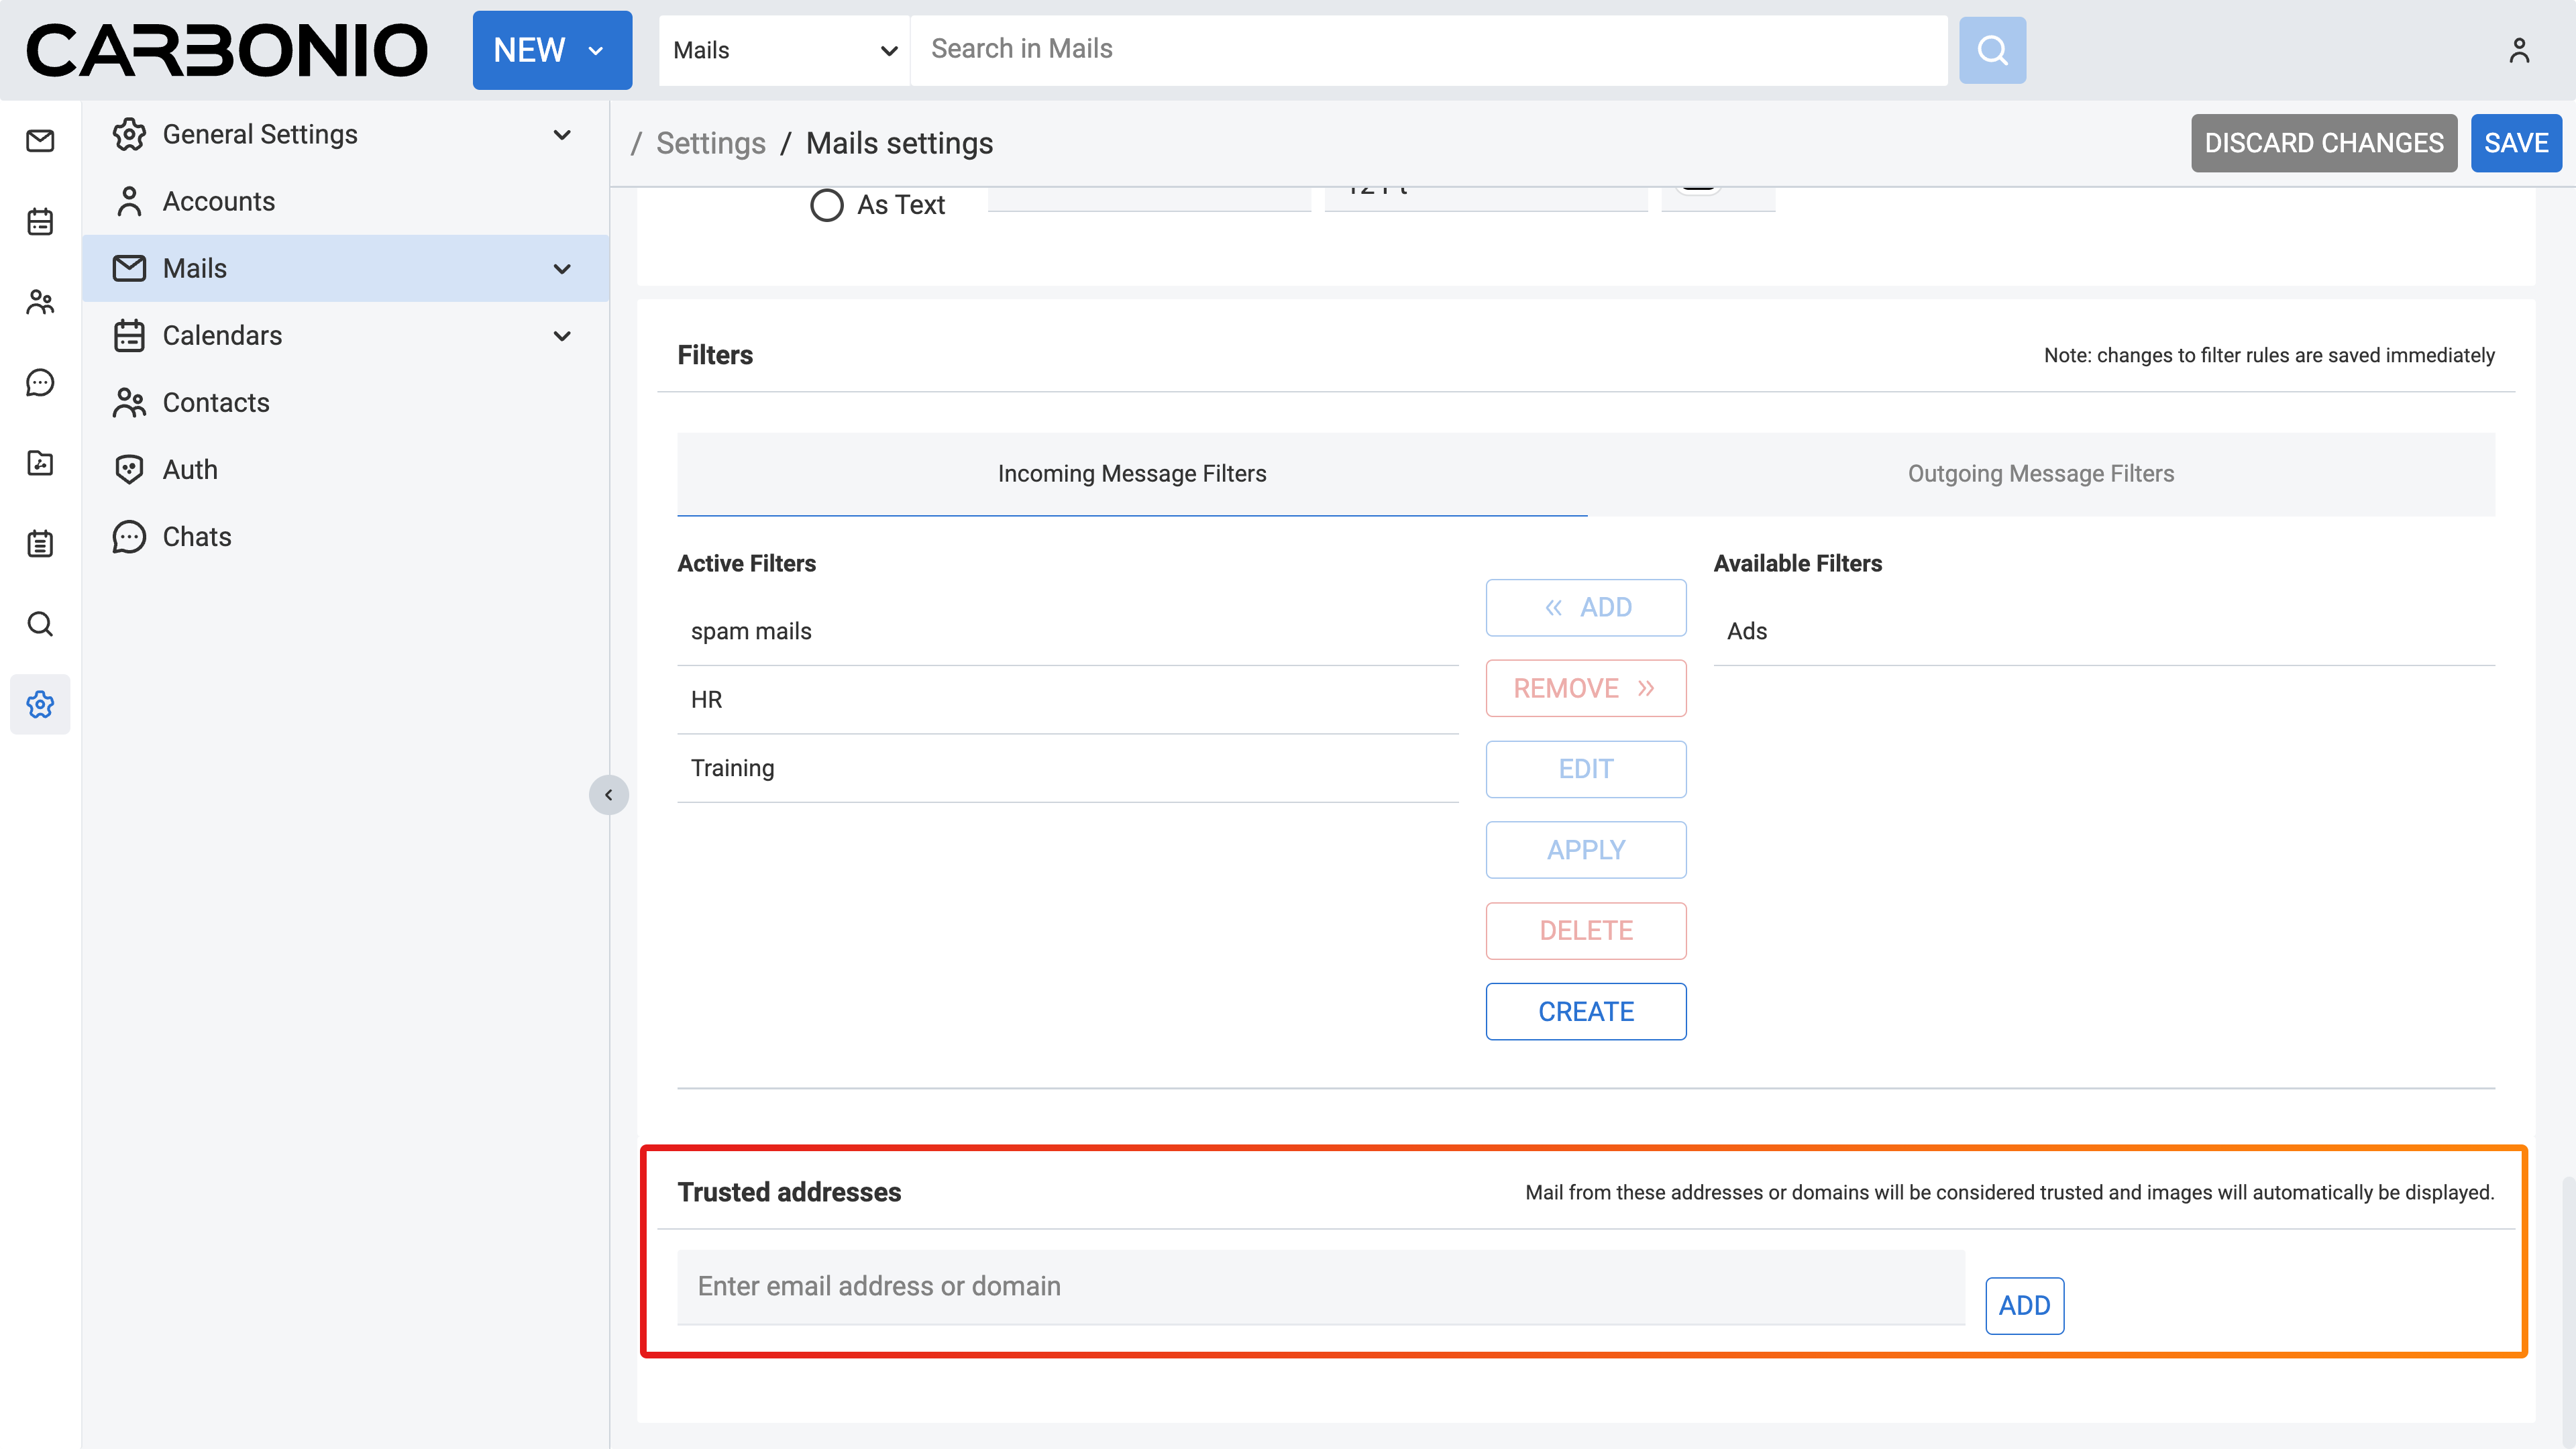
You have the option to designate email addresses from specific domains as trusted addresses (the domain is part of the address after the @ like the yourCompany in . Doing so ensures that any embedded images in emails received from addresses with this domain will automatically display upon opening the email. Here is how to do it:
Click on the Settings (gear icon) in the left sidebar.
Select Mails.
Under Trusted addresses, set email address, or domain name in the provided text box. If you want to trust all addresses from a specific domain, use the entire domain name.
Click the Add button to add the address or domain to the trusted list.
Click the SAVE button in the top right corner.
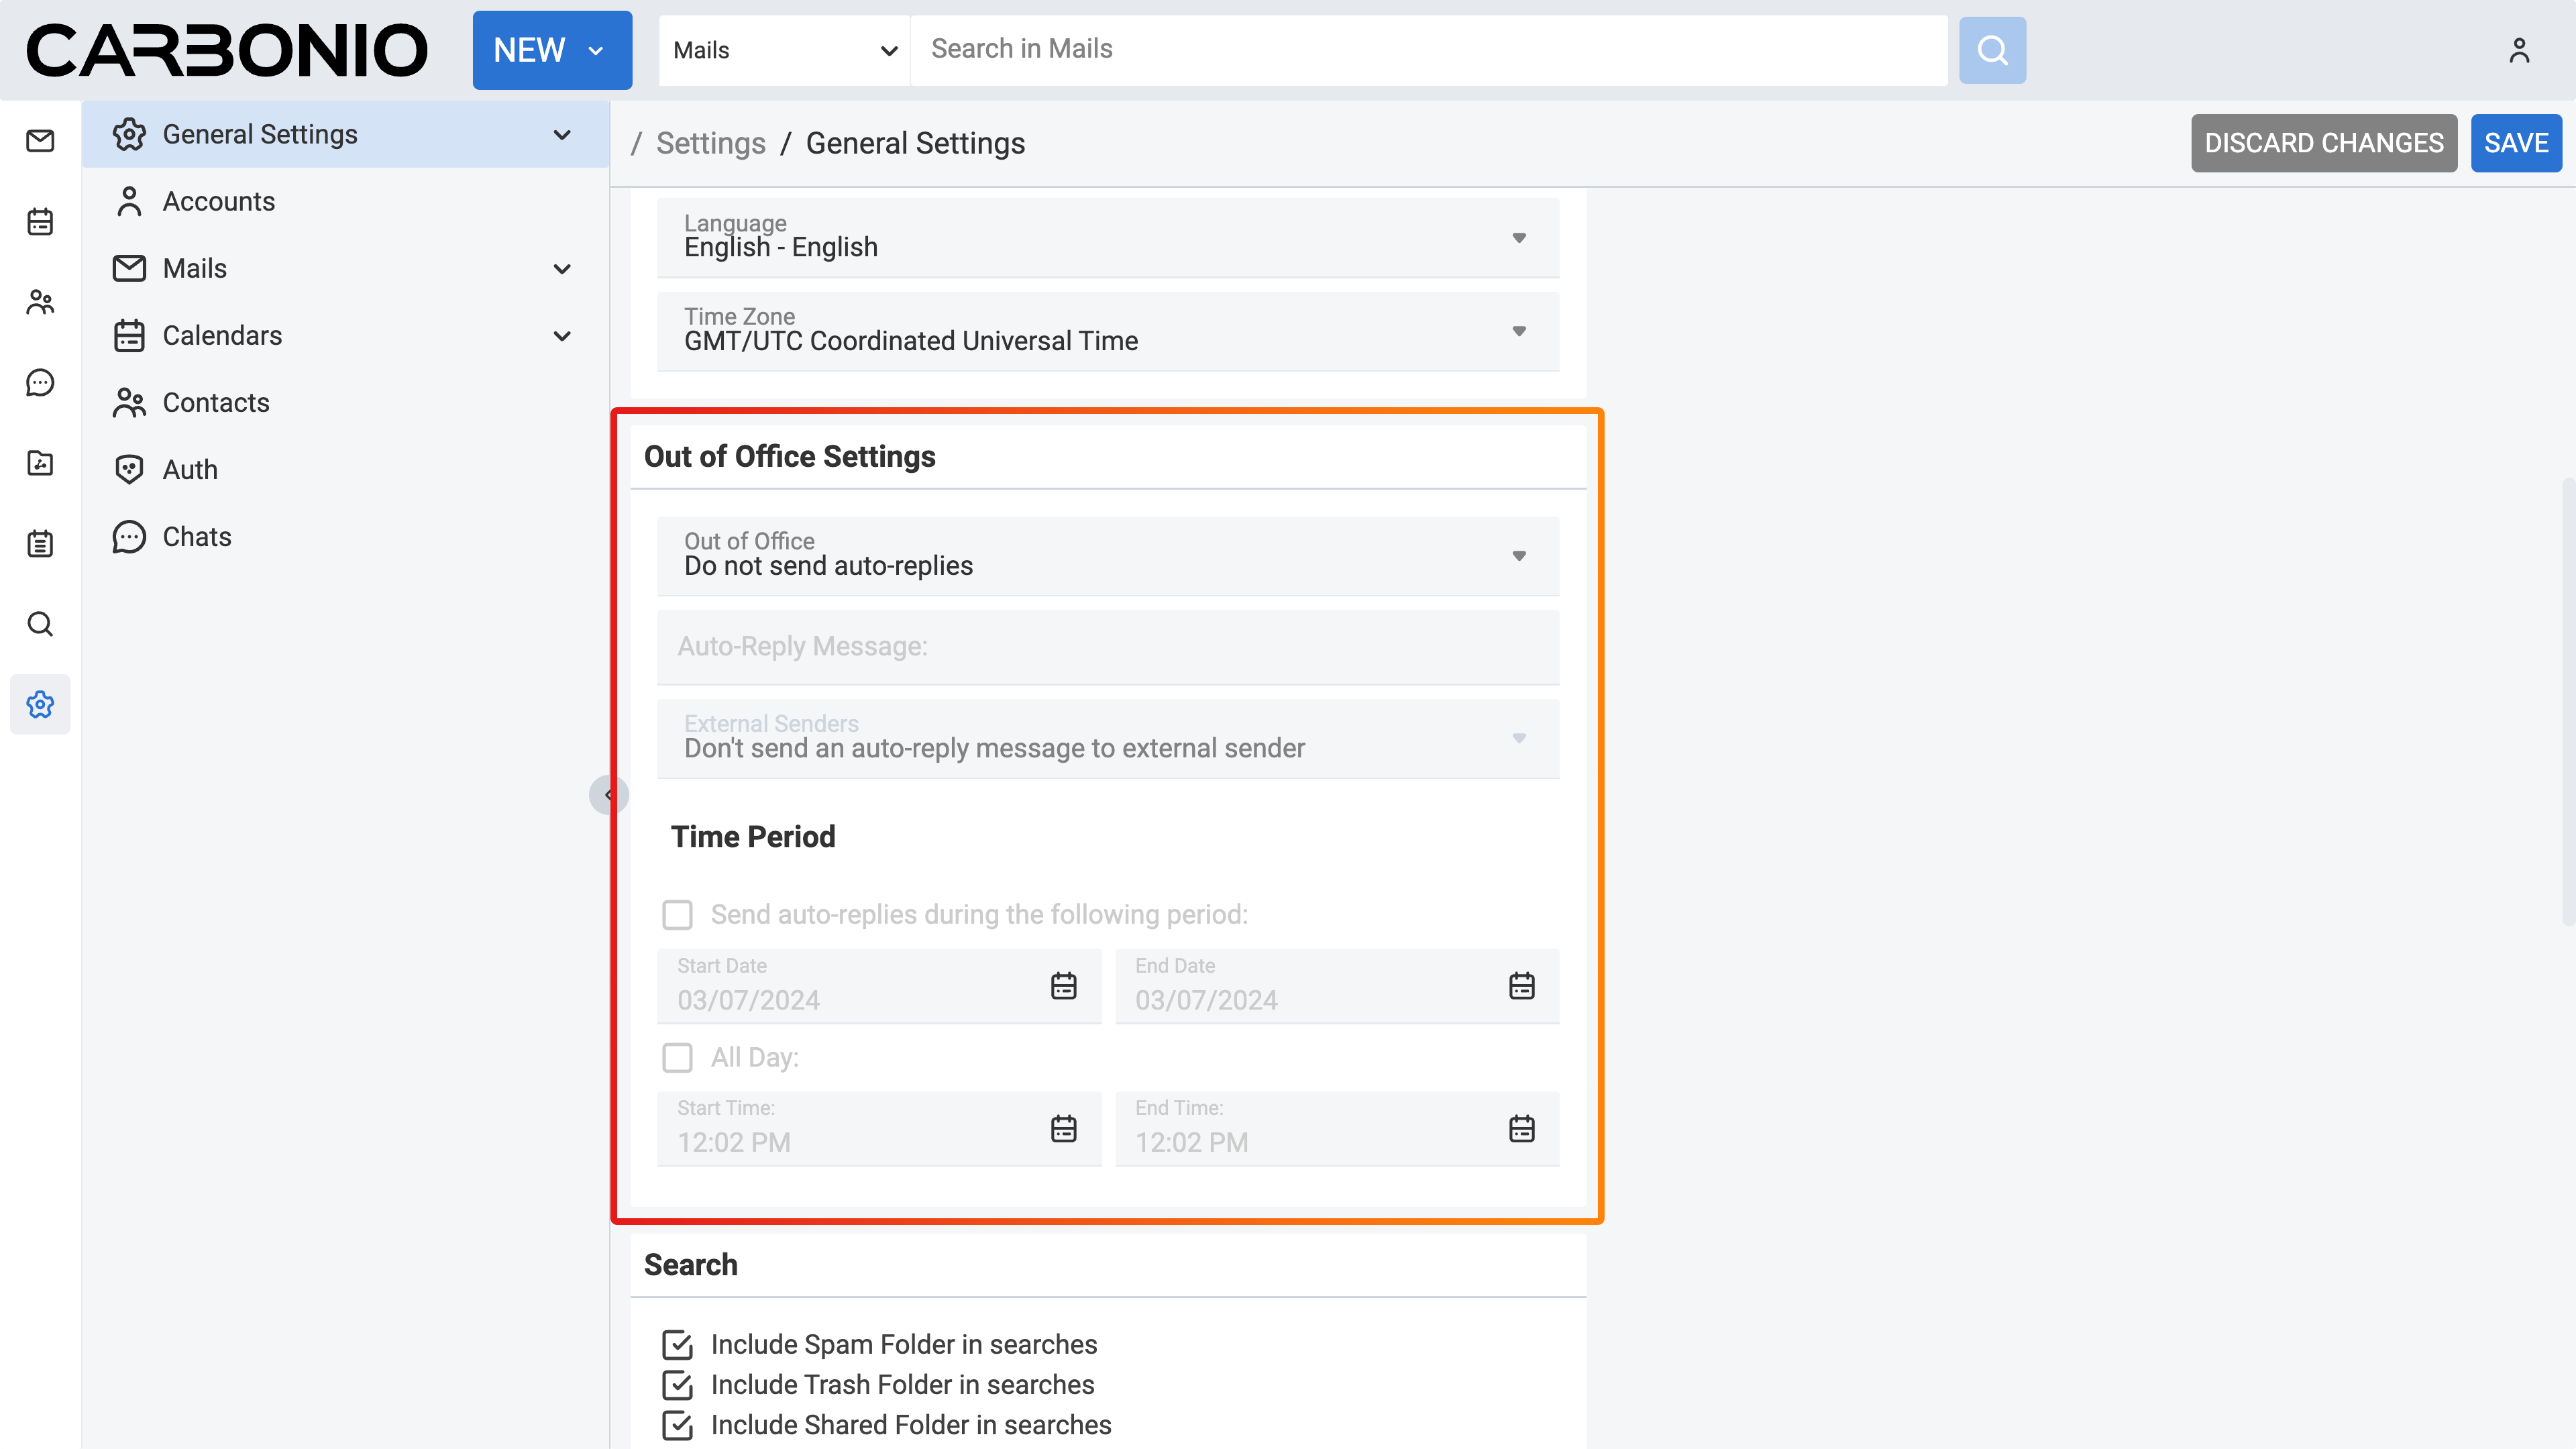
Creating an Out-of-Office Email#
When you are away from the office, setting up an automatic reply can keep colleagues and clients informed. Here is how to set it up:
Click on the Settings (gear icon) in the left sidebar.
Select General Settings.
Under Out of Office Settings, select Send auto-replies from the first drop-down menu.
In the Auto-Reply Message field, type the message you would like to be sent out while you are away.
Select the recipient from the External Senders field.
Under Time Period select Send auto-replies during the following period and select the dates.
Click the SAVE button in the top right corner.
If you prefer to send the out-of-office email only during specific hours of the day, you can customize the interval by selecting All Day and then specifying the desired time frame by choosing the start and end hours.
Showing Emails in HTML or Plain Text Format#
You can view email messages in two formats, HTML, or plain text. HTML messages can have text formatting, numbering, bullets, colored backgrounds, and links, which can make messages easier to read. Plain text messages can always be read by other email clients. Plain text does not support any text formatting, styles, links, or images. You can view a message in plain-text mode even if it contains HTML. The HTML tags are displayed in the body of the message in the plain text view.
Click on the Settings (gear icon) in the left sidebar.
Select Mails.
Under Displaying Messages, click on the Display mail field.
From the drop-down menu, select As HTML or As text.
Click the SAVE button in the top right corner.
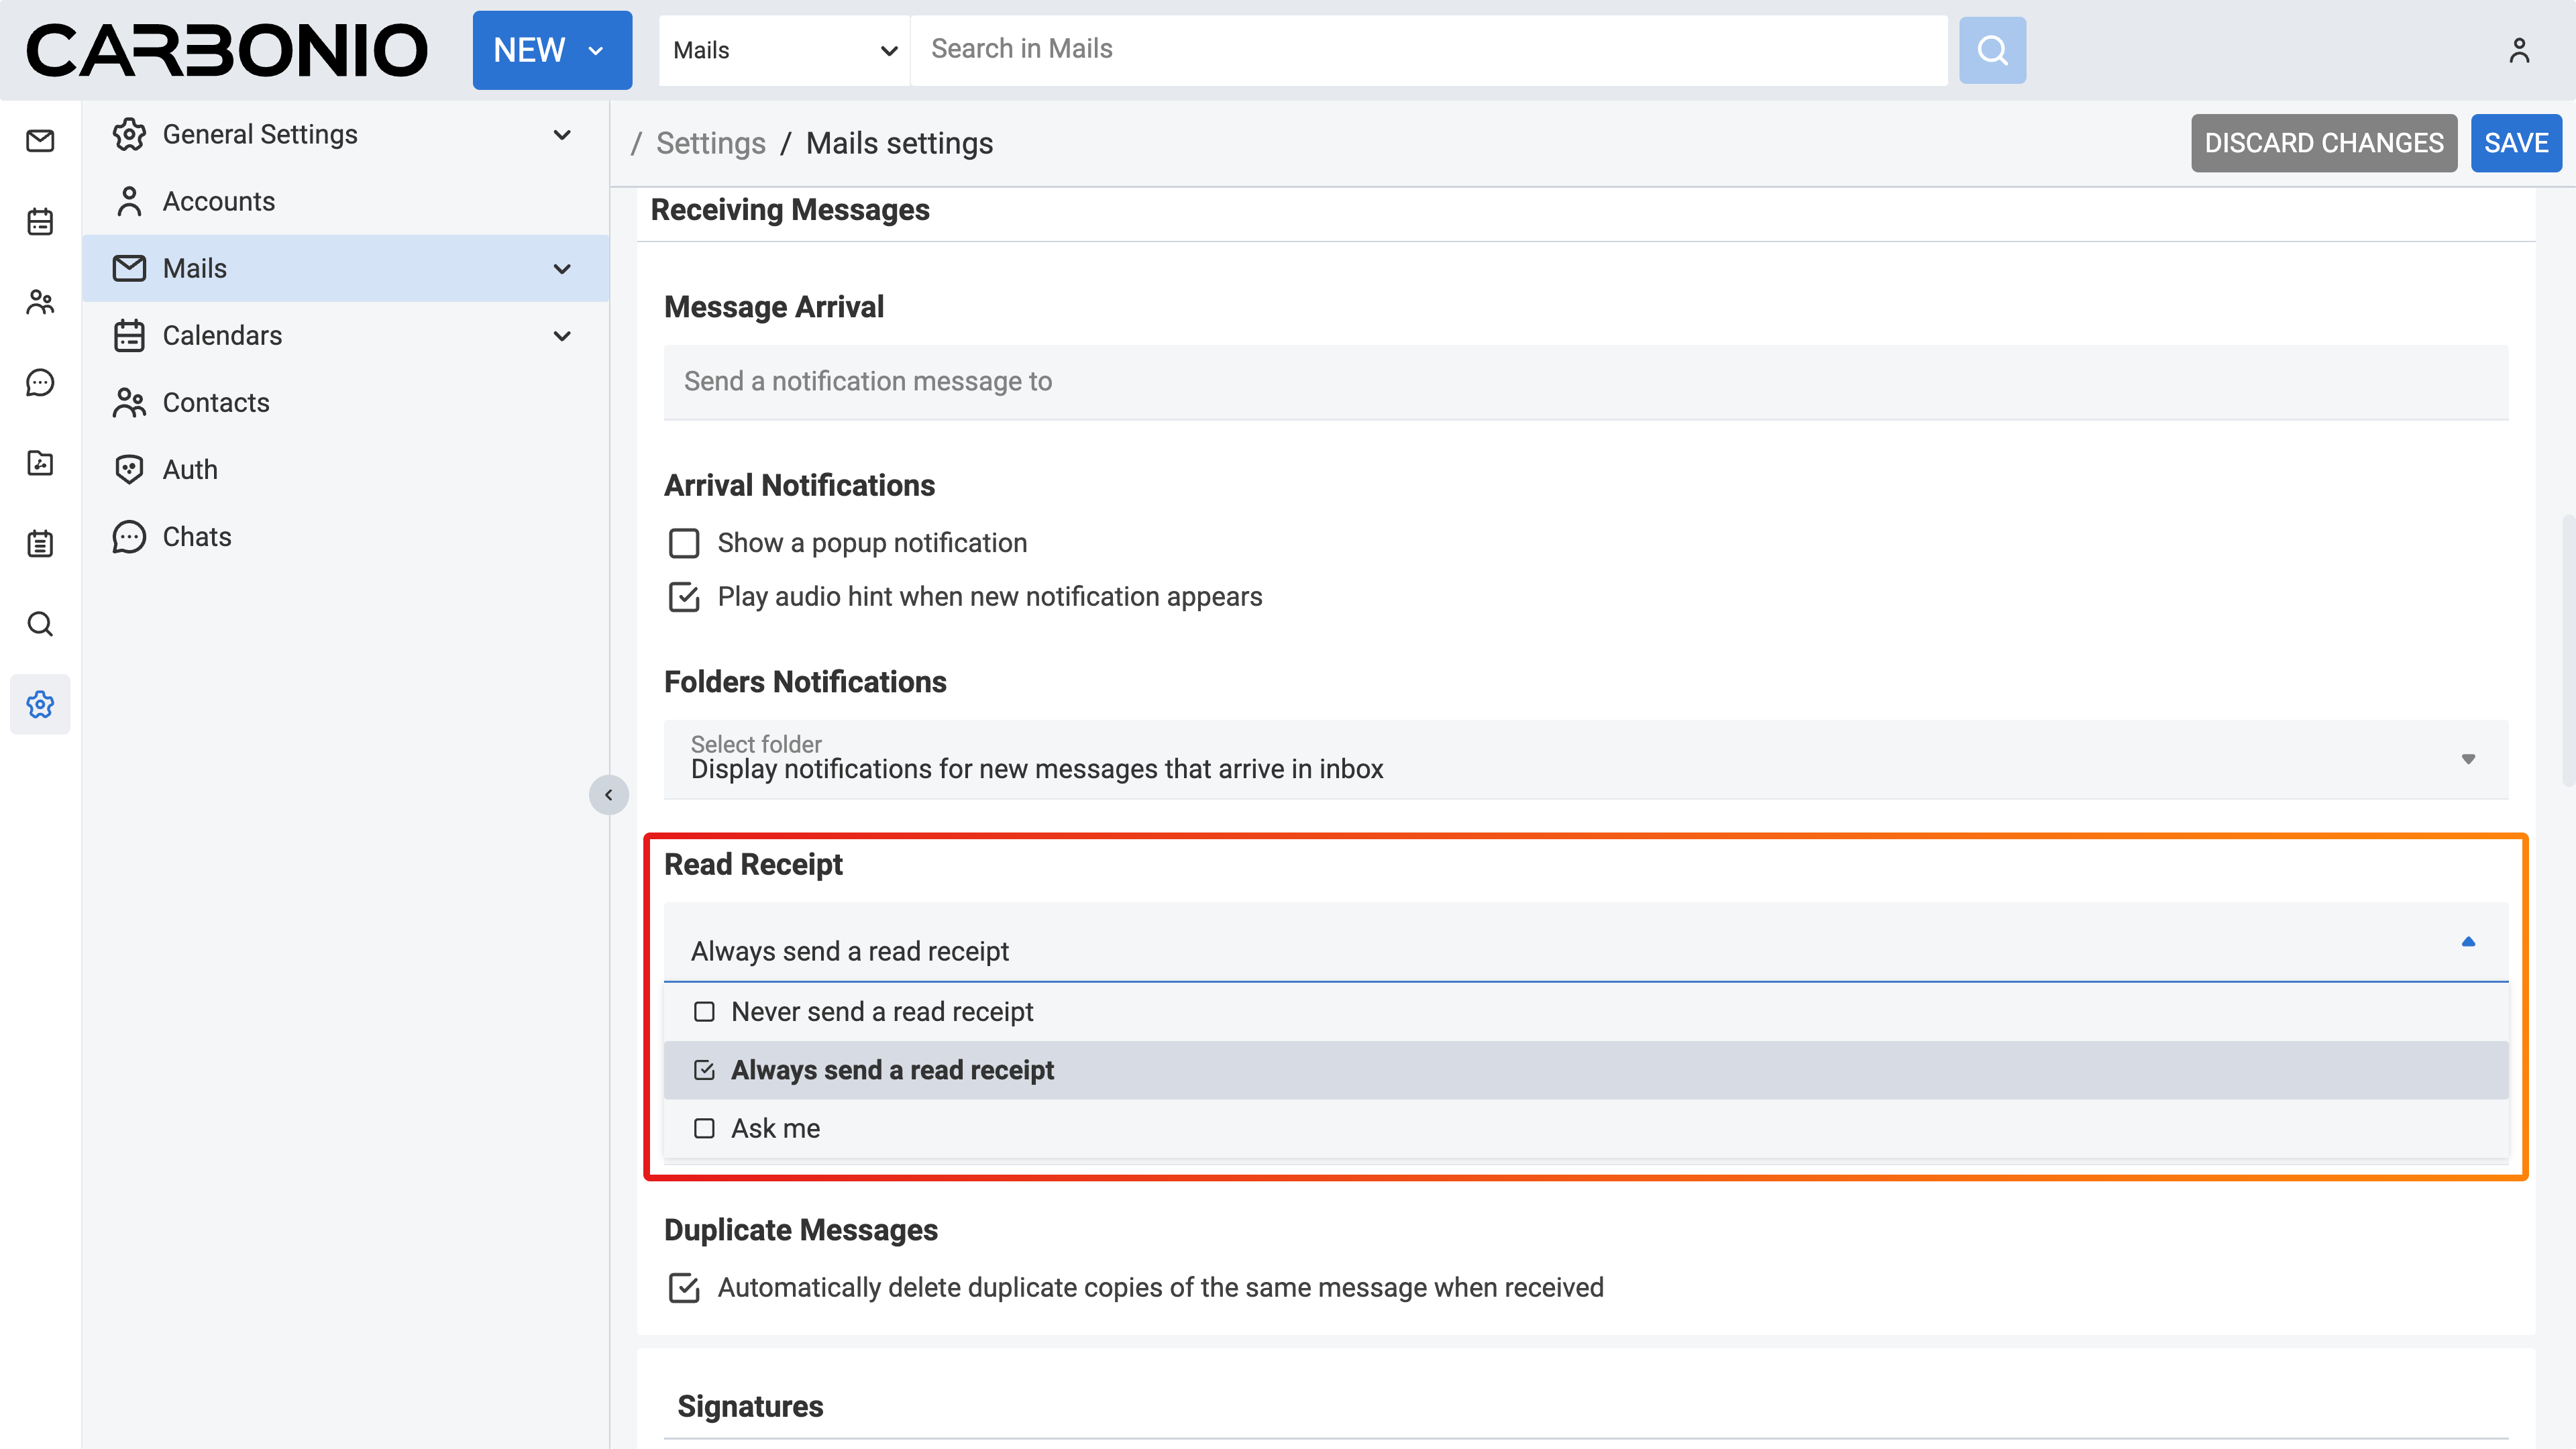
Configuring Read Receipts Behavior#
When sending messages to other Carbonio users, you can choose to request a return receipt, which notifies you when the recipient opens your email. However, for this feature to function, the recipient must have the read receipt feature enabled or manually accept it as soon as they open the email.
To enable the read receipt feature:
Click on the Settings (gear icon) in the left sidebar.
Select Mails.
Under Receiving Messages, click on the Read Receipt field.
Select Always send a read receipt.
Click the SAVE button in the top right corner.
Alternatively, you can choose the option Never send a read receipt to ensure it is never sent automatically or select Ask me so that you are prompted each time you open an email with a read receipt request, giving you the choice to send it or not.
Setting Up Email Filters#
You can effectively manage your inbox by utilizing email filters. These filters allow you to set up actions, such as organizing incoming and outgoing emails into specific folders.
A filter consists of specific conditions paired with corresponding actions.
When an email satisfies the specified conditions, the designated actions are triggered.
Conditions can encompass various criteria, such as the subject, sender, or date of the email.
Actions may include moving, tagging, or redirecting the emails.
Some examples are:
Automatically moving incoming emails into designated folders. For instance, emails from your supervisor can be automatically routed to your “Management Directives” folder upon arrival.
Tag specific emails for easy identification. For example, emails from the corporate events mailing list can be labeled with an “Events” tag.
Redirect or delete emails based on predefined criteria. For instance, all emails from a specific sender can be forwarded or moved to the Trash folder.
Assign importance flags to specific emails.
Filters are applied sequentially, following the order in which they are listed in your settings. You retain the flexibility to modify the order of filters as needed.
Creating a Filter#
You can configure filters independently for incoming and outgoing emails.
To create a filter for incoming or outgoing emails:
Click on the Settings (gear icon) in the left sidebar.
Select Mails.
Under Filters, choose either Incoming Message Filters or Outgoing Message Filters depending on whether you intend to create a filter for emails you receive or emails you send, respectively.
Click CREATE. A new window appears.
Insert a name for your filter in the Filter Name field (e.g., junk mail)
Ensure to mark the Active filter checkbox so the filter becomes operational immediately upon its creation.
Under the Conditions section, select the proper options for the logic of your filter. Press the + button if you need to add more conditions (please refer to the section below titled How to create conditions for guidance on setting up the necessary criteria).
Under the Actions section, choose the appropriate action to be taken if the filter conditions are met. Press the + button if you need to add more actions (please refer to the section below titled How to create actions for guidance on setting up the necessary criteria).
Check or uncheck the Do not process additional filters checkbox to determine whether this filter rule, when its conditions are met, will prevent the execution of any other rules. Enabling this option means that once this filter’s conditions are satisfied, the system will not evaluate any other filters.
Click CREATE.
You can locate your filter under Active Filters, indicating that it is already operational and will be applied to incoming emails.
If you did not select the Active filter on step 6, you will find the filter under the Available Filters. To activate it, simply select it and click ADD.
How to create conditions:
Under the Conditions section, you can configure various fields. These fields determine the conditions that must be met for your email filter to execute the specified action.
If field: In this field, you can specify whether Any or All conditions need to be matched for the filter rule to be executed.
First field: This field contains multiple values. i.e.
From: Specifies the sender’s email address.
To: Specifies the recipient’s email address.
Cc: Specifies the email addresses listed in the “Cc” field.
To or Cc: Specifies email addresses in either the “To” or “Cc” fields.
Subject: Specifies keywords or phrases found in the email subject.
Message: Specifies email properties, such as those involved in conversations I’ve participated in.
Size: Specifies the size of the email in kilobytes.
Date: Specifies the date the email was sent or received.
Body: Specifies specific content within the email body.
Attachment: Specifies the presence or absence of attachments.
Read Receipt: Specifies whether a read receipt has been requested or received.
Address In: Specifies specific addresses (e.g., sender, or recipient) that exist in the contacts or frequent emails.
Calendar: Specifies events or calendar-related information within the email, such as whether the invitation has been replied to.
Social: Specifies social media-related content within the email.
Header Named: Specifies a custom email header name.
You can choose anything among these values and your next field values will appear accordingly.
Second field: Depending on the value of the first field, you will get to choose values for this field. Let me give you an example. If you choose From as a value in the first field, then in this field you will get the following values to choose. (i.e. Matches Exactly, Does Not Match Exactly, Contains, Does Not Contain, Matches Wildcard Condition, Does Not Match Wildcard Condition). But if you choose Size as a value in the first field, then you will get Under, Not Under, Over, and Not Over as selectable values in this field. Similarly, for all other values of the first field, you will get a different set of values for this field.
Depending on the First field and second field, you may get additional fields with different values.
How to create actions:
Under the Action section, you can configure various fields. These fields determine the actions to be taken if the specified conditions are met. Actions have a few paths to set such as:
Discard: Moves the email into the Junk folder.
Move Into Folder: Transfers the email to a specified folder.
Mark As: Marks the email as read or flagged.
Tag With: Assigns a tag to the email.
Redirect To Address: Redirects the email to the specified email address.
Example:
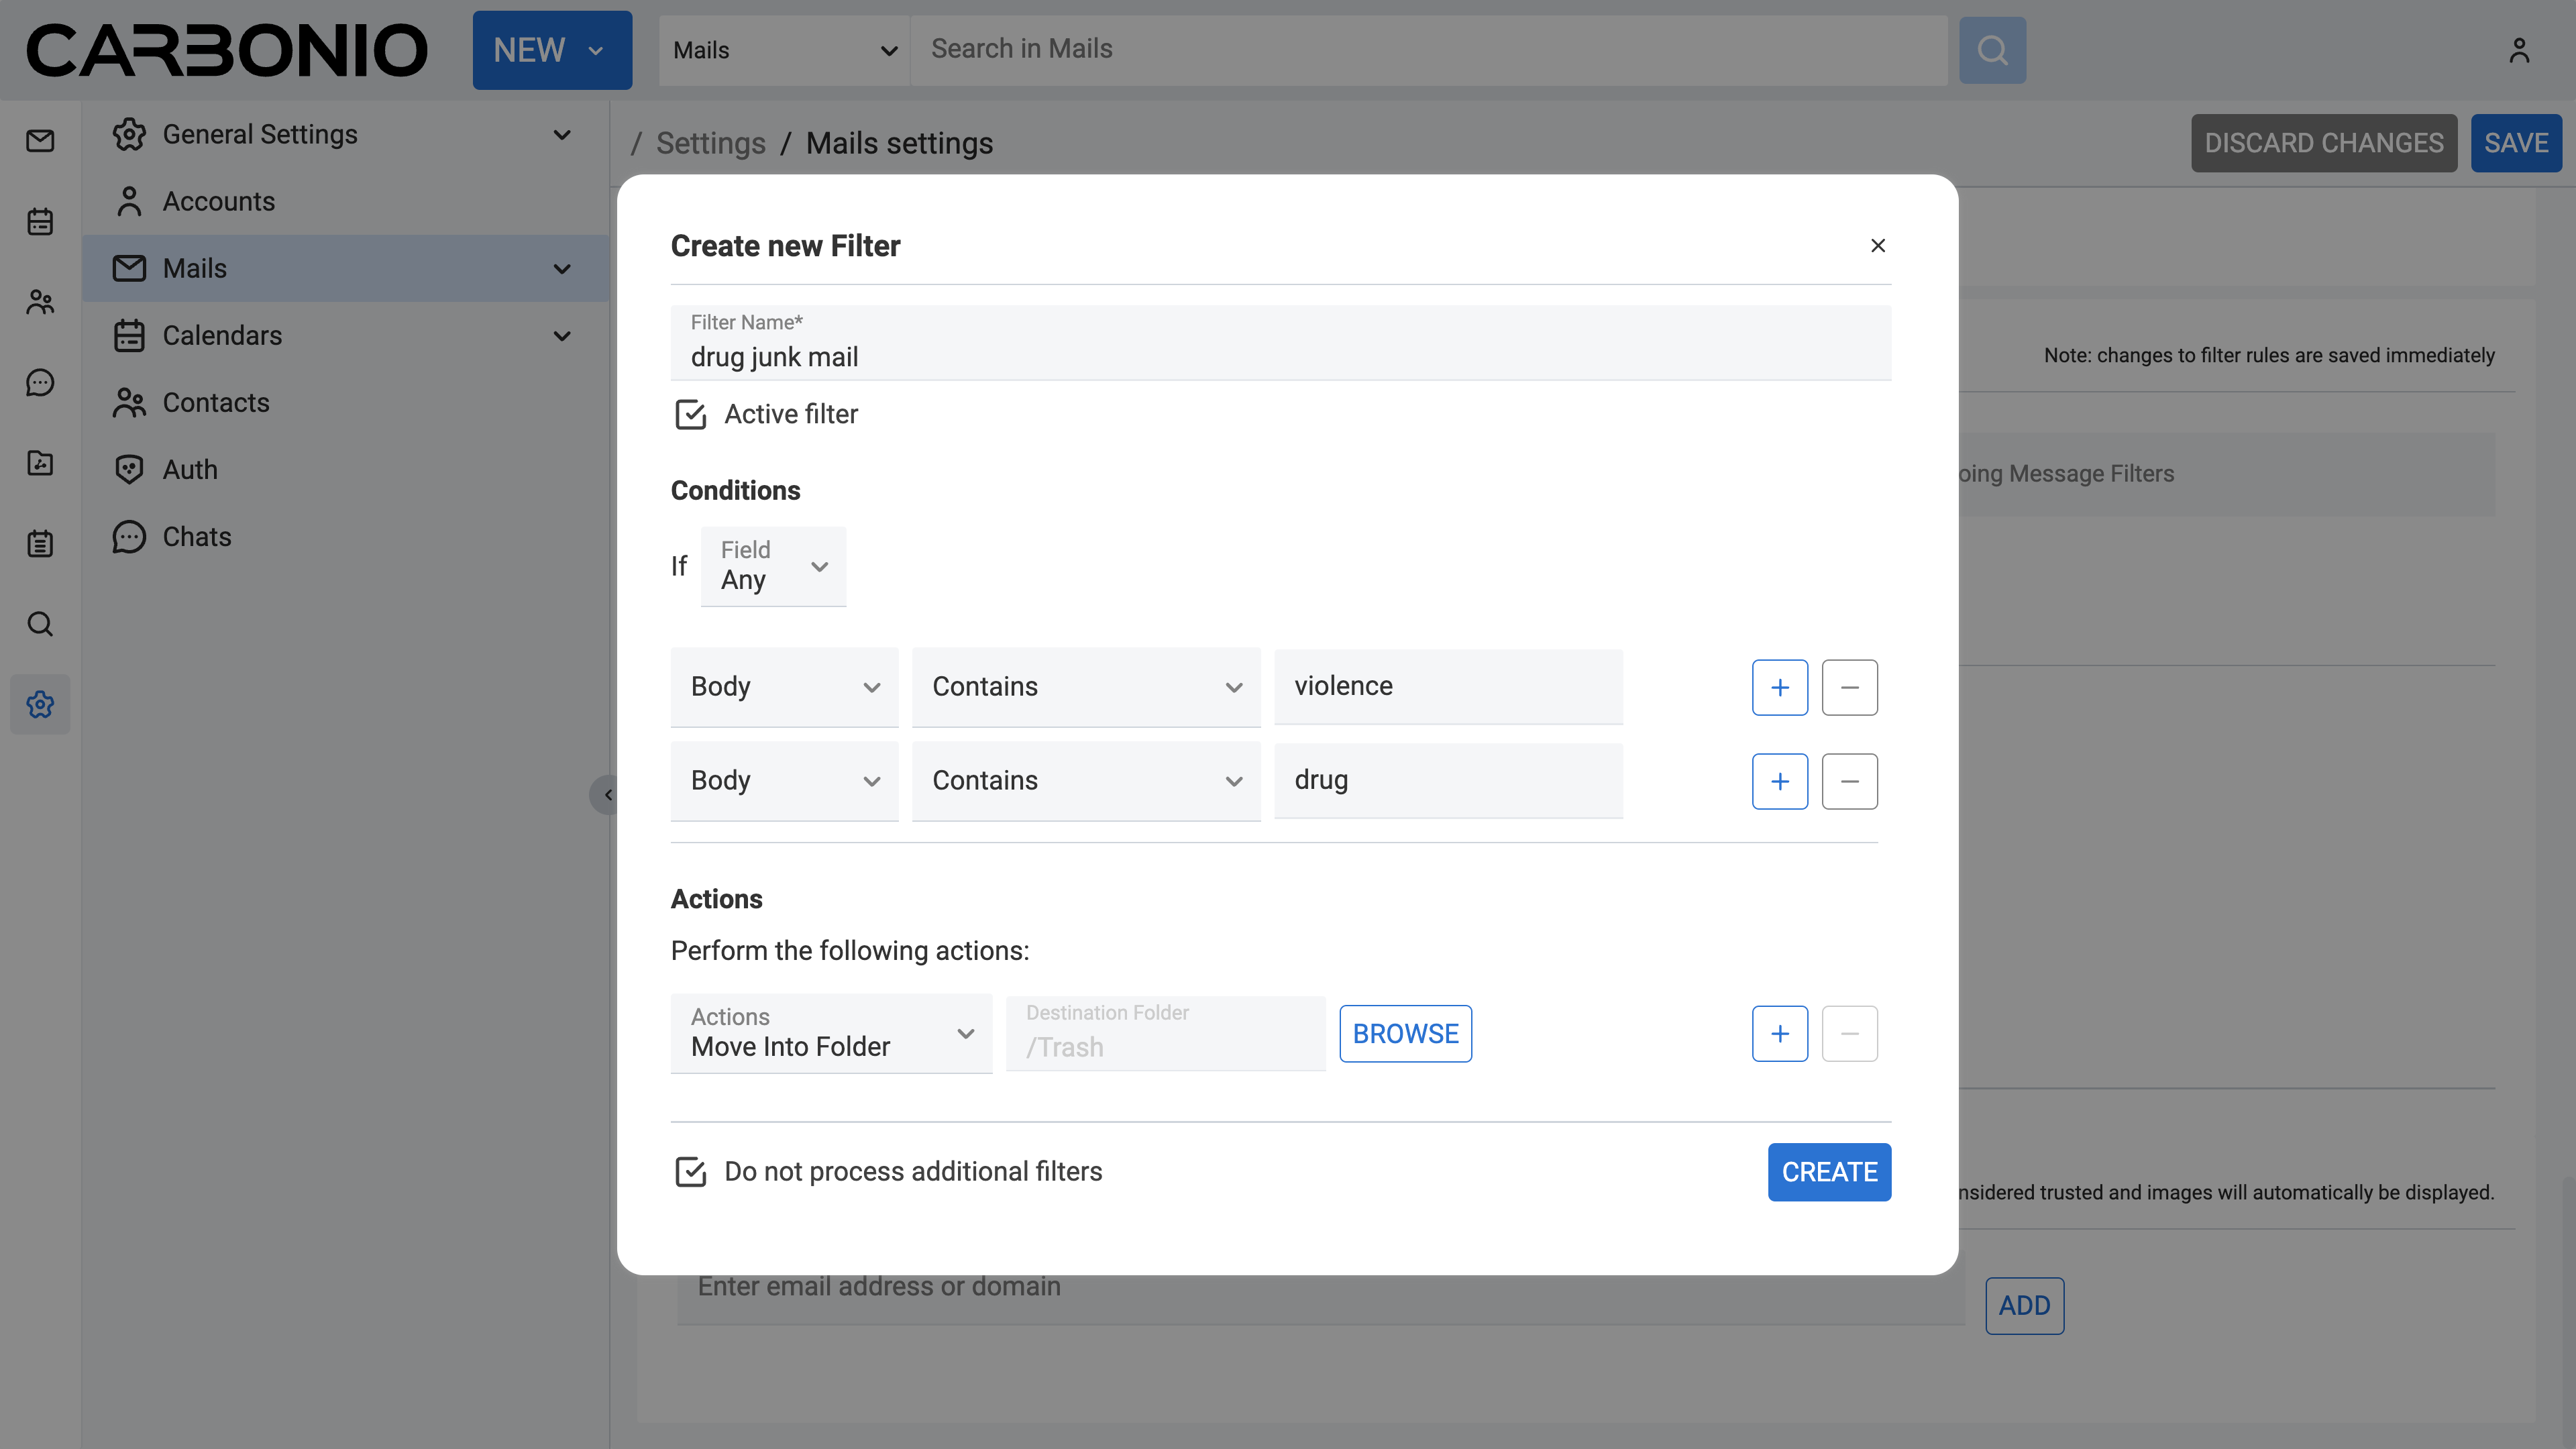
Let’s implement a filter to automatically move incoming emails containing the keywords ‘Drug’ and ‘Violence’ into the Trash folder.
Click on the Settings (gear icon) in the left sidebar.
Select Mails.
Under Filters, choose Incoming Message Filters.
Click CREATE. A new window appears.
Insert a name for your filter in the Filter Name field (e.g., drug junk mail)
Ensure to mark the Active filter checkbox so the filter becomes operational immediately upon its creation.
Under the Conditions section, select Any. We set it to match any condition, meaning if either ‘Drug’ or ‘Violence’ is found in the email, it will be moved to the junk folder.
In the first field, select Body, in the second field, select Contains, and lastly in the third field, write Violence to specify that any email containing the word ‘Violence’ in its body should trigger the filter.
Click on the + button to add another condition.
In the first field, select Body, in the second field, select Contains, and lastly in the third field, write Drug to specify that any email containing the word ‘Drug’ in its body should trigger the filter.
Under the Actions section, choose Move Into Folder.
Click BROWSE, and a new window appears.
Select your Trash folder and click CHOOSE.
Check or uncheck the Do not process additional filters checkbox to determine whether this filter rule, when its conditions are met, will prevent the execution of any other rules. Enabling this option means that once this filter’s conditions are satisfied, the system will not evaluate any other filters.
Click CREATE.
Activating/Deactivating a Filter#
When creating a filter, you have the option to mark the Active filter checkbox. If selected, your filter will be placed in the Active Filters section; otherwise, it will be listed under Available Filters.
Active Filters are operational and will be applied to emails automatically. Conversely, filters kept in the Available Filters section are inactive but can be retained for future use. You have the flexibility to move them into the Active Filters section whenever needed.
To move a filter from the Active Filters to the Available Filters, simply select the filter you want to deactivate and click on the REMOVE button. This action will transfer the filter to the Available Filters section, where it will remain inactive until reactivated.
To move a filter from the Available Filters to the Active Filters, simply select the filter you want to activate and click on the ADD button. This action will transfer the filter to the Available Filters section, where it will remain active until deactivated.
Applying a Filter to Existing Emails#
Active Filters are automatically applied to new emails, whereas for managing existing emails, you may need to manually apply a filter. For instance, you can create a filter to move all emails containing the word ‘Violence’ into the junk folder to tidy up your inbox.
This manual application allows you to organize existing emails according to your preferences.
To apply a filter to existing emails, follow these steps:
Click on the Settings (gear icon) in the left sidebar.
Select Mails.
Under Filters, choose Incoming Message Filters or Outgoing Message Filters, depending on where your filter is located.
Select the filter you want to apply from the list.
Click APPLY. A new window will appear.
From the drop-down menu, select the folder you want the filter to be applied to.
Click APPLY to confirm and execute the filter on existing emails.
Note: To avoid server overload, the standard configuration prevents a filter from being applied on a folder with more than 10.000 items.
Editing a Filter#
To edit an existing filter, follow these steps:
Click on the Settings (gear icon) in the left sidebar.
Select Mails.
Under Filters, choose Incoming Message Filters or Outgoing Message Filters, depending on where your filter is located.
Select the filter you want to edit from the list.
Click EDIT. A new window will appear.
Perform your edits, ensuring the filter is set up according to your preferences.
Click SAVE to confirm and apply the changes.
Deleting a Filter#
To delete an existing filter, follow these steps:
Click on the Settings (gear icon) in the left sidebar.
Select Mails.
Under Filters, choose Incoming Message Filters or Outgoing Message Filters, depending on where your filter is located.
Select the filter you want to delete from the list.
Click DELETE. A new window will appear; click DELETE again to confirm and remove the selected filter.
Change Filter Order#
The order of filters determines their application. You have the freedom to adjust the order of filters at any point to influence their priority in processing emails. To change the order:
Click on the Settings (gear icon) in the left sidebar.
Select Mails.
Under Filters, choose Incoming Message Filters or Outgoing Message Filters, depending on where your filter is located.
Select a filter whose order you want to modify.
Click the downward or upward arrow to adjust the position of the selected filter, thereby changing its order in the list.
Account Signatures#
Incorporating an automatic signature at the end of your emails is a common practice. A signature typically comprises your name along with any supplementary text. If you are utilizing a rich text editor, you have the flexibility to format your signature, insert URLs for links, and include graphics. It is also feasible to create multiple signatures to suit various contexts. For instance, you might opt for a formal signature tailored for correspondence with clients, while reserving an informal one for communication with friends. Moreover, if you manage multiple email identities, often referred to as personas, you can devise distinct signatures and allocate them to specific addresses.
Using Signatures#
To ensure that signatures appear in your email, you must switch to the rich text editor while composing.
Follow these steps to toggle the rich text editor on:
Click on the three vertical dots located in the top-right corner of the compose board.
Select Enable rich text editor from the menu that appears.
When a signature is set, it will be visible at the end of the email you are composing. Additionally, you can effortlessly switch between identities /personas by selecting them from the top-left corner of the composing board, automatically applying the respective signatures assigned to each identity/persona.
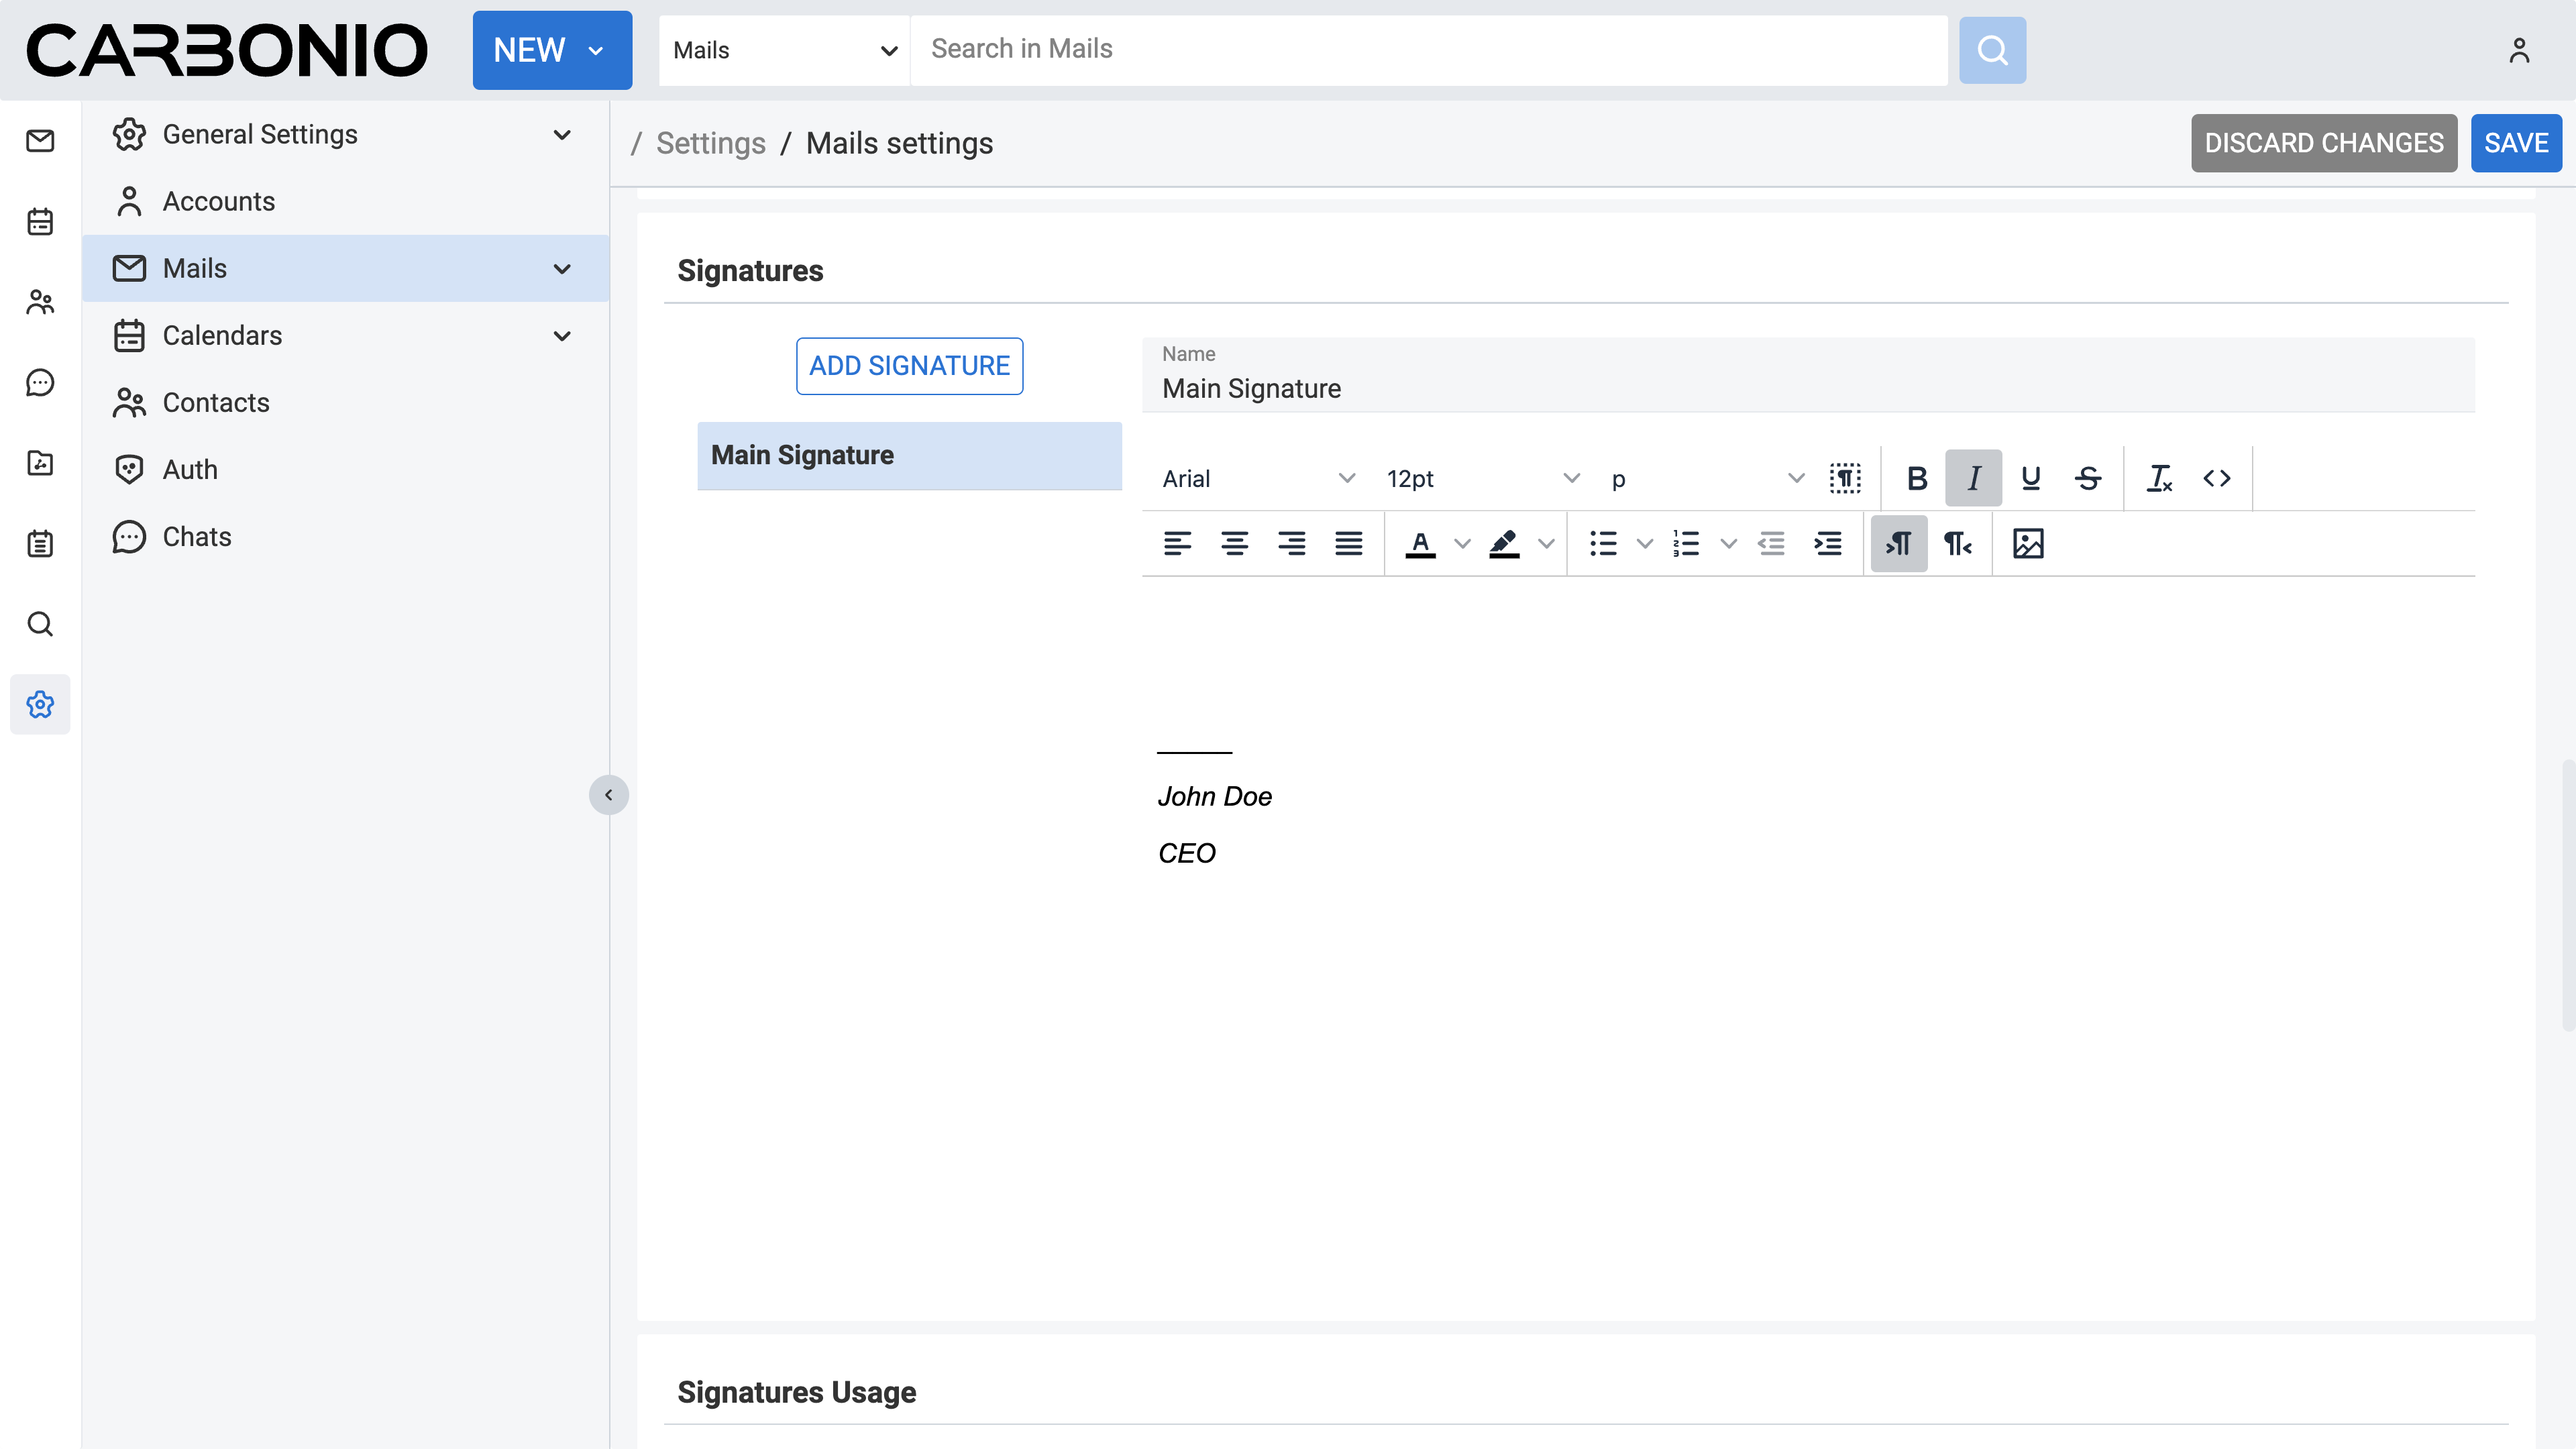
Creating Signatures#
To create a signature:
Click on the Settings (gear icon) in the left sidebar.
Select Mails.
Under the Signatures section, click ADD SIGNATURE.
Provide a name for the signature in the designated field.
Utilize the rich text editor on the right side to compose your signature.
Click SAVE from the top-right corner.
Anything composed in this section will automatically append to the end of your email as shown in the following example:
_____
John Doe
CEO
Editing Signatures#
To edit a signature:
Click on the Settings (gear icon) in the left sidebar.
Select Mails.
Under the Signatures section, click on the signature you want to edit.
Utilize the rich text editor on the right side to edit your signature.
Click SAVE from the top-right corner.
Removing Signatures#
To remove a signature:
Click on the Settings (gear icon) in the left sidebar.
Select Mails.
Under the Signatures section, click on the signature you want to remove.
Hover your mouse cursor over the signature name. A red button labeled DELETE will appear. Click on it, and the signature will be removed.
Click SAVE from the top-right corner.
Assign Different Signatures to Different Identities / Personas#
You can personalize each account persona or identity with a unique signature. This ensures that when selecting an identity/persona while composing an email, the appropriate signature is automatically applied.
To assign each identity/persona a signature:
Click on the Settings (gear icon) in the left sidebar.
Select Mails.
In the Signatures Usage section, choose a signature for each persona/identity from the dropdown menu provided.
Click SAVE from the top-right corner.
You can effortlessly switch between identities/personas by selecting them from the top-left corner of the composing board, automatically applying the respective signatures assigned to each identity/persona.
Changing Signature While Composing An Email#
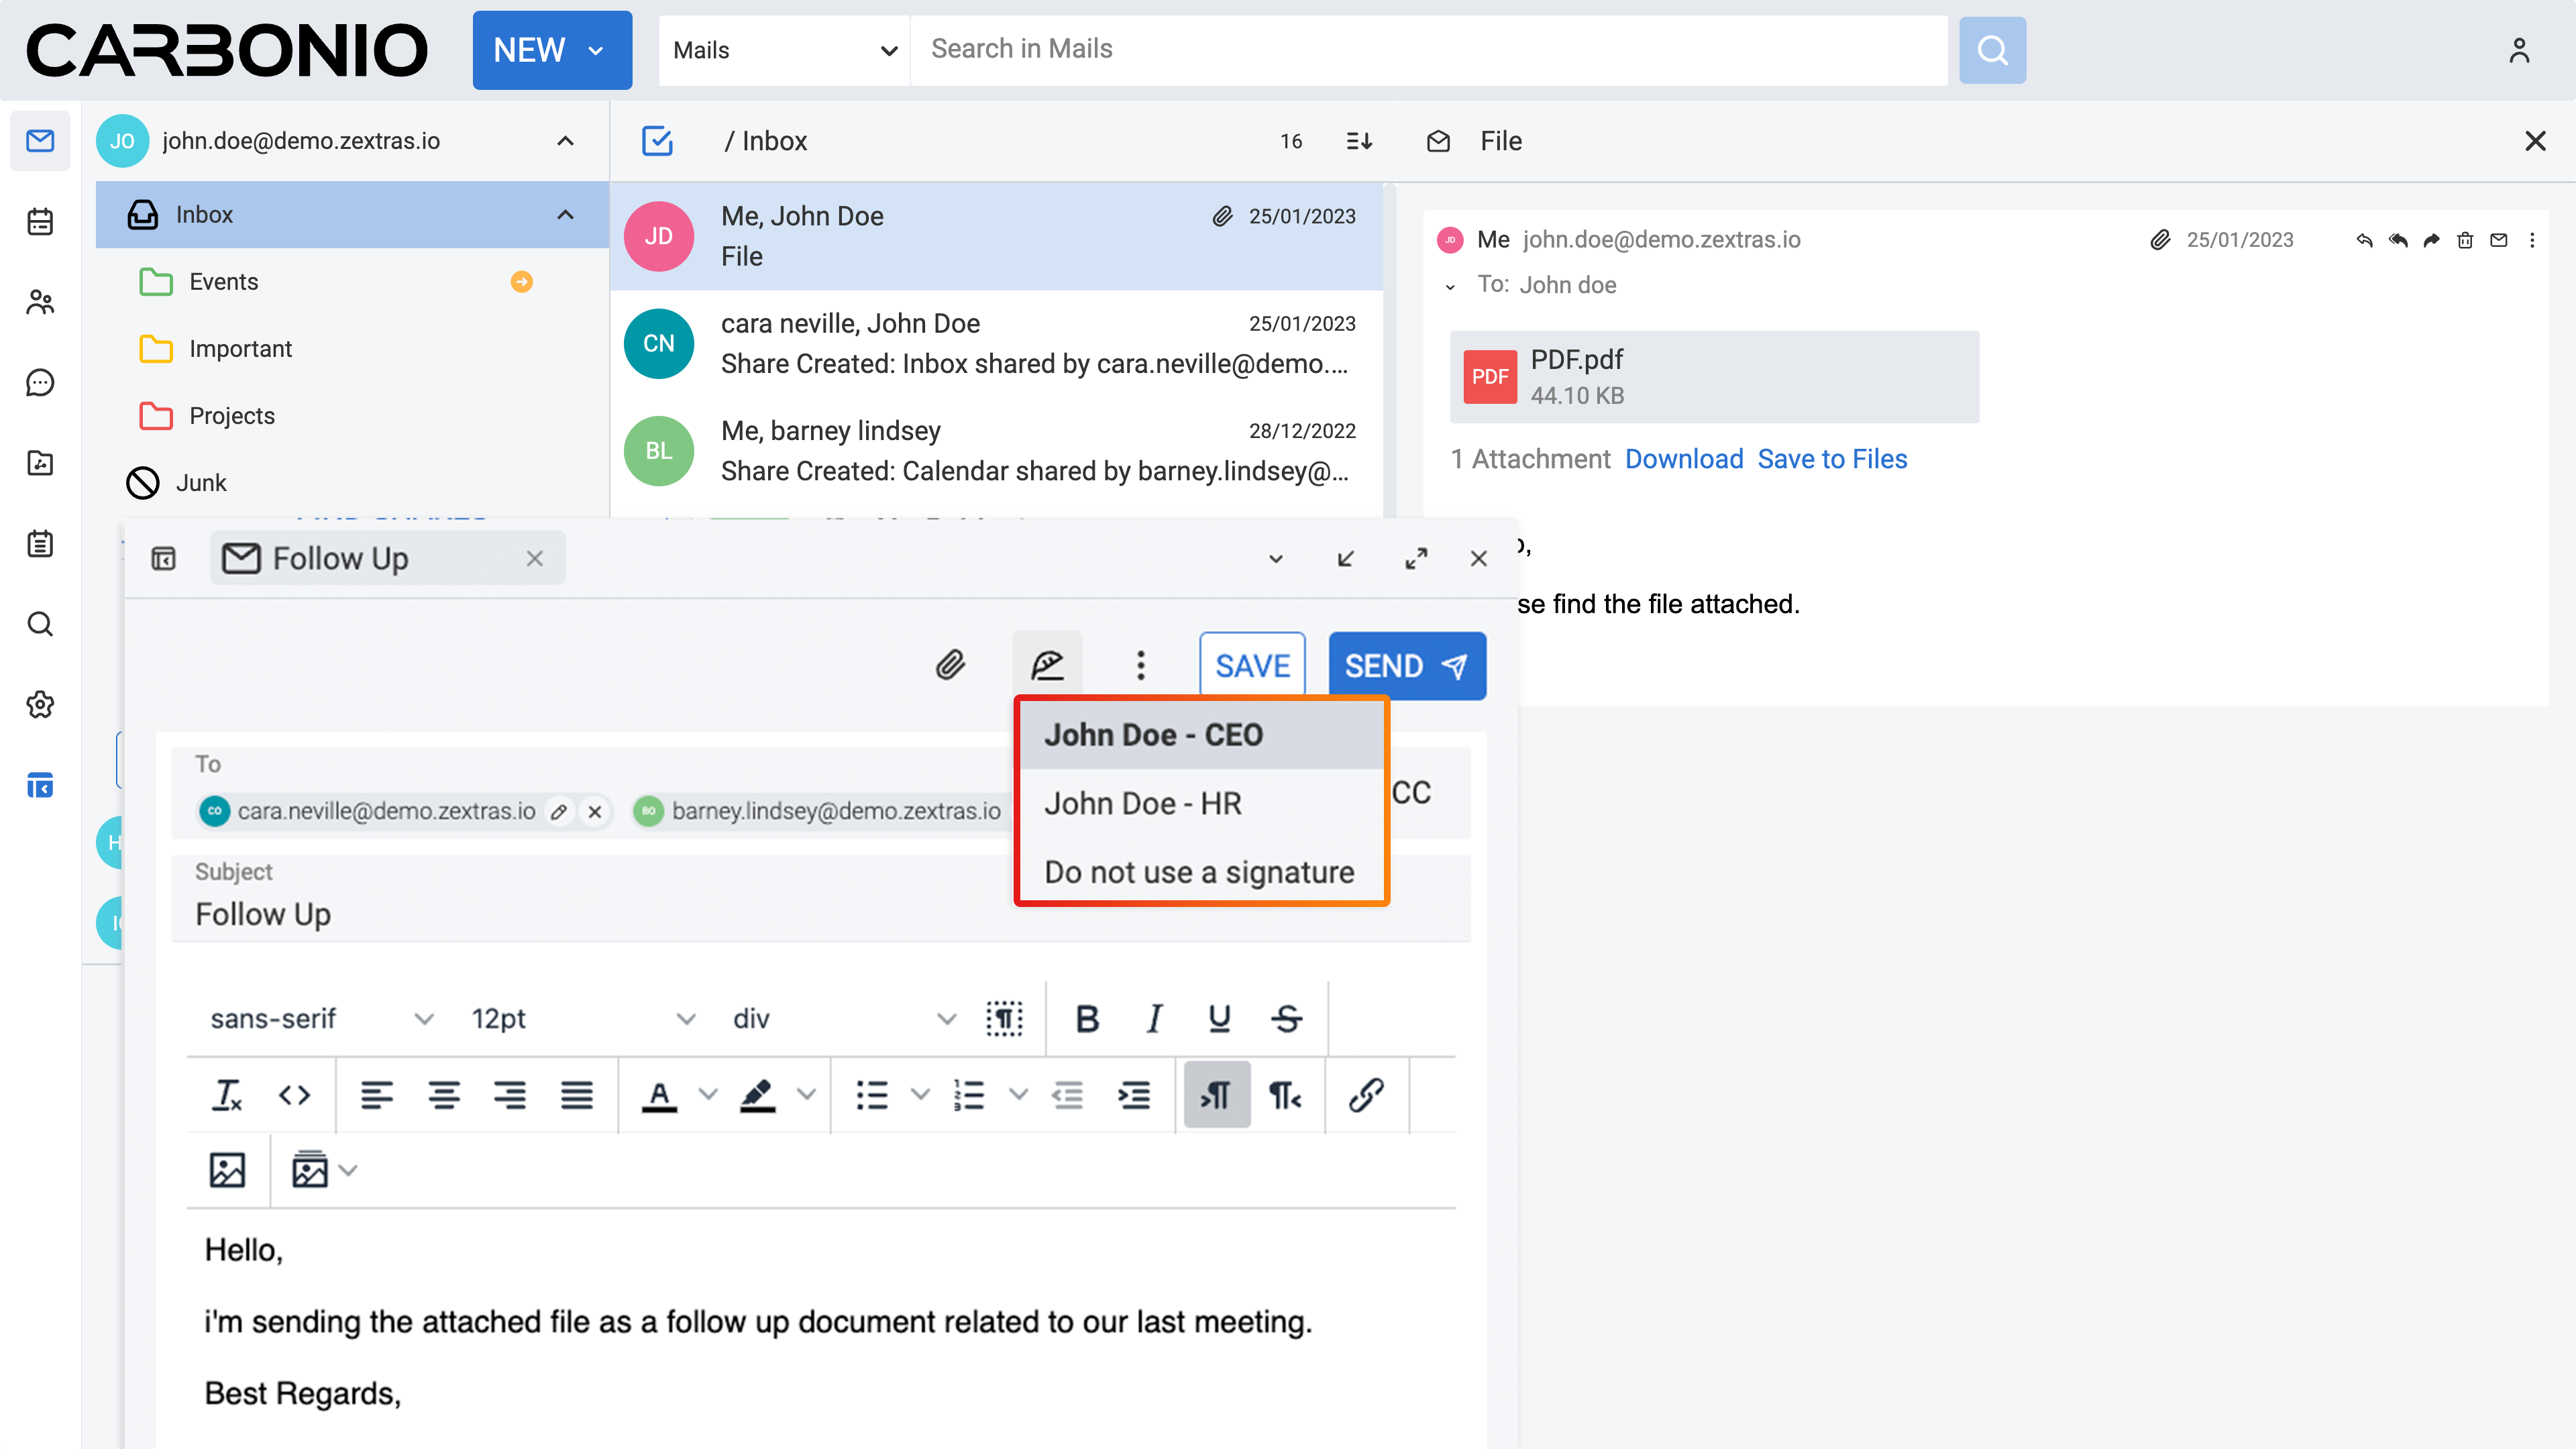
If you have set two or more signatures, you can easily switch between them, while you are writing an email.
Just click on the feather pen icon on top of the composing tab and choose the one you want to use, between the different options in the list, based on the existing signatures. You can also choose Do not use a signature option, if you want to completely remove the signature from the current email.
Email Delegations#
You can permit others to send emails on your behalf. When someone sends an email on your behalf, the recipient sees both your name and the sender’s name. It is important to note that this is not the same as sharing your entire inbox. The sender operates from their email account when sending emails on your behalf, with your name selected from the From field drop-down menu as the sender.
Similarly, if you have been delegated permission to send emails on behalf of someone else, you can do so with their email address as the sender. In this case, the From address will display both your email address and the person you are representing. When you have been given authorization to send an email to that person, their email address appears in the menu, without including your address in the email.
Email delegation can be particularly useful in scenarios where you need someone else to handle your email correspondence on your behalf, such as when you are out of the office or managing multiple responsibilities. It allows for efficient management of emails without the need for direct access to your inbox, streamlining communication processes. This feature is especially handy for executives, assistants, or team members who need to act on behalf of others while maintaining clarity about the sender’s identity.
Delegating Others to Send Emails on Your Behalf#
You can authorize others to send messages on your behalf. When they do so, your name and email address appear as the sender, even though the message is dispatched from the delegate’s inbox.
To set this up:
Click on the Settings (gear icon) in the left sidebar.
Select Accounts.
In the Delegates section, click ADD DELEGATE.
Enter the email address of the person you are authorizing; this should be an internal user’s address like one of your colleagues.
Choose the permissions you wish to grant, and then click OK.
Choose Save a copy of sent messages to my Sent folder from the list, if you want to get a copy of the email sent by the delegate. Otherwise, you can choose different options based on your preferences.
Click SAVE from the top-right corner.
An email notification will be sent to the designated person, informing them of their newly acquired delegate permissions.

Sending Email on Behalf of Someone Else#
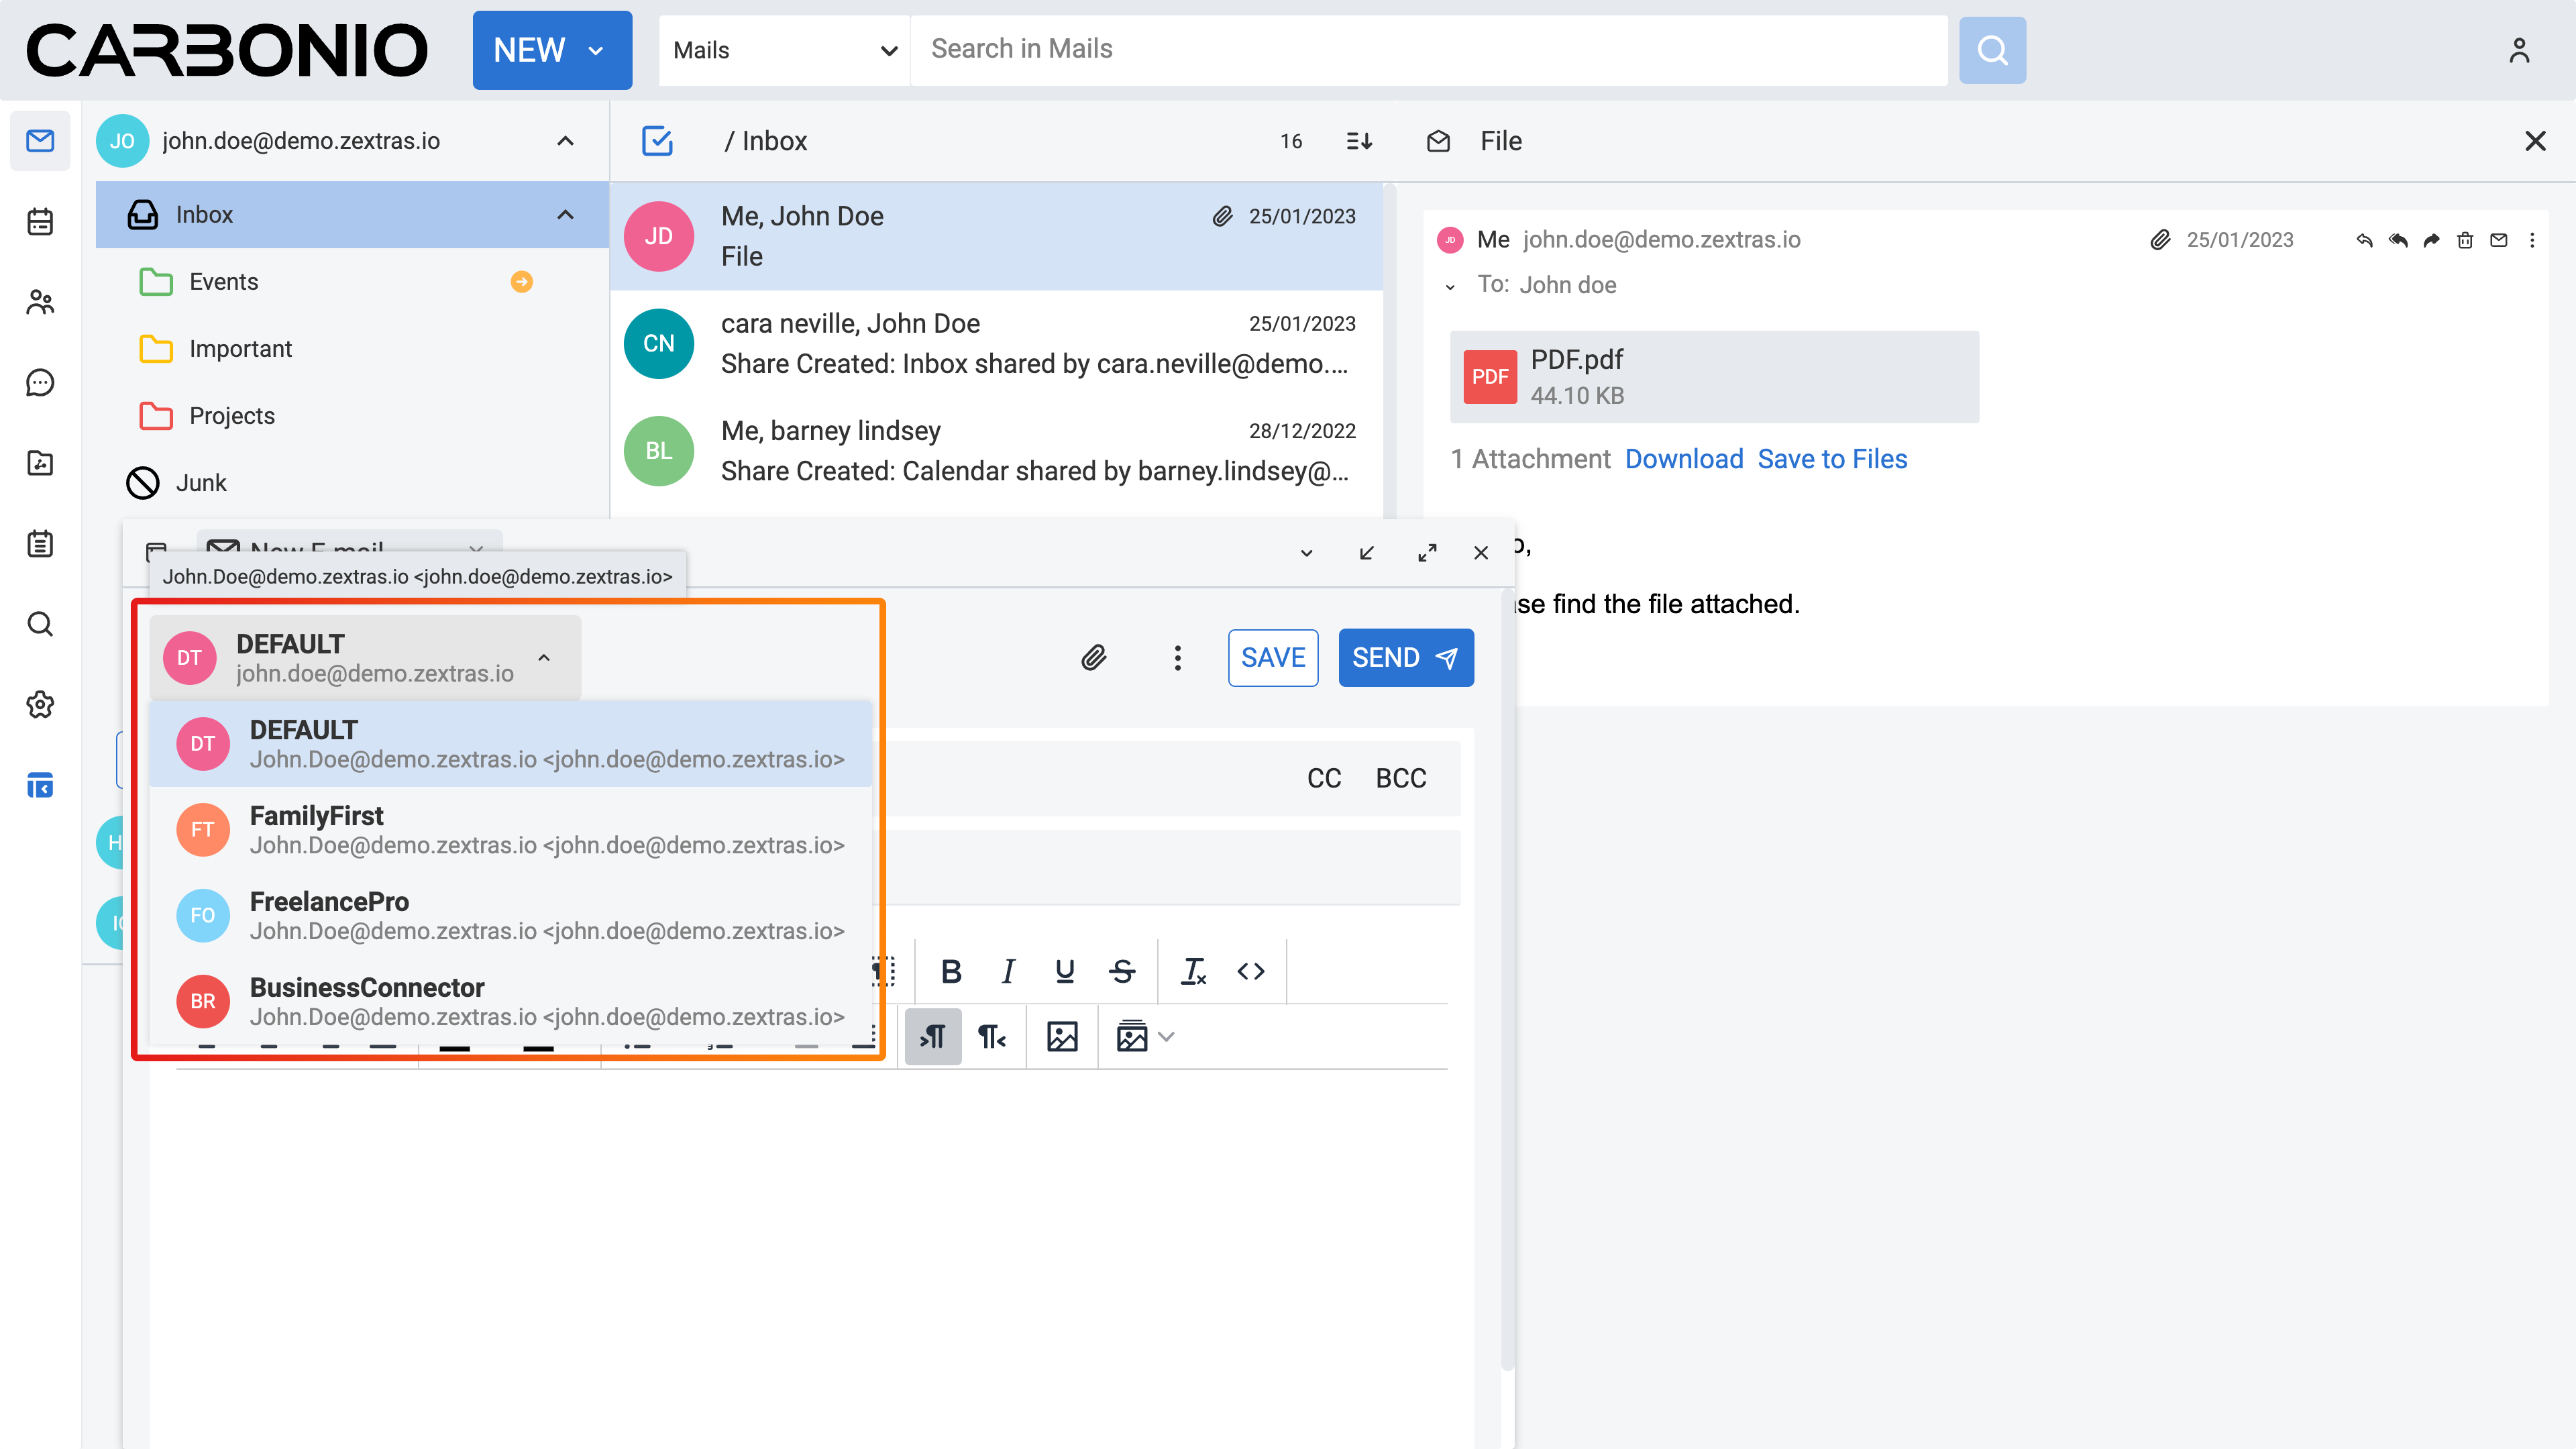
If you have been granted delegate permissions for another person, you can send emails on their behalf. While composing an email, click on the top-left corner where your account name is displayed. From there, you can select your email address, as well as any other identities or personas you may have, and the person you are representing. If you have been permitted to send messages as that individual, their email address will be available in the menu. When selected, your address will be omitted from the email.
Account Personas#
When sending emails, each email is associated with an email account. By default, your primary identity is tied to your account name when setting up your email account. However, you have the option to create additional email identities known as personas, which can be used to manage different types of emails.
For instance, you might establish one persona for your sales correspondence and another for personal emails.
If you have multiple personas or external accounts linked, you can choose the specific persona you wish to utilize when sending an email.
Using Personas#
If you have multiple personas or external accounts linked, you can choose the specific persona you wish to utilize when sending an email.
You can send emails from different personas while composing a message.
The recipient will see the username aligned with the selected persona as the sender of the emails.
To switch personas, follow these steps:
Click on your email address located at the top left corner of the composing board when composing your email.
Choose your preferred persona from the menu.
Creating Personas#
To create a new persona alongside your default one:
Click on the Settings (gear icon) in the left sidebar.
Select Accounts.
Under the Accounts list section, click ADD PERSONA.
Under the Persona Settings section, choose a name for the added persona.
Click SAVE from the top-right corner.

Removing Personas#
To remove a persona:
Click on the Settings (gear icon) in the left sidebar.
Select Accounts.
Under the Accounts list section, select the persona you wish to remove.
Click DELETE, and then DELETE PERMANENTLY to confirm.
Set Disposal Policies for a Folder#
The email disposal policy dictates that emails residing in a specified folder and surpassing the disposal threshold will undergo automated cleanup and deletion without requiring manual intervention.
To enable and set a disposal policy for a folder:
From the left sidebar click on the Mails section.
In the Navigation Panel, right-click on the folder for which you wish to set its disposal policy.
From the dropdown menu, select Edit. A new window appears.
Click the downward arrow next to the Retention policy section.
Tick the box labeled Enable Message Disposal.
Enter a numerical value in the Disposal Threshold field and choose the appropriate unit of time (such as days, weeks, etc.) from the adjacent dropdown menu.
Click EDIT.
After clicking EDIT, the disposal policy will be applied to the specified folder, triggering automated cleanup and deletion for emails surpassing the disposal threshold.
S/MIME signed emails#
If you don’t see these options, it means that your administrator has not enabled them. Please contact your administrator for more information.
S/MIME (Secure/Multipurpose Internet Mail Extensions) is a standard for public key encryption and signing of MIME data. It is used to secure email communications and is supported by most email clients. S/MIME provides a way to encrypt email messages and digitally sign them. When you digitally sign an email, you are adding a digital signature to the message. This signature is unique to you and is used to verify that the email has not been tampered with and that it was sent by you.
Difference between Signing and Encryption#
Signing: When you sign an email, you are adding a digital signature to the message. This signature is unique to you and is used to verify that the email has not been tampered with and that it was sent by you. Encryption: When you encrypt an email, you are scrambling the contents of the message so that only the intended recipient can read it. This ensures that the email is secure and cannot be read by anyone else.
Requirements for S/MIME#
To use S/MIME, you need:
A valid S/MIME certificate (X.509 format) issued by a trusted Certificate Authority (CA).
Carbonio webmail (S/MIME is not available in Carbonio Community Edition, it only allows to show that the email is digitally signed).
A compatible email client (Another user with Carbonio webmail, Outlook, Thunderbird –to check–, others?).
Obtaining an S/MIME Certificate#
You need an S/MIME certificate issued by a trusted Certificate Authority (CA).Popular CAs include: Sectigo (Comodo); DigiCert; GlobalSign; Actalis; Entrust; GoDaddy; Thawte; VeriSign; and others.
To obtain an S/MIME certificate: 1. Go to the website of a trusted CA. 2. Request an S/MIME certificate from a CA. 3. Download the certificate in PKCS#12 format (.p12 or .pfx). 4. Note the password used to export the private key.
How S/MIME Signing Works in Carbonio#
Importing an S/MIME Certificate#
Upload your personal certificate (containing a public and a private key) into Carbonio webmail via Settings → S/MIME Certificates (the system will ask to enter a password to protect the certificate. If one has already been set it will ask for the password).
Click Upload Certificate under Personal certificates for signing, encryption and decryption.
Signing an Email#
When composing an email, select “Use certificate to sign (S/MIME)”.
Carbonio uses the user’s private key to generate a digital signature.
The signature is attached to the email as a cryptographic hash.
The recipient can verify the signature using the sender’s public key.
Verifying a Signed Email#
When you receive a signed email, the signature is displayed in the email header.
Click on the signature to view the certificate details.
The certificate details include the certificate issuer, the certificate validity period, and the certificate fingerprint.
The recipient can verify the signature using the sender’s public key.
If the signature is valid:
The recipient sees a signed email notification.
It confirms the email hasn’t been modified and is truly from the claimed sender.
If the signature is invalid or missing:
The email might be tampered with or sent from an untrusted source.
The recipient should be cautious when interacting with such emails.
How S/MIME Encryption Works in Carbonio#
Key Components#
Public Key: Used to encrypt the email. Stored in the recipient’s S/MIME certificate.
Private Key: Used to decrypt the email. Stored securely by the recipient.
Certificate Authority (CA): Issues S/MIME certificates to users.
The Encryption Process#
Sender Retrieves Recipient’s Public Key
The sender must have the recipient’s public key.
Email Encryption
The sender composes an email and selects “Encrypt with S/MIME”
Sender email content is encrypted using the recipient’s public key.
The email is sent in an encrypted format.
-
Recipient Decrypts the Email
When the recipient opens the email, its private key is used to decrypt the message.
If the private key matches the encrypted data, the email is decrypted and displayed normally.
The recipient can only decrypt the email if they have the corresponding private key. This ensures that only the intended recipient can read the email.
Requirements for S/MIME Encryption#
Both sender and recipient must have S/MIME certificates installed.
The recipient’s public key must be available to the sender.
Uploading a Certificate in Carbonio Webmail#
Go to Settings → S/MIME Certificates.
Click “Upload Certificate” under Personal certificates for signing, encryption and decryption.
Select your PKCS#12 certificate file (.pfx or .p12).
Enter the certificate secret.
Click Save.
Uploading Recipient Certificate#
Click “Upload Certificate” under Recipients certificates for encryption
Click Save.
Sending an Encrypted Email#
Compose a new email in Carbonio webmail.
Select “Use certificate to encrypt (S/MIME)” before sending.
The email will be encrypted using the recipient’s public key.
Receiving and Decrypting an Email#
If your private key is installed, Carbonio will automatically decrypt the message.
If not, you’ll see an “Unable to decrypt” error.
You can upload your private key to decrypt the message.