

Getting Started#
In this section, we are going to explore the essential steps for signing in to your Carbonio web client. Properly signing in is the first step towards accessing your emails and utilizing the various features offered by the platform. We will cover everything from accessing the webmail address to navigating through two-factor authentication (2FA) and using SAML functionality. Additionally, we will discuss how to sign out securely, recover forgotten passwords, change your login credentials, and other configurations.
Signing In#
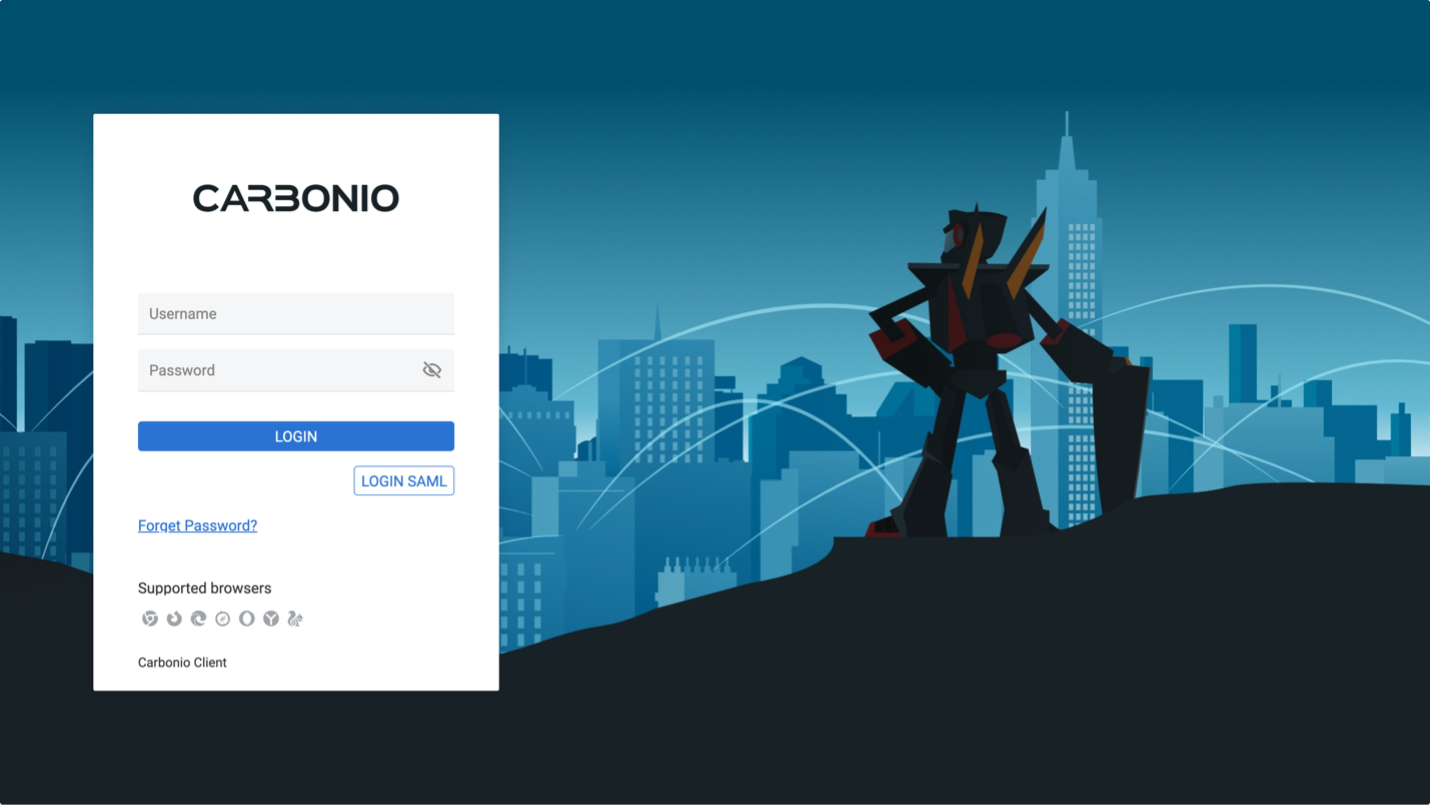
To access your Carbonio web client, the initial step is to sign in. This can be easily accomplished by navigating to your company’s webmail address via your browser. To do so, you can simply follow these steps:
Open Your Browser: Start by opening your web browser (like Chrome, Firefox, or Safari).
Enter the Webmail Address: In the address bar at the top of your browser, type in your company’s webmail address. If you are not sure what it is, ask your company’s system administrator for help.
Sign In: Once you have reached the webmail page, you will see a login screen. Enter your username (usually in the format of ) and your password.
Click LOGIN: After entering your credentials, click the LOGIN button. This will verify your identity.
Access Your Webmail: You will now be redirected to your webmail interface. From here, you can easily read and send emails.
Watch Out for 2FA: Sometimes, you might encounter a second-factor authentication (2FA) prompt after your initial login. If that happens, follow the additional steps below to complete the login process.
Using Two-factor Auth (2FA)#
Two-factor Authentication (2FA) is a security feature activated by your system administrator. When enabled, accessing your webmail requires an additional verification step for enhanced security.
Before you can log in using 2FA, you must have configured your second-factor method from your webmail preferences. If you have not yet completed the setup, you may request from your system administrator the credentials to access your account and the necessary permissions to configure 2FA.
Once you have access to your account and the required permissions, you can configure 2FA as described below.
1. Accessing 2FA Settings#
Click the gear icon in the left sidebar of your webmail interface.
Navigate to the Auth section.
Open OTP Authentication and click NEW OTP.
2. Creating an OTP#
Insert a label to identify the new OTP (e.g.,
myOTP1).Click CREATE PASSWORD.
-
After creation, you can complete the setup using one of the two available authentication methods:
Option A: Scanning a QR code with an authenticator app.
Option B: Generating PIN codes for manual authentication.
Note
You can choose to trust your current login environment so that the second factor will not be requested the next time you sign in. The duration of this trust is defined by your system administrator.
3. Option A — Using an Authenticator App#
Install a supported authenticator app (e.g., Google Authenticator or MS auth) on your mobile device.
Open the app and press the + button.
Scan the QR code displayed in your webmail.
The app will create an entry that generates a temporary verification code, refreshed every 30 seconds.
4. Option B — Using PIN Codes#
Select the option to generate PIN codes instead of scanning the QR code.
A list of 12 single-use PINs will be displayed.
Print the list and keep it in a safe location.
Each PIN can only be used once to complete the second-factor authentication.
5. Logging In with 2FA#
Once 2FA is configured, follow these steps at each login:
> Enter your username and password;
> When prompted for the second factor, choose your OTP credential (eg. myOTP1);
> Open your authenticator app or use your next available PIN code;
> Insert the verification code or PIN into the login form;
> Click LOGIN.
Using SAML to Sign In#
SAML stands for Security Assertion Markup Language. It is like a secret handshake between different websites and apps to make sure you are who you say you are. Imagine it as a special pass that lets you into multiple places without needing a separate key for each door.
You have generally two ways to use SAML functionality to sign in to your Carbonio account:
First Flow:
When logging in to Carbonio webmail, look for the LOGIN SAML button.
Click it, and it will automatically sign you into your webmail.
Important: You must already be logged into your identity provider service (like Okta or other services provided by your system administrator).
If you are not sure how to log into your identity provider, reach out to your system administrator for assistance.
Second Flow:
First, log in to your identity provider service (e.g., Okta or other services provided by your system administrator).
Once you are logged in there, simply click on the |product| mail app.
SAML will seamlessly take you to your webmail without requiring you to insert your credentials.
Signing Out#
To ensure the security of your Carbonio web client, it is essential to sign out when you are away from your computer. Here are two straightforward methods to log out:
Using the Account Icon:
Click on the account icon located in the top-right corner of the webmail interface.
Select the Logout button.
You will be securely signed out.
Via General Settings:
Click the gear icon on the left sidebar panel to access settings.
Navigate to General Settings.
In the Account section, click the LOGOUT button, and you will be successfully logged out.
For security purposes, your system administrator might set a maximum duration for your login session.
When your session is about to expire, you will be notified in advance through the bottom left bar, which will display the remaining time: 10 minutes, 3 minutes, and 60 seconds before the session ends, respectively. In the snackbar, you will find the option to return to the login page. You can simply log back in as usual to continue working.
In Case of Forgetting Your Password#
To start the password recovery procedure, you need to enter the recovery address in the Auth panel, in the Settings section. Alternatively, you can ask the administrator to set up a recovery e-mail for your account.
Note
If in the Auth panel - Settings section - you do not see the field to set a recovery address, it means that the administrator has not enabled your account for the recovery process.
If you forgot your password, follow these steps:
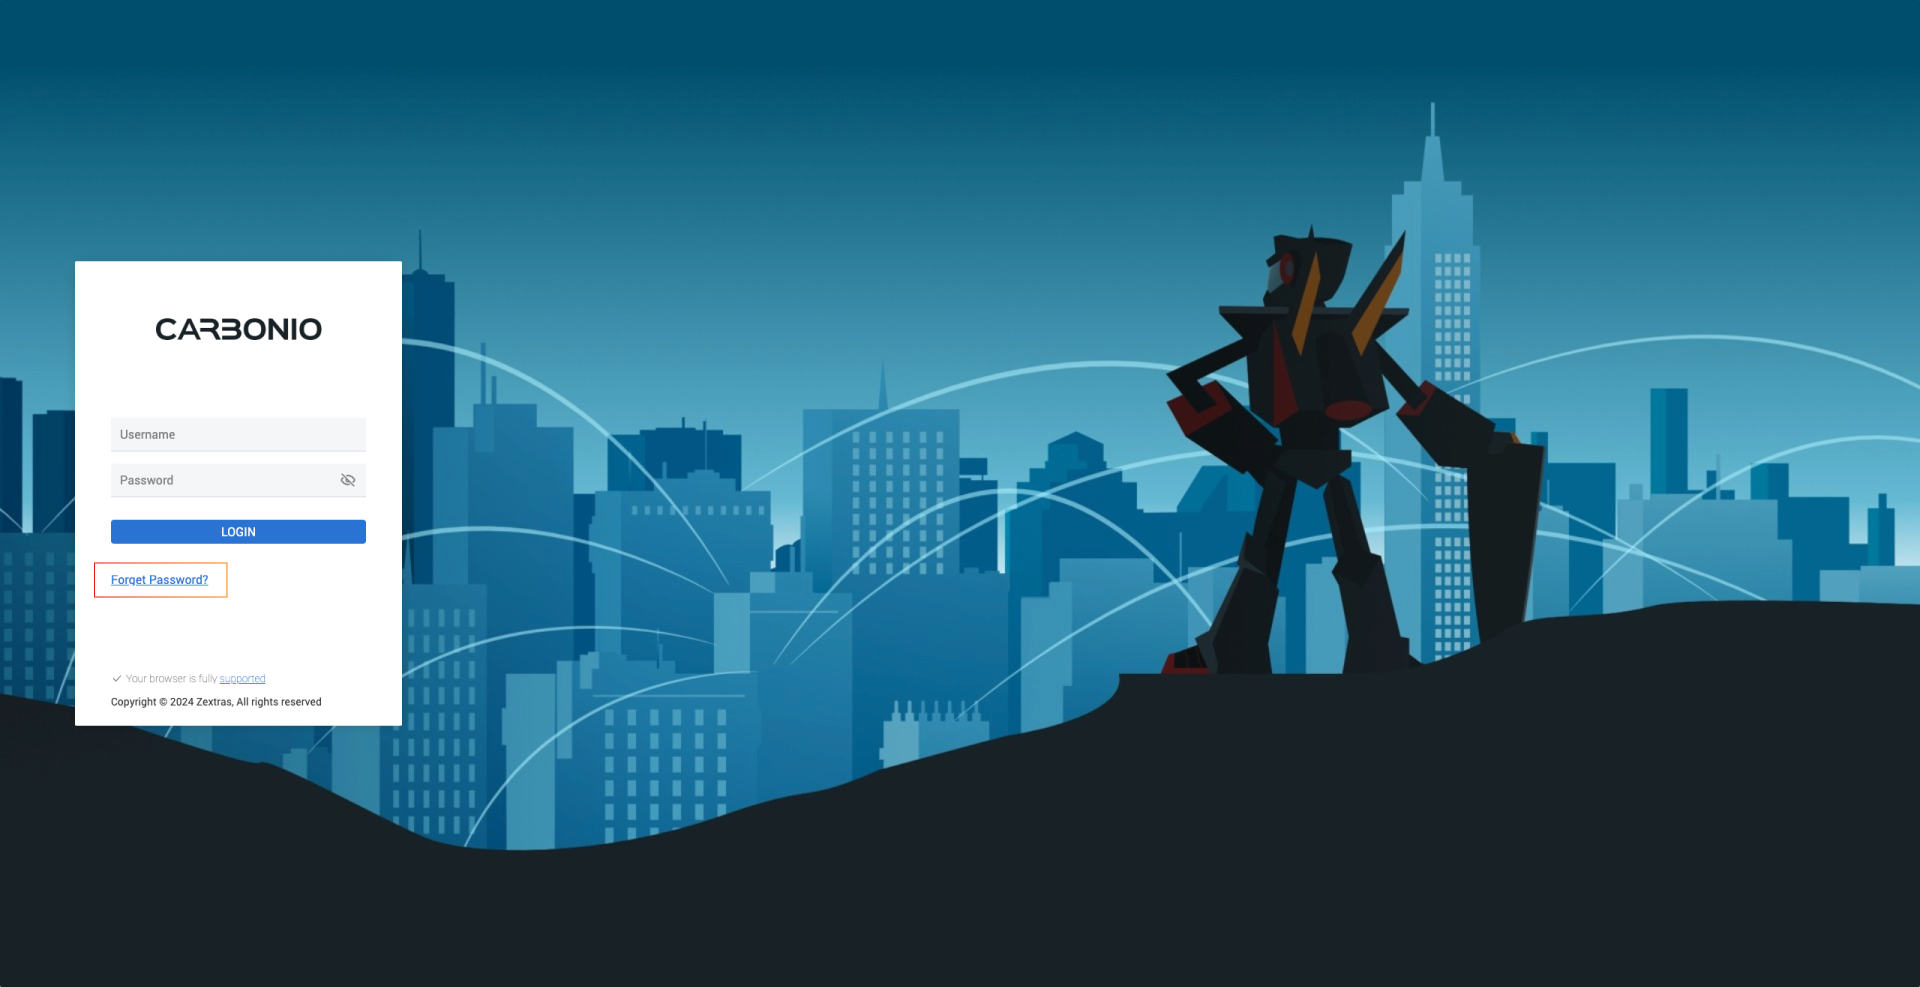
Click on the Forget Password? Button, from the login page.
Enter your username.
You will receive an email at your recovery email address.
A temporary validation code, that expires in twenty-four hours, will be sent to the recovery e-mail address.
Copy it and insert it, then click the VALIDATE CODE button.
If the code is validated, you can CONTINUE WITH YOUR SESSION, access your mailbox and then add a new password in the Settings’s module, where you can also change the recovery address.
If your system administrator has not configured a recovery email for your account, or you have not inserted your own recovery email address, when you attempt to insert your username to receive the password recovery email, you will encounter an error message.
The error will prompt you to contact your system administrator. In this scenario, the only way to log into your account is by seeking assistance from your system administrator.
Changing Your Password#
Resetting a password becomes necessary when you want to update your existing password due to security reasons or any other relevant factors. To change your password, you must be logged into your account. You can change your password in two ways: through Settings or directly via the User Account menu.
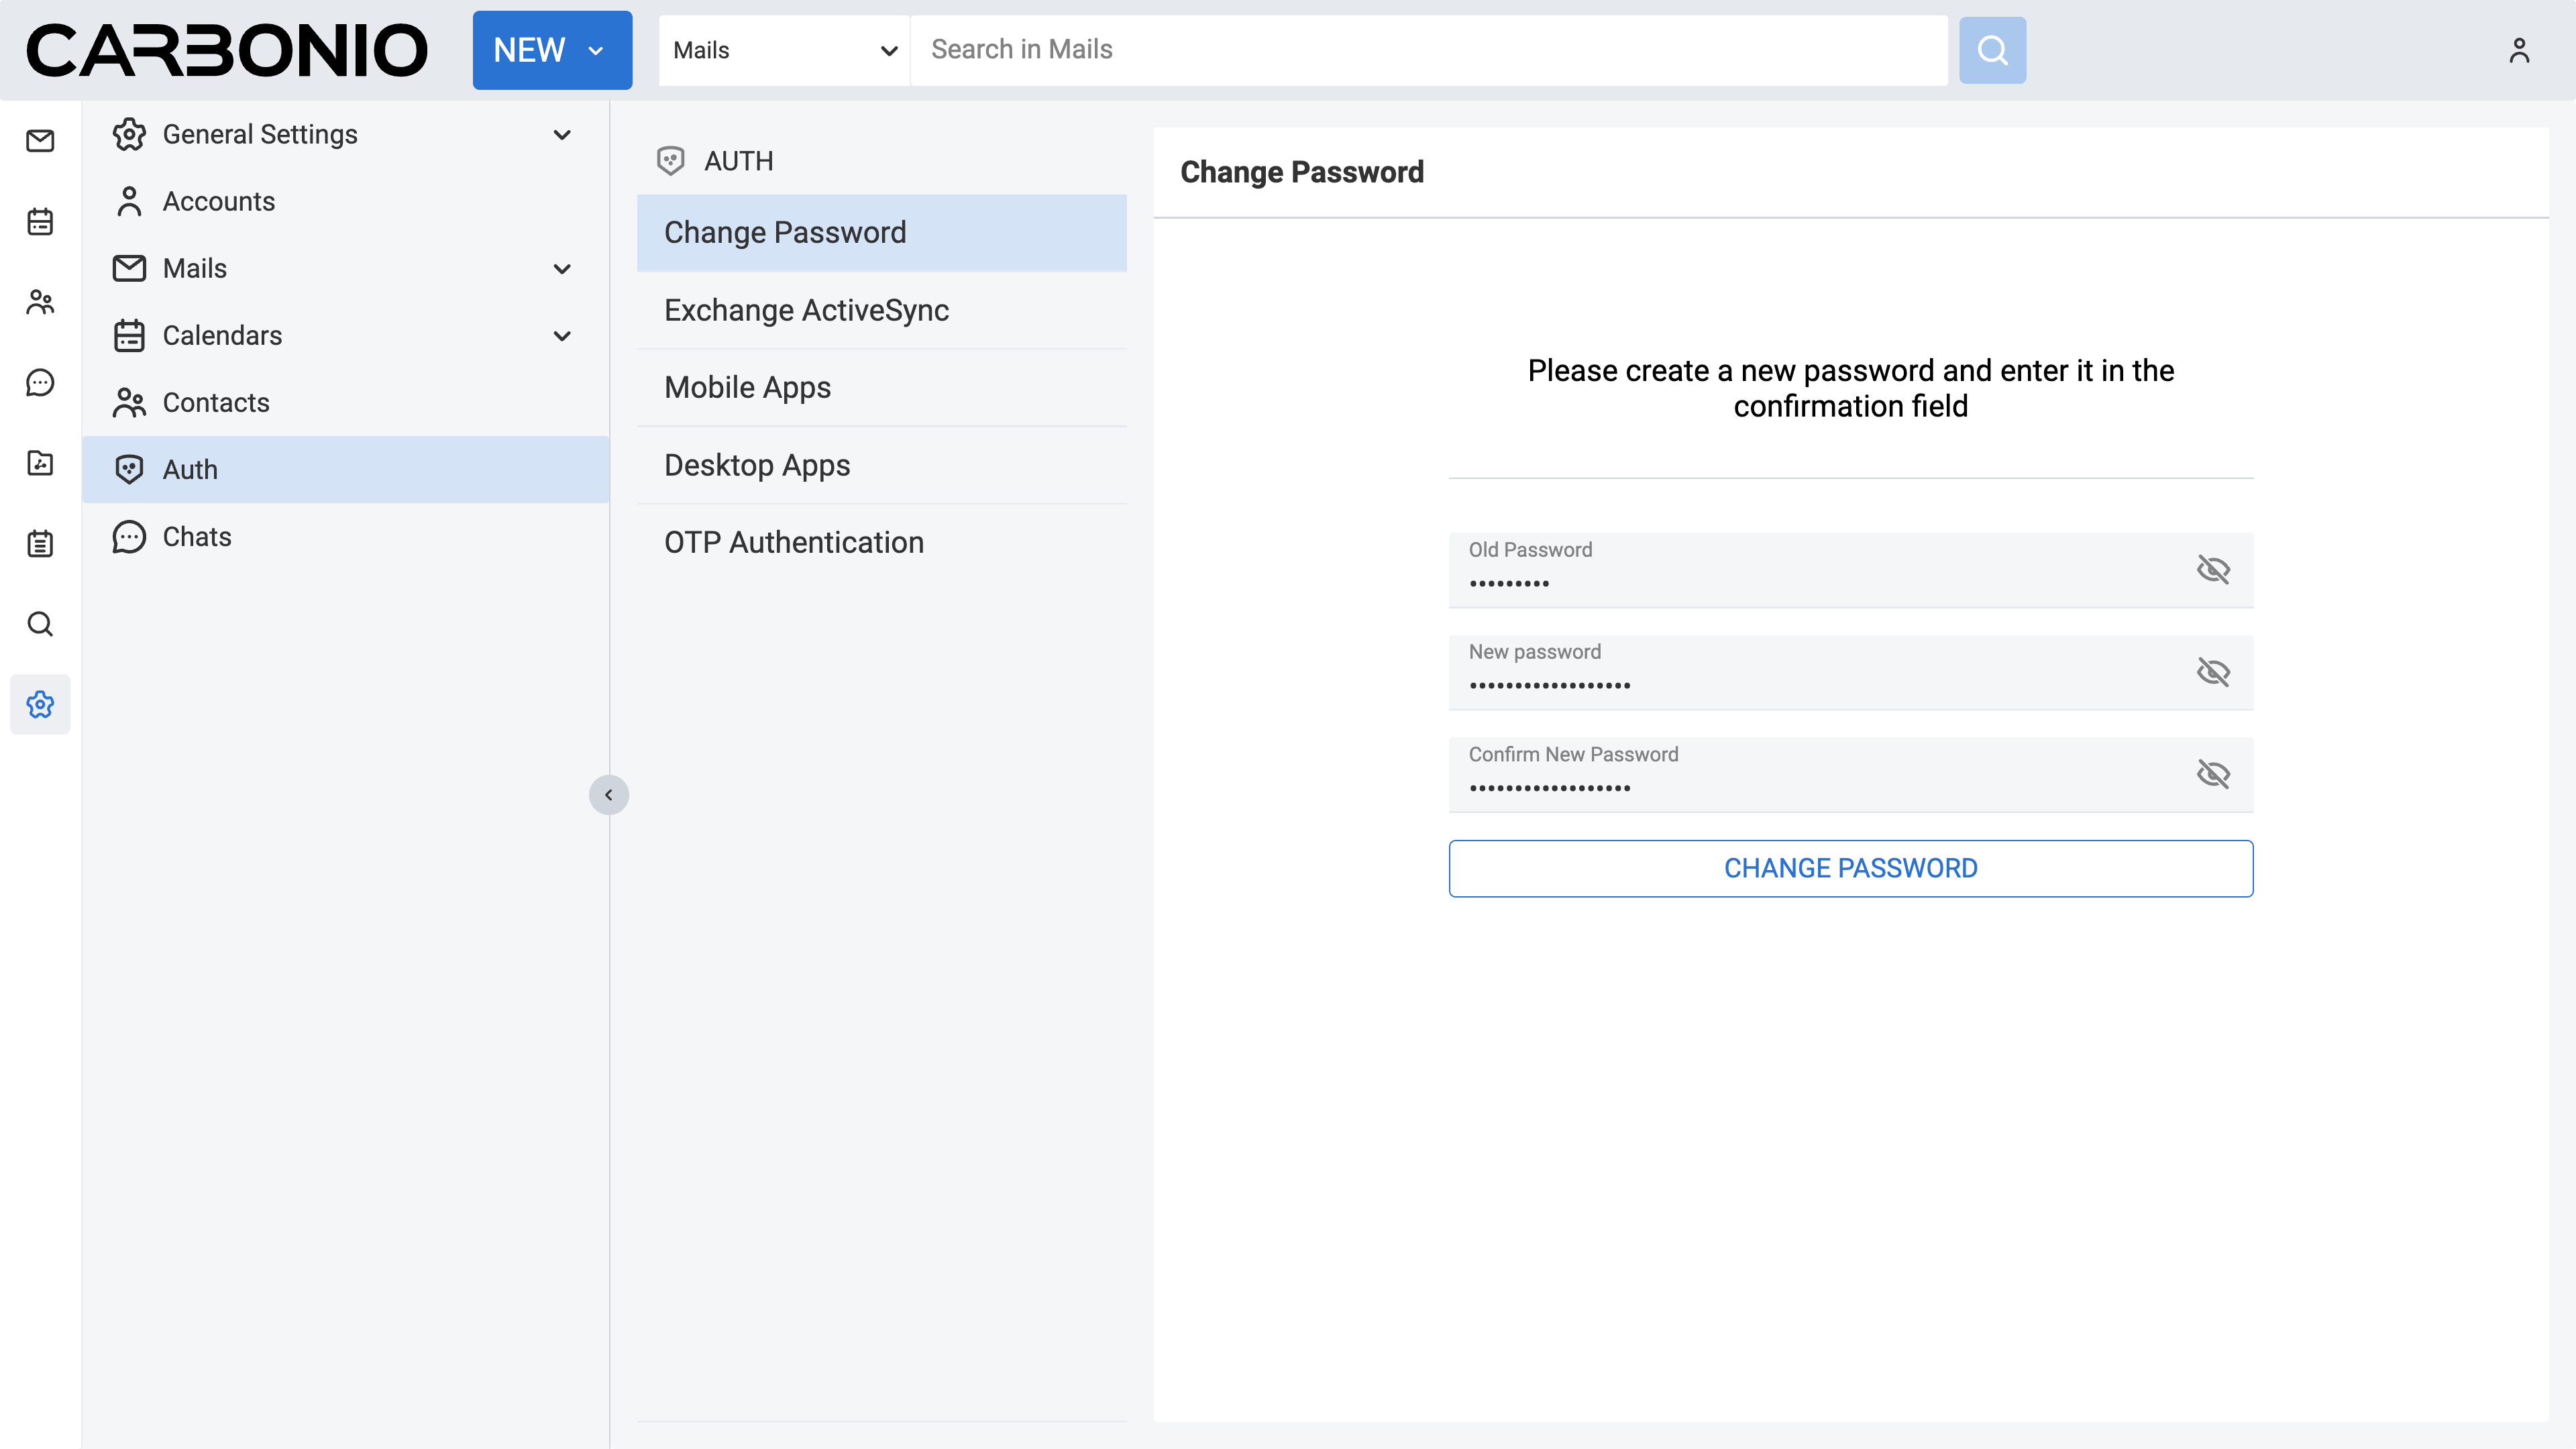
Option 1: Changing Password via Settings
Log into your account.
Click on the settings (gear icon) located in the left sidebar.
Select Auth.
Click on Change Password.
Enter your old password along with your new password.
Click the CHANGE PASSWORD button.
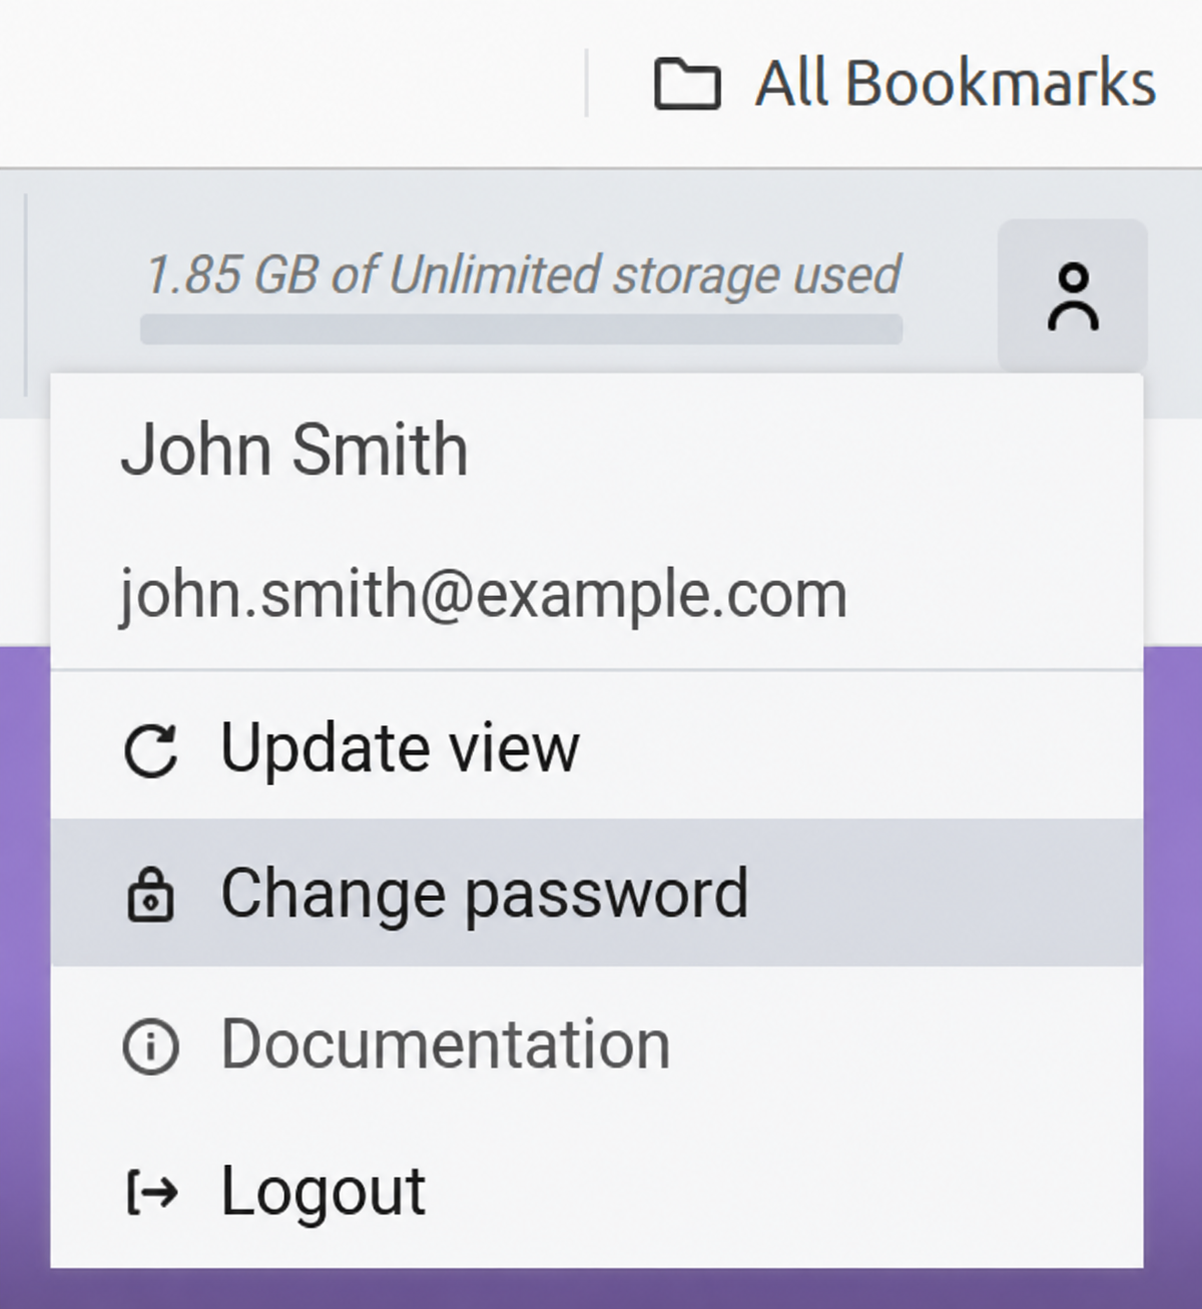
Option 2: Changing Password via User Account Menu
Click the User icon in the top‑right corner.
Select the Change password option.
You will be taken directly to the Auth section in Settings, which is dedicated to password changes.
Enter your current password and then your new password.
Click the CHANGE PASSWORD button to confirm.
-
You will receive a confirmation message indicating that your password has been successfully changed.
Introduction of Carbonio Web Client#
When you log in to check your emails, the Carbonio web client interface greets you with the following components:
Left Sidebar: This section provides navigation options and quick access to various features such as Mails, Calendars, Contacts, etc.
Navigation Panel: Here, you will find additional context related to the active feature you have selected from the left sidebar. For example, if you select “Mails” from the left sidebar, you will find access to your inboxes and email folders here.
Main Panel: The central area displays your actual content related to the active feature you have selected from the left sidebar. For example, if you select “Mails” from the left sidebar, you will see your emails in this area; similarly, choosing “Calendars” will display your calendar events.
Storage Quota: Displays your overall storage usage across Carbonio modules, including Mail, Files, and Chats. It shows the used space compared with the total available quota, together with a progress bar to help you quickly monitor your storage consumption.
Account Personalization#
Before you start using the Carbonio web client, take a moment to personalize your account. You can customize visual aspects such as the theme, as well as other account settings like your time zone. Most of these options are conveniently accessible in the Settings menu. To access it, simply click the gear icon on the left sidebar, and then select General Settings.
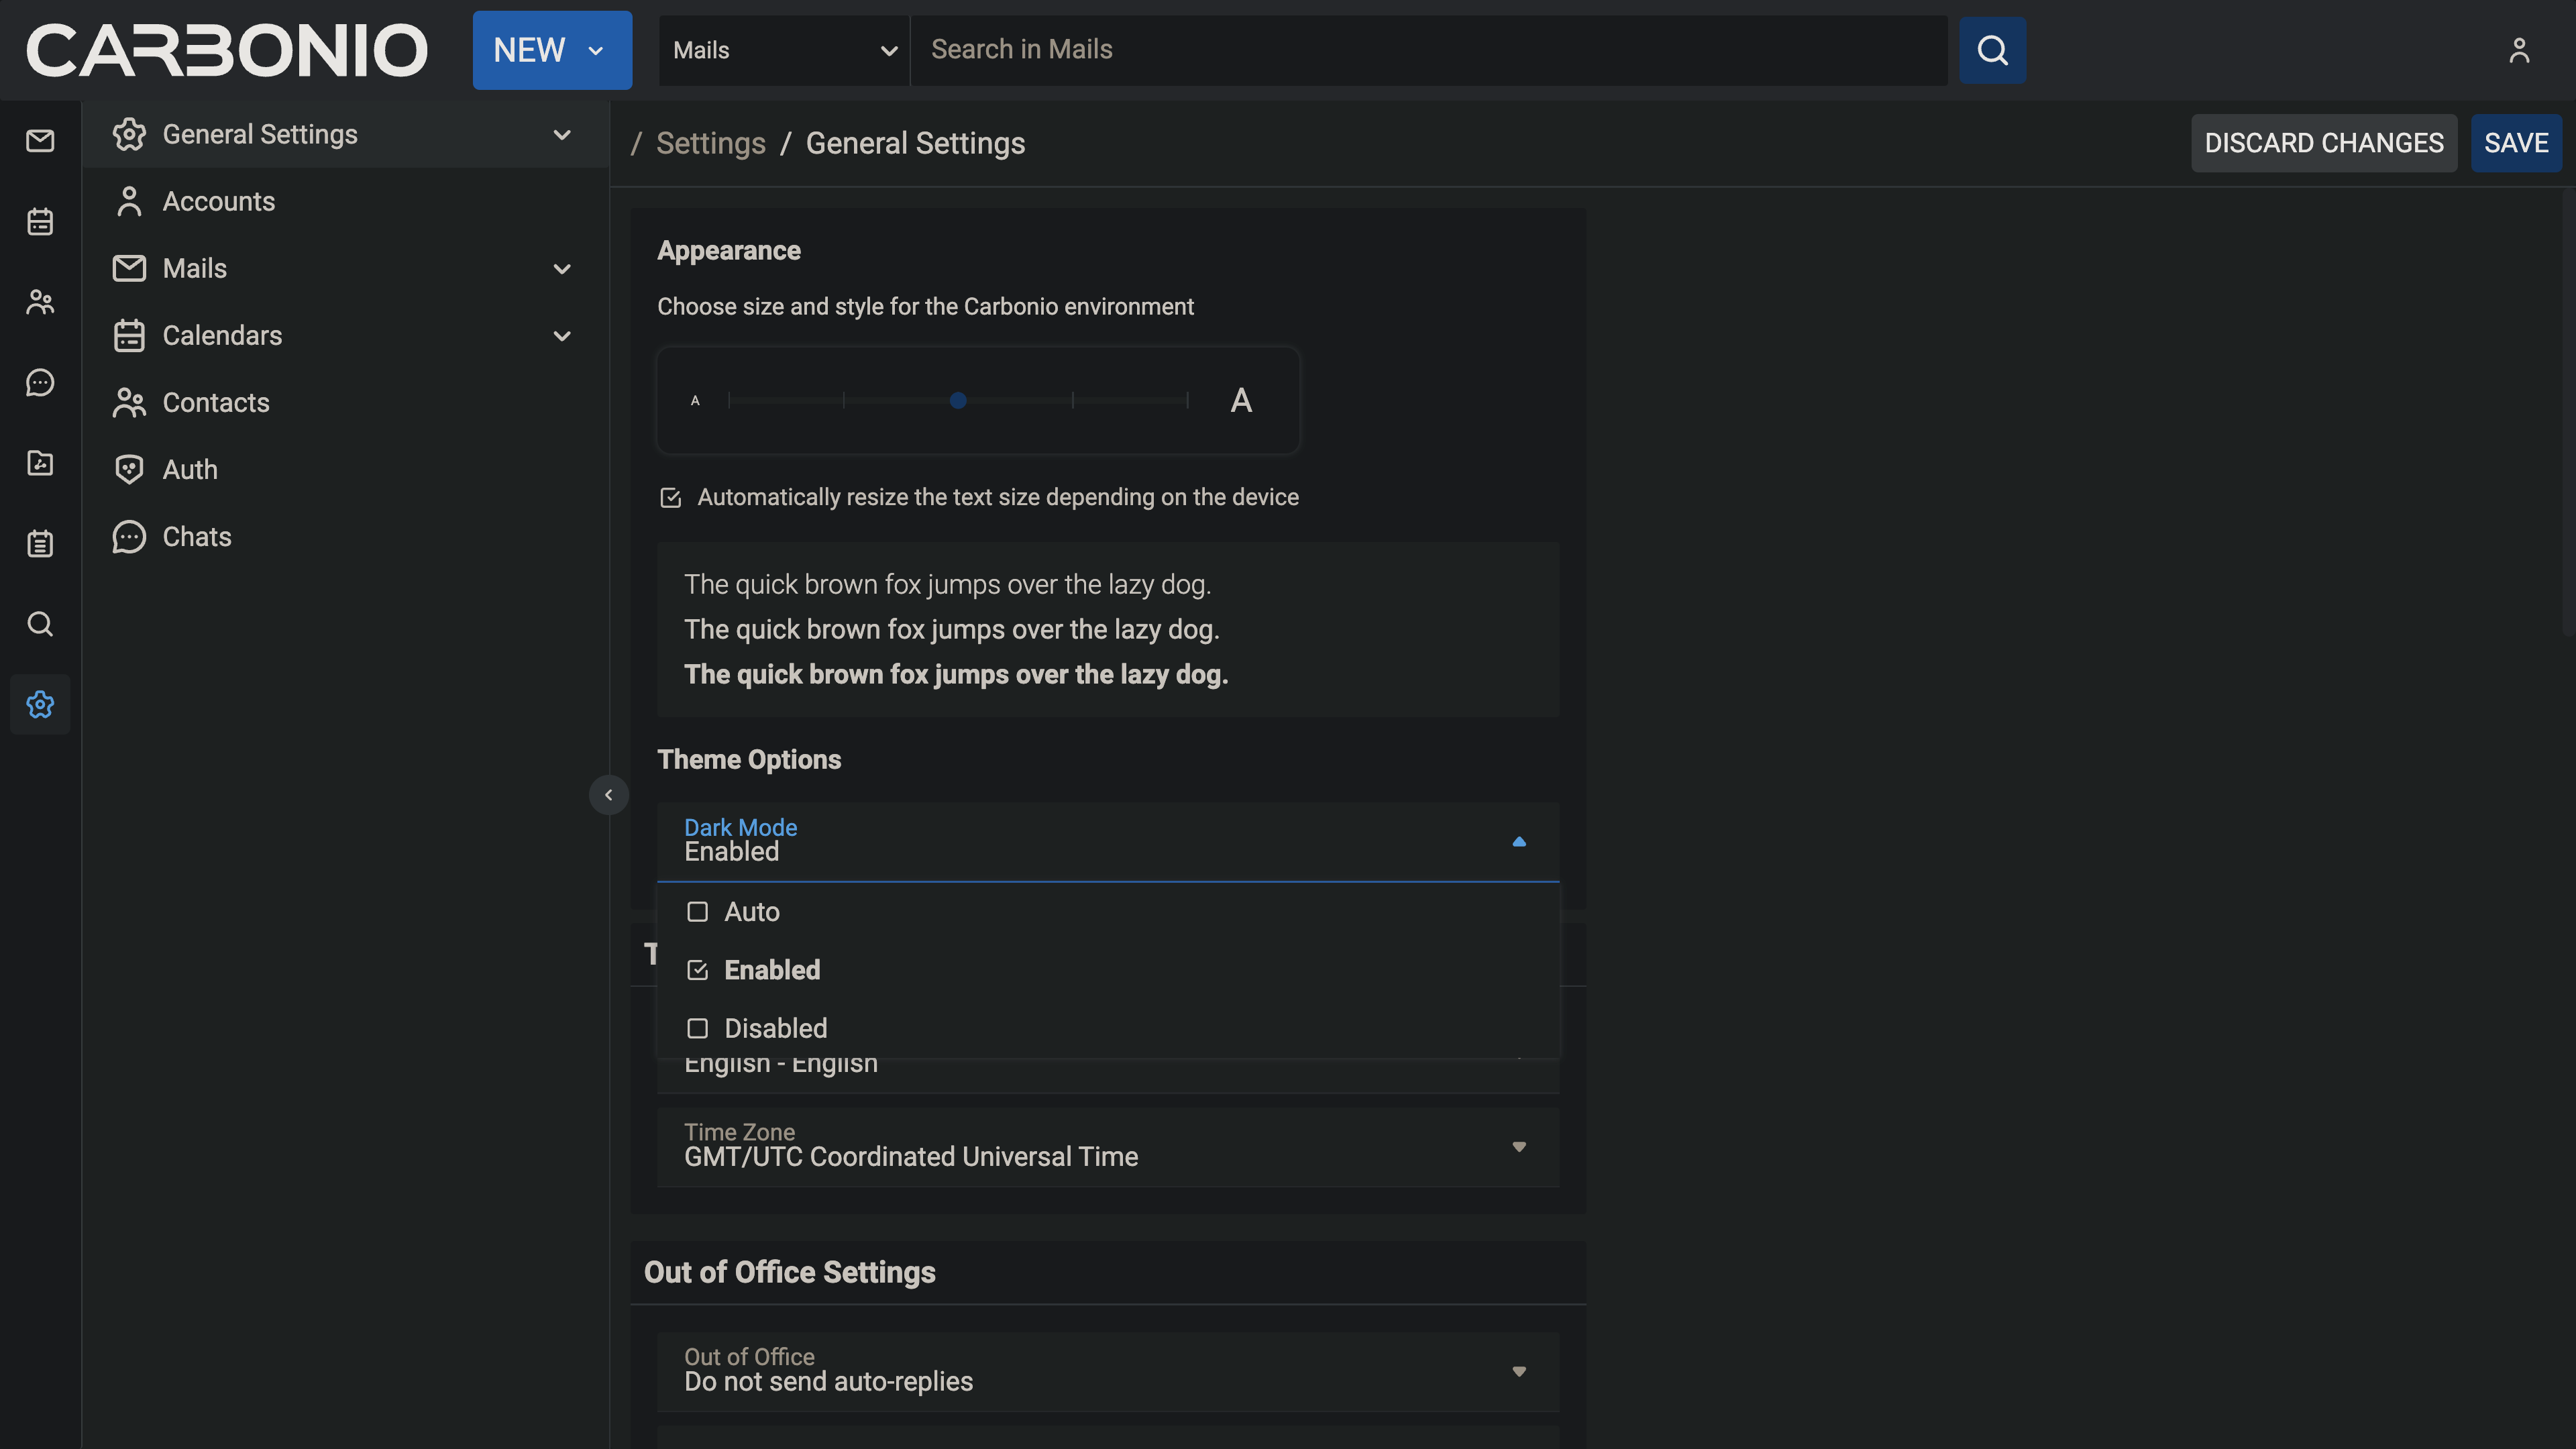
Changing Theme#
A theme in the Carbonio web client defines the color scheme used for its appearance. Currently, there are two themes available: Dark mode and Light mode. Here is how you can manage them:
To activate Dark mode, follow these steps:
Go to Settings (gear icon) from the left sidebar.
Select General Settings.
Under Theme Options, open the dropdown menu.
Click on Enabled.
Click on the SAVE button located in the top right corner of the screen.
To disable Dark mode, follow these steps:
Click on Disabled in the same dropdown menu and click SAVE.
If you choose Auto, Carbonio will adapt to your operating system’s default theme. For example:
If your OS theme is dark, Carbonio will also be in dark mode.
If your OS theme is light, Carbonio will match that as well.
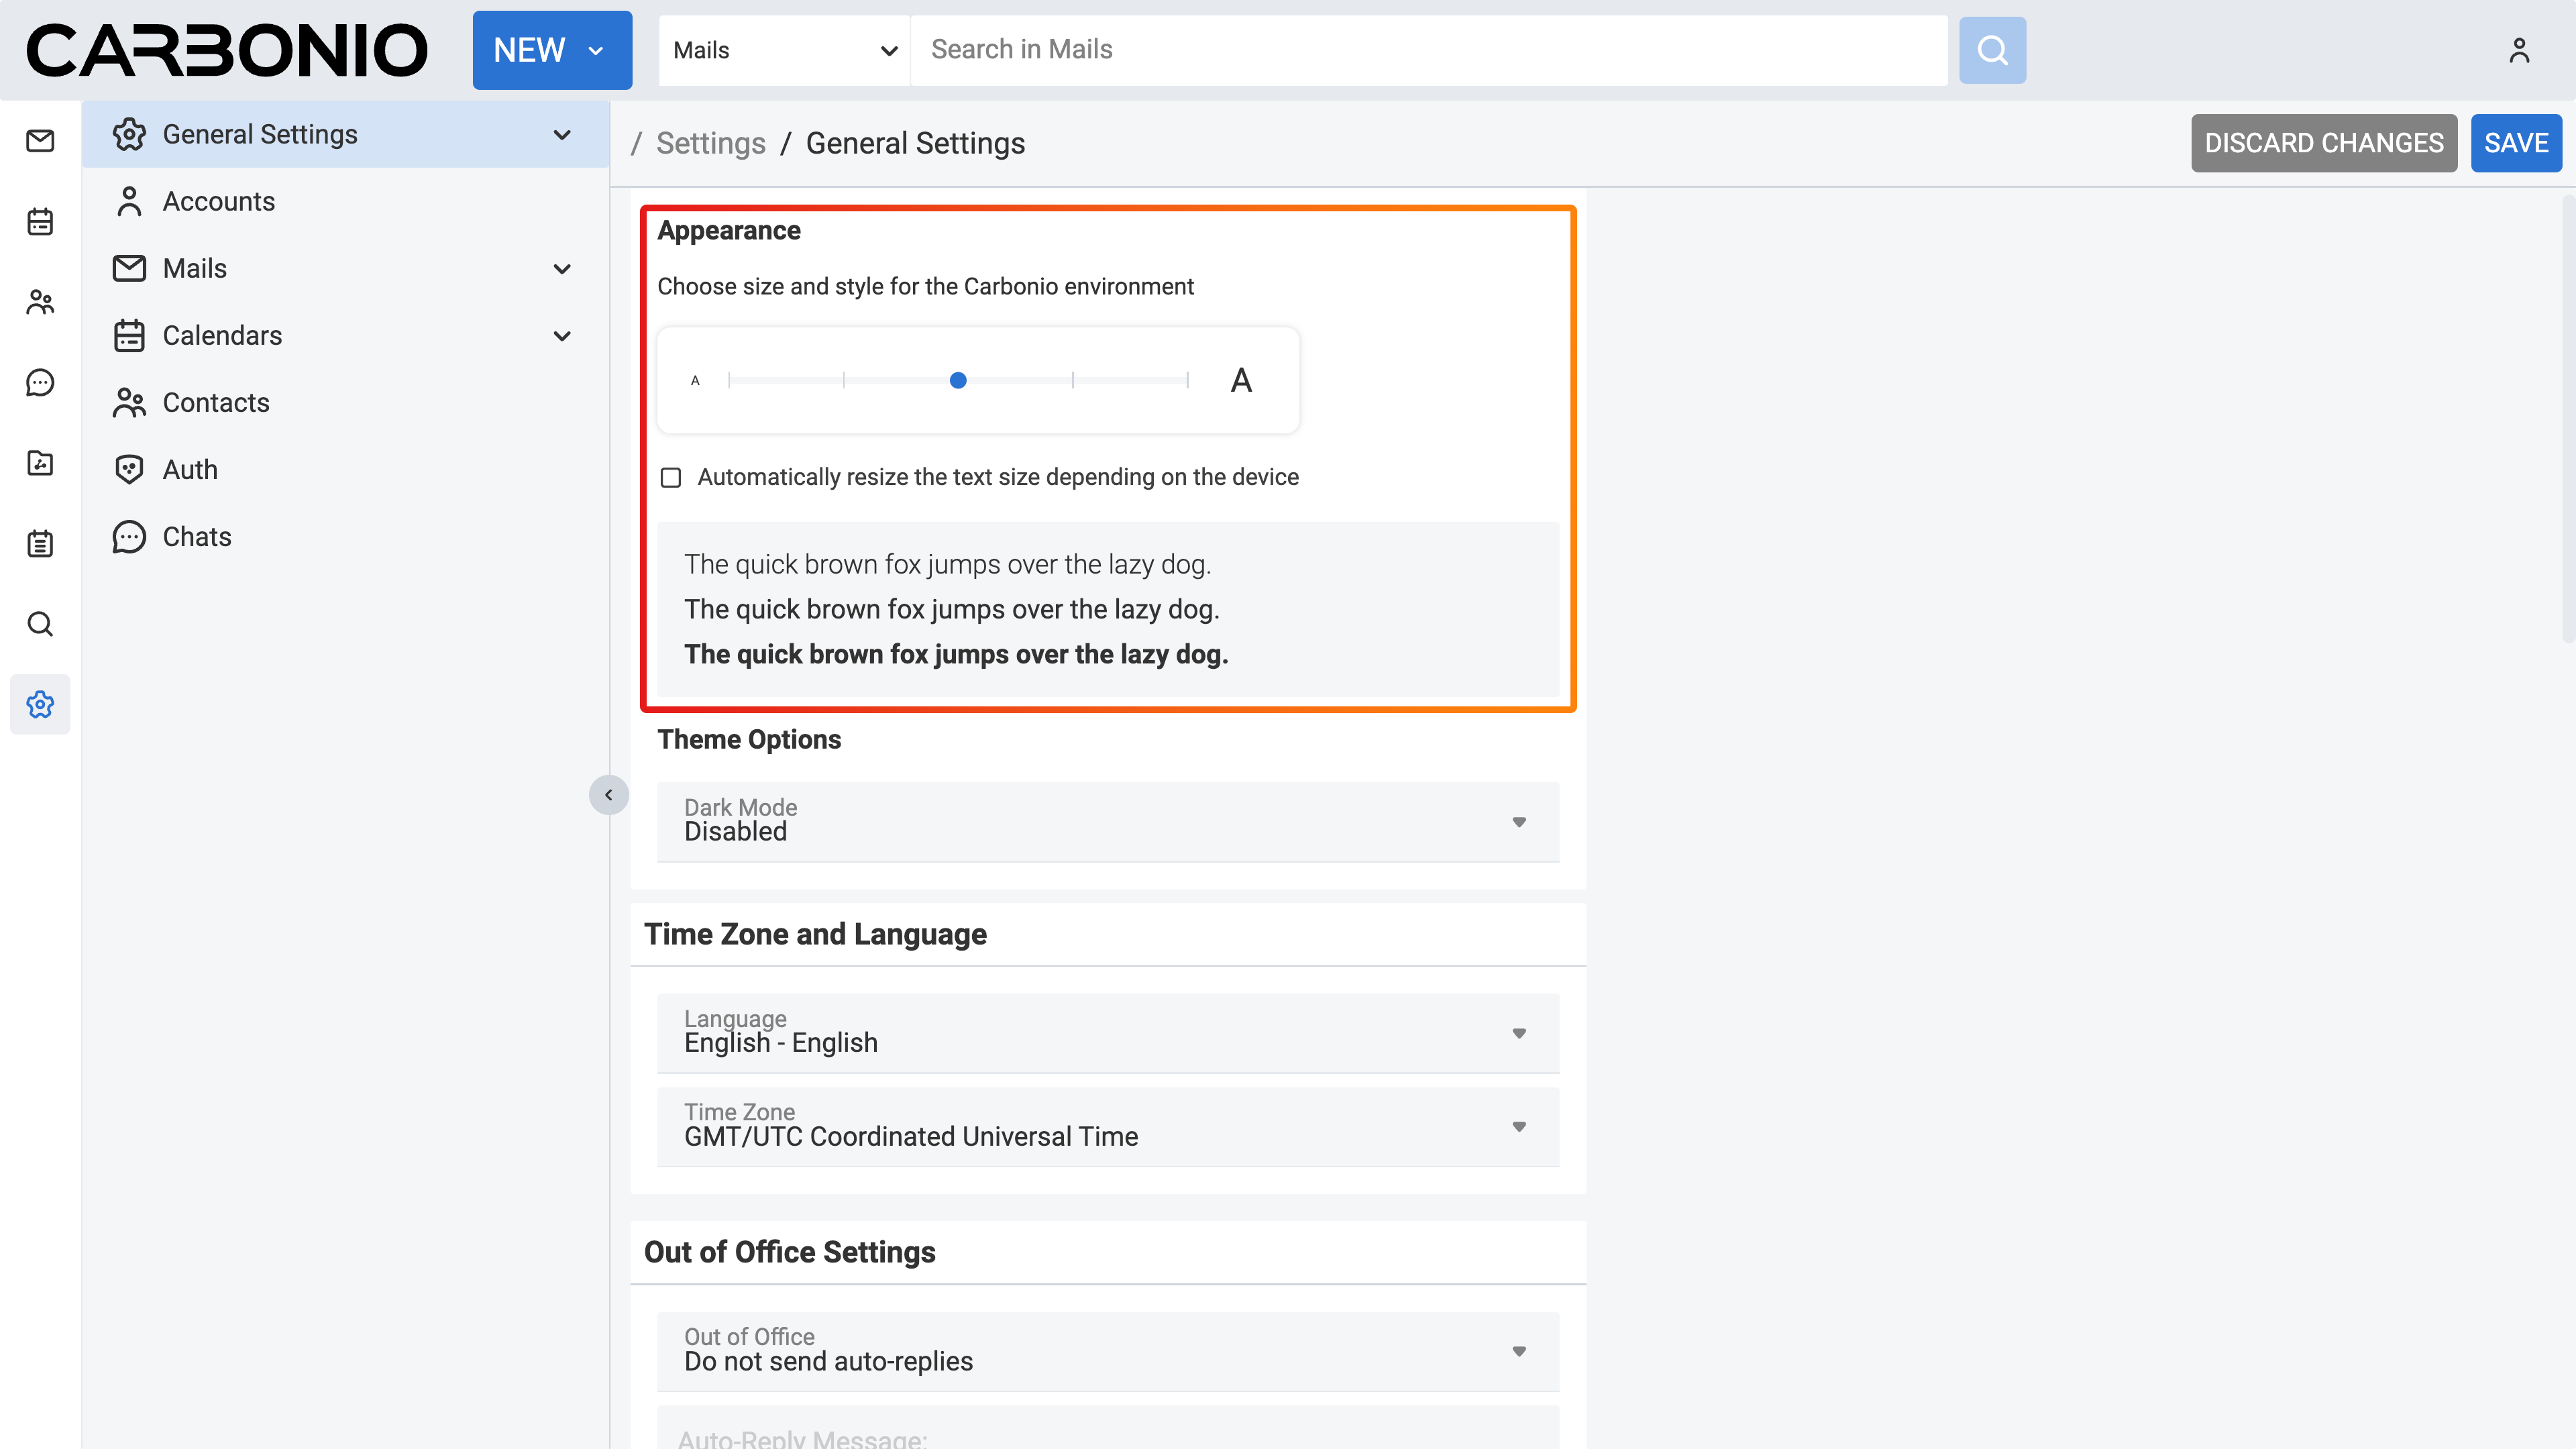
Changing Font Size#
You can change the font size across all Carbonio web clients according to your preferences. To change the font size simply follow these steps:
Open the Settings (gear icon) from the left sidebar.
Select General Settings.
Under the Appearance section, find the slider for adjusting the font size.
If you want to manually control the font size, uncheck the option that says Automatically resize the text size depending on the device.
Use the slider to set the font size to your preference. As you move the slider, you will see the results in the bottom box with some dummy text.
Once you are satisfied, click SAVE in the top right corner.
Remember, if you prefer automatic resizing based on the device, you can leave the checkbox checked. Otherwise, adjust the font size manually using the slider.
Manage time zones in Carbonio for accurate collaboration#
Carbonio relies on accurate time zone settings to ensure correct timestamps for calendars, emails, and other features.
This is particularly important when collaborating across different countries and time zones. By default, Carbonio uses the time zone configured on your operating system.
To display a different time zone in the Carbonio interface, update your system’s time zone settings.
Carbonio will then automatically apply the updated system time zone.
Changing Carbonio Language#
To change your Carbonio web client language, follow these steps:
Open the Settings (gear icon) from the left sidebar.
Select General Settings.
Under the Language section select the dropdown menu for Language and choose your language.
Click SAVE in the top right corner.
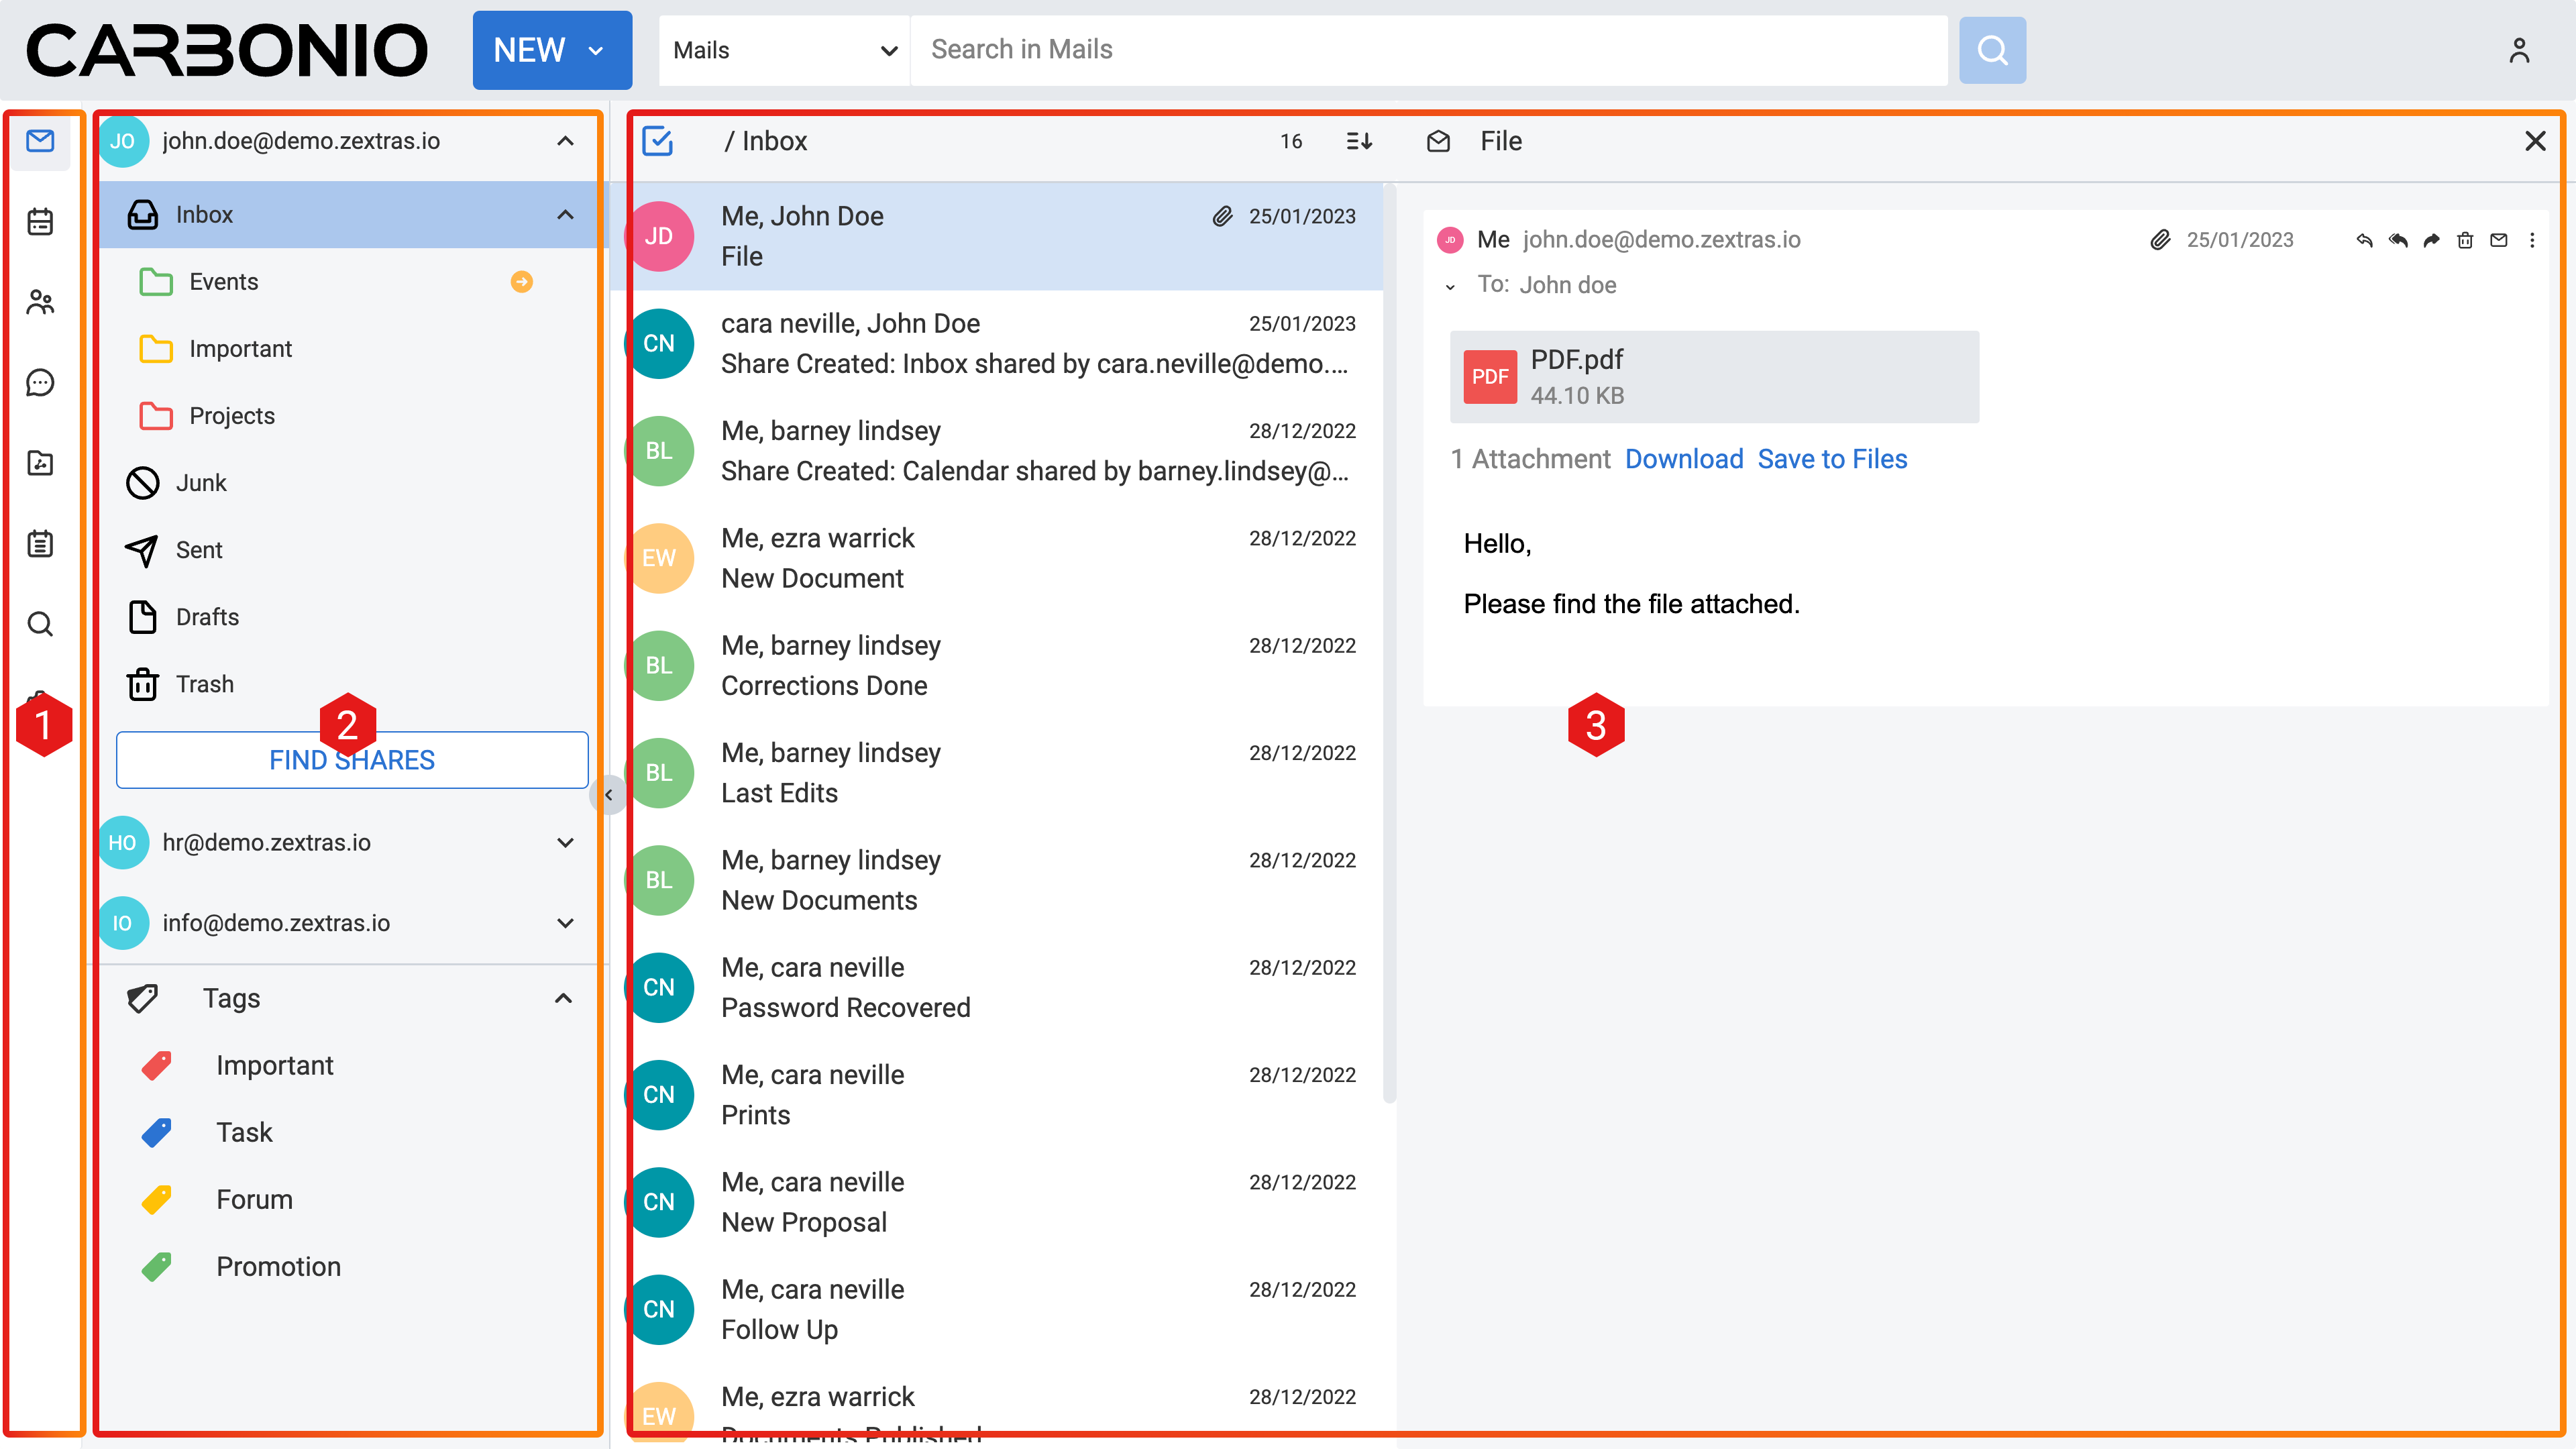
Accessing Multiple Accounts#
On the Carbonio web client, you have access to multiple accounts. Let’s say you have your personal account, as well as two additional accounts created for HR tasks and communications with your colleagues under the name “”, and another one named “” for external communications of the company. Only your system administrator can add these accounts and grant you access to manage them via your main account.
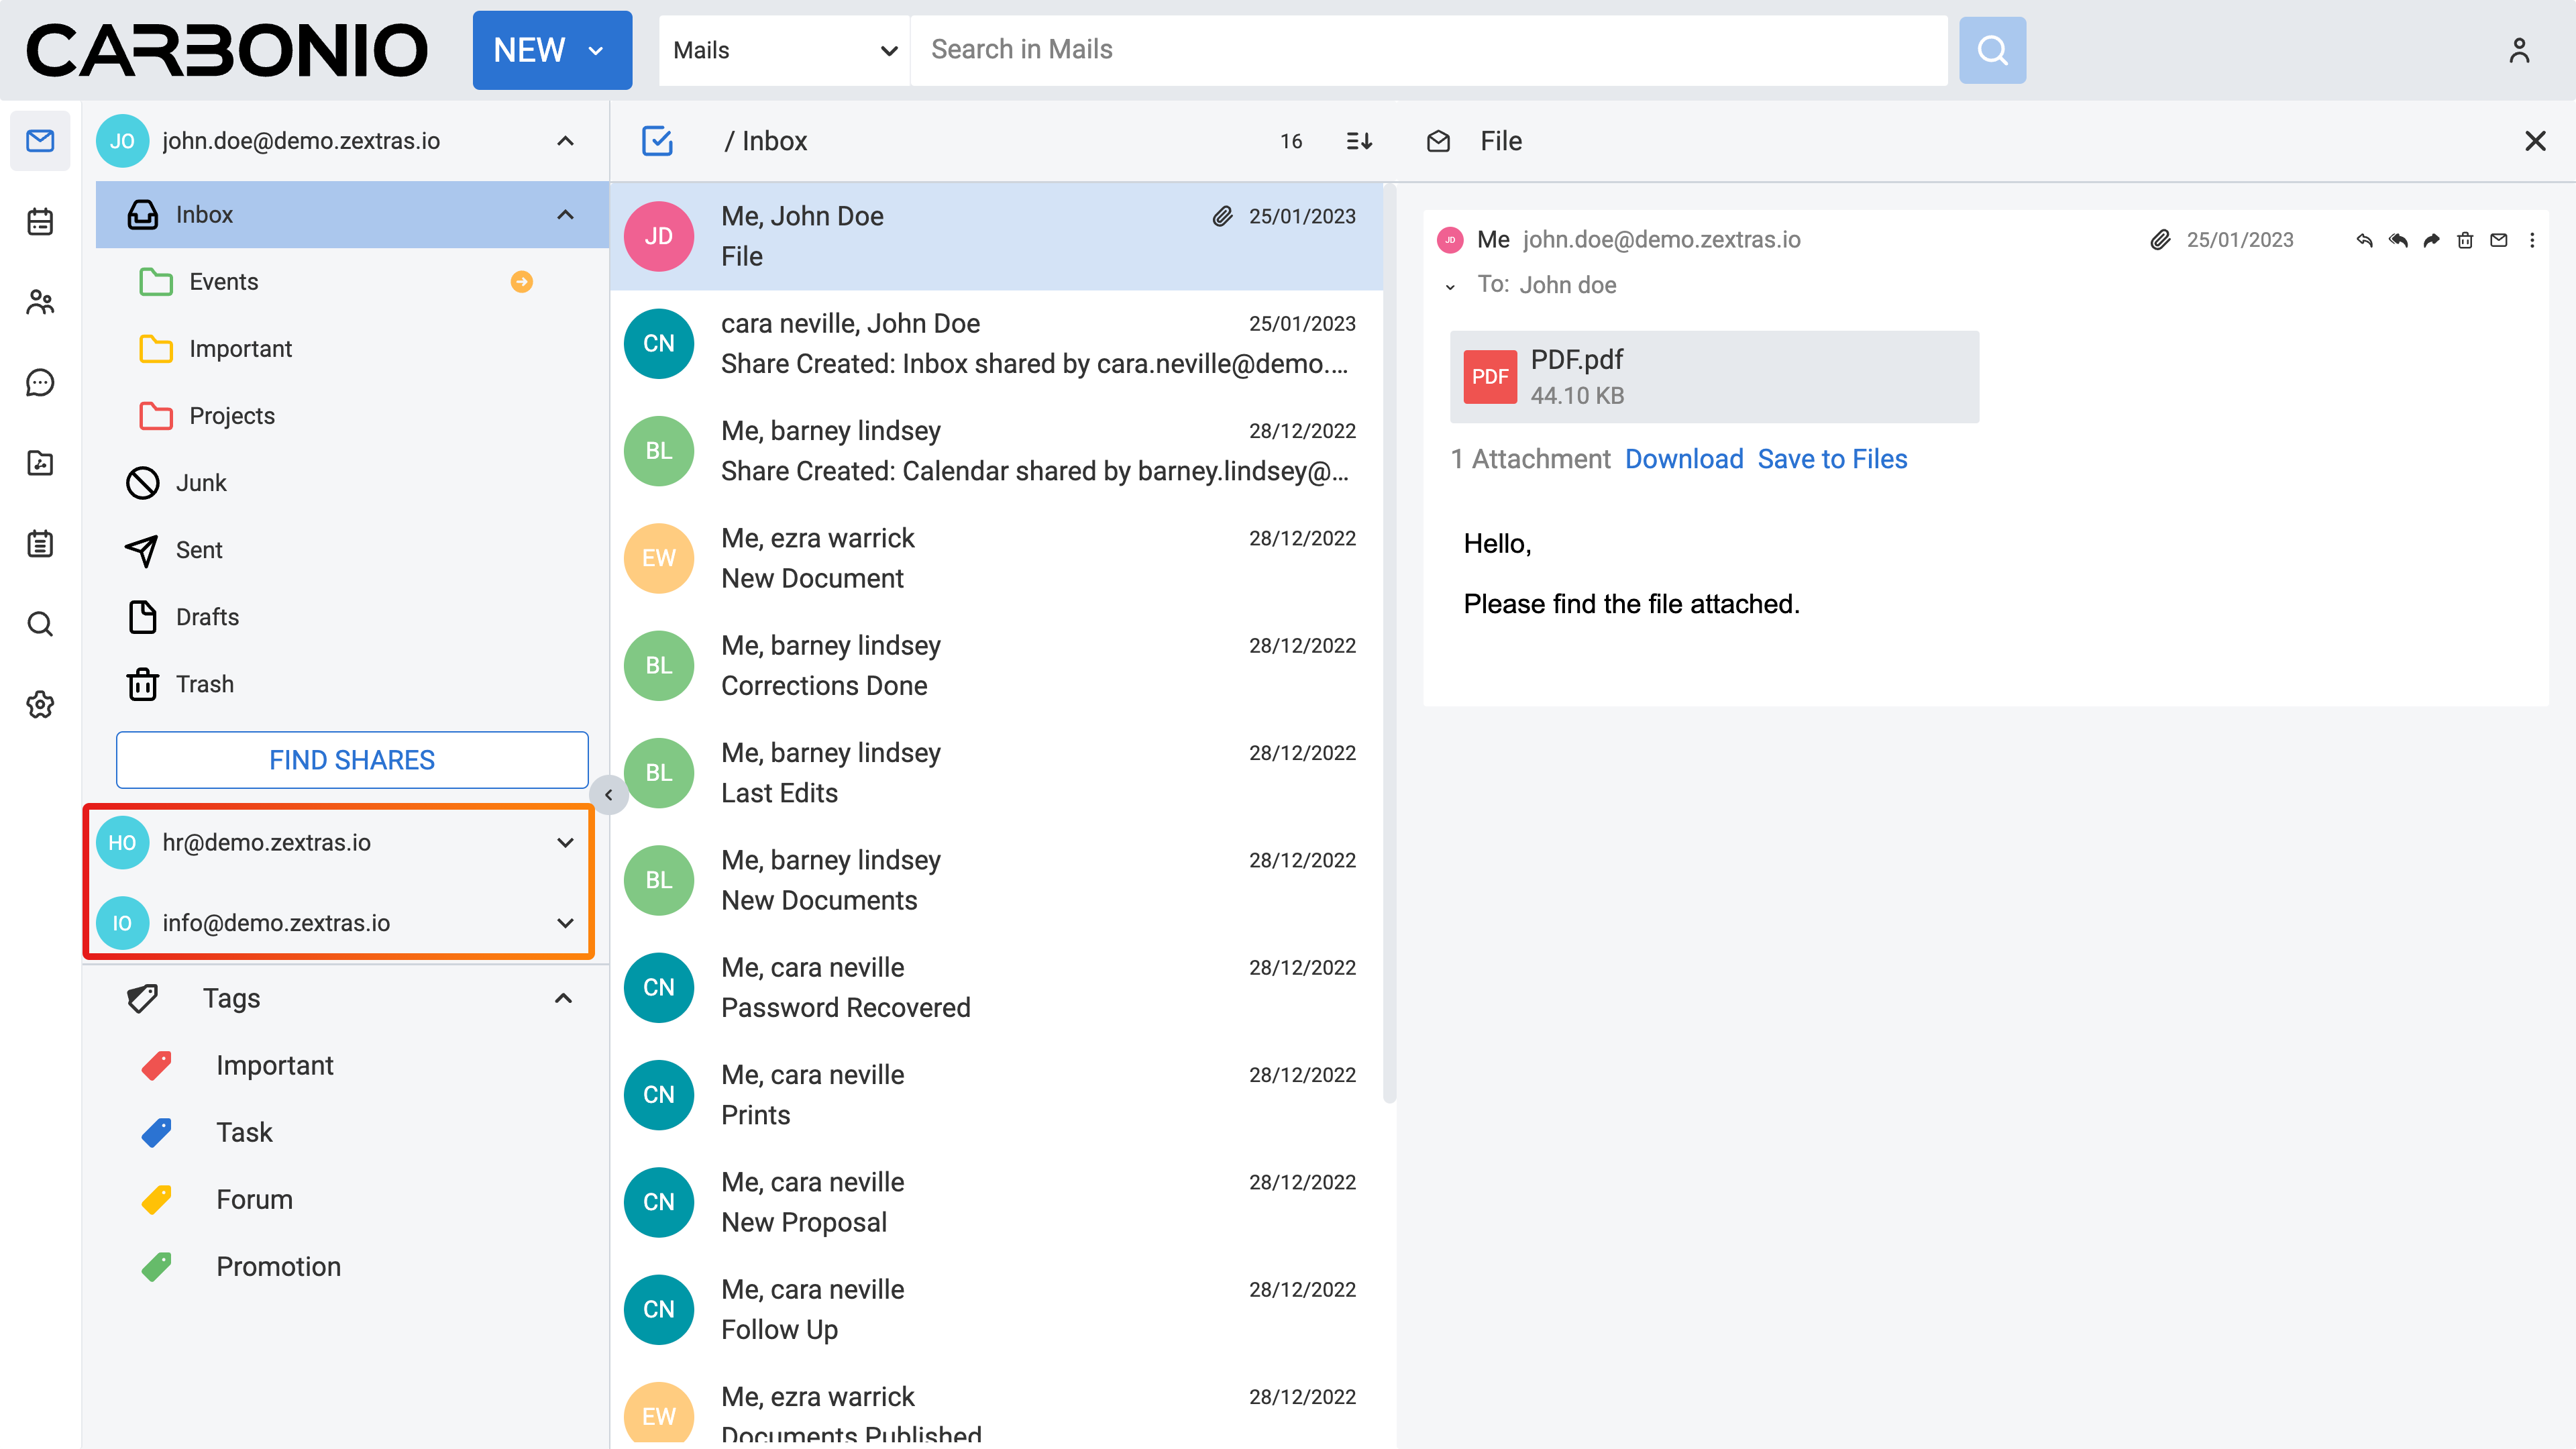
So, when you sign into your main account, you will see these two additional accounts listed under your main account. To access these accounts, simply click on the downward arrow next to their names to open a dropdown menu. From there, you can access the inbox and other folders within each account.