
Calendars#
The calendar component allows to keep track of the appointments, meetings, and events you need to attend to and share them with your colleagues.
Beside using NEW, a new appointment can be created in other ways. The first one is with a click of the mouse on the desired date and time on the calendar. The only difference is in the start (and end) date and time: by using the button, they are set to the current date and time, by clicking the calendar they are taken from the clicked date and time.
Alternatively, you can open an existing appointment, clone it, and edit only the relevant details, like for example date and time, without the necessity to create a new one and fill in all the details. This option is useful if you have to schedule recurrent events without a fixed schedule.
When an account is configured with multiple identities, it is possible to choose from which one to send the invitations: the e-mail’s sender will then be automatically filled according the identity chosen.
Attendees, whose presence is either mandatory or optional, can be added by writing their e-mail address. If the attendee already is not available or has some overlapping appointment, its e-mail address will be coloured and a message will be shown. This improves and makes easier the creation of events. Moreover, if the attendee is a distribution list, a small chevron next to the list name can be clicked to show all the members. Click the SELECT ALL ADDRESSES button to replace the distribution list with the e-mail addresses of each member.
Besides inviting attendees (internal colleagues or external people), many more information can be added to an appointment:
The Location where the meeting takes place (usually the town or city)
-
One or more Meeting Rooms and Equipments, if configured by the administrator, can be selected from a drop-down menu, if they are available, otherwise they are marked by an icon. In case either of them is already booked, it will be shown in the drop-down menu as well, although it can be selected even if it is booked.
Warning
You need to SEND an appointment to make sure that the resource is correctly booked, because otherwise the e-mail associated with the Resource is not notified.
Whether the appointment is private or not. If yes, no details is visible to other colleagues who have access to the calendar of the attendees.
The repeat recurrence of the appointment, that is, if it is a single appointment or it repeats. You can use any of the pre-defined recurrences (every day, week, month, or year) or define a custom one, that may end after a date or a number of occurrences.
-
The time zone, if different from the default one
Hint
You need to enable this option in the Calendars module’s Creating Appointment Section.
In case the invitation was not sent or if something went wrong, the event will show up in the calendar, but marked with a red icon. The attendee can propose a new time. In this case, new e-mail will be generated and sent to the other participant to inform them of the change.
When right-clicking an event in the calendar, different actions can be carried out: open it and show all participants and details, edit, copy or move it, and its original, plain text version, can be shown. In case you only need to modify the time allocated for an event (for example you need to move it to a different time slot or change either its start or end time), you can simply move it via drag&drop to the new time or use the tiny icons at the top or bottom of the event and move them to the new start or end times. If there are other participants in the event, a new e-mail notification, that you can even modify, will automatically be sent to them.
Additionally, Tags can be added to any calendar event and the event itself can be (tentatively) accepted or declined
Searching for events is easy: insert a search string in the quick search bar to retrieve a first batch of results. By default, all matches in the past and future 30 days are shown. To broaden or restrict the search, click the ADVANCED FILTER bar and select the new start and end dates using the date pickers. Optionally, also add more keywords to search.
Manage Invitations#
When you receive an e-mail invitation to an event and open it, it will be always accompanied by a green or yellow icon:
green: you are available for the full duration of the event.
yellow: some other appointments overlap with this and you should check your schedule
This happens only on the calendars associated to the account that received the e-mail (shared calendars or other accounts are not taken into account) and if in the calendar properties the option Exclude this calendar when reporting the free/busy/time is not ticked.
Additionally, public events that you can access may include a few icons that visually provide additional information. Their location is different if you see the event in the calendar or you open it to show its details.
Icon description |
Position on calendar entry |
Position on open entry |
|---|---|---|
A blue icon which requires to take an action (confirm or not your presence) |
Left-hand side |
Top right-hand side |
Whether it is a private appointment |
Left-hand side |
Top |
Any tags associated with the event |
Right-hand side |
Bottom |
If the event is recurrent |
Left-hand side |
Top right-hand side |
Calendar Export and Import#
Right click one of your calendars to download (in ICS format) all the
appointments that are included in the calendar. The file will be saved
in the default browser’s Downloads folder, with name composed by the
calendar name and the date of download. For example, a calendar called
Office Meetings exported on first of May 2024 will be called
office meetings-2024-05-01.ics.
If you save a single or a recurrent event, it will be saved with the
name of the event, for example an event called Team Meetings will be
saved as team meetings.ics, regardless if it is a single event
or a series of events
Hint
It is not possible to save a single instance of a recurrent event.
Calendar can be imported if they have been exported in ics format: right click one of your calendars to add any event to it.
Warning
If you export one of your calendars (source calendar) and import it into one of your other calendars (destination calendar), all the existing appointments in the destination calendar will be updated, but the source calendar will be emptied.
Configure a CalDAV Client#
Adding a Carbonio calendar to your favourite CalDAV client is straightforward and requires only a few steps. The procedure is almost identical on any client; in the box at the end of this section we mention which are the differences.
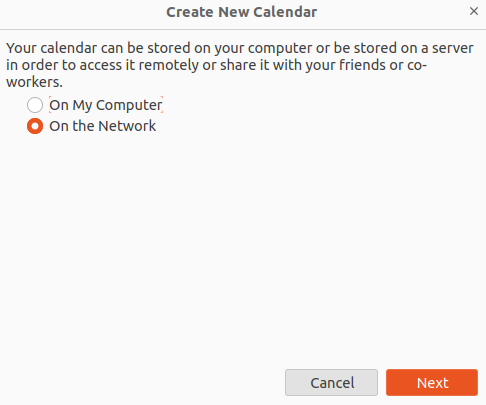
In this scenario, the user john.smith@example.com wants to configure in Mozilla’s Thunderbird a calendar called Calendar on the domain mail.example.com. In the remainder, replace these values with suitable ones.
On your client, go to the Calendar and select New Calendar…. Choose On the Network
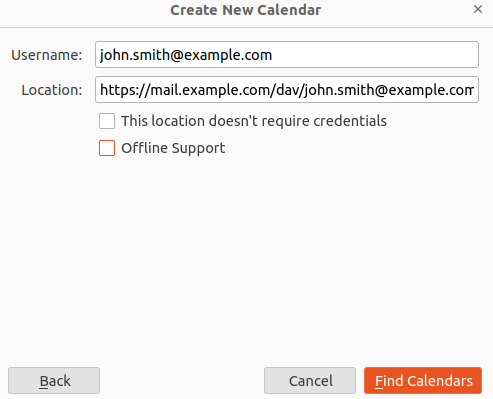
Provide the Username and the Location, which has format
https://<domain>/dav/username, so
https://mail.example.com/dav/john.smith@example.com
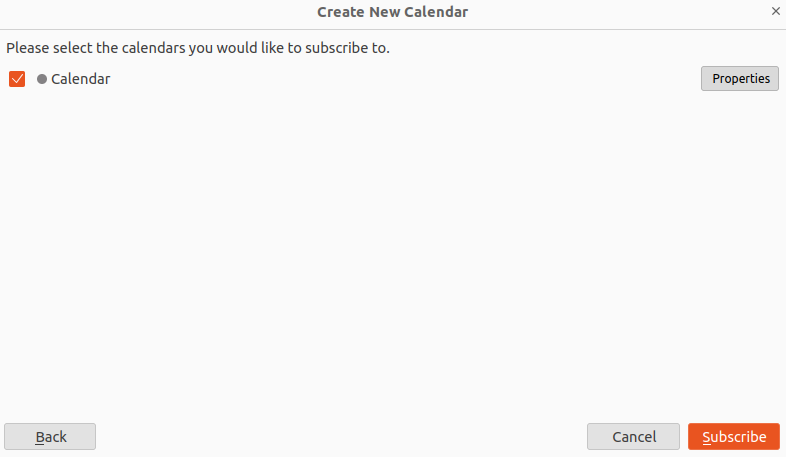
You will be then presented a list, from which to choose Calendar.
You are now done! the calendar will show up in the list of your client.
CalDAV is a standard protocol and therefore the data required to set up a client are a username, an URL, and the name of a calendar. The only difference is that some client requires that the calendar’s name be part of the URL, so you might need to provide https://mail.example.com/dav/john.smith@example.com/Calendar as the URL.