

Storage#
This section is used to configure and manage the remote servers, buckets, and volumes used to store the items (e-mails and, documents, and so on) available in Carbonio.
Global Servers#
Server List#
The lists of all configured server appears here.
Bucket list#
A new bucket can be added to the list by clicking the CREATE + button. In the opening dialog, you can add all the necessary data needed to set up and test communication with the remote bucket, including URL and access credentials. You can then proceed to section Data Volumes below to create volumes in the bucket.
Server Details#
In the Server Details section it is possible to select a server, check its currently used volumes and assign new ones, and finally configure HSM policies.
Data Volumes#
After you selected the server, the volumes it currently uses are shown, along with a few configured options. To add a new Volume, click on the NEW VOLUME button.
In the dialog window, provide the basic information of the new volume in the first tab: The allocation type, name, and path.
The second tab depends on the allocation:
Local: decide whether this is a primary, secondary, or index volume and the path on which to mount it; then select a compression threshold if necessary, and finally if this will become the new current volume.
-
Object Storage: primary, secondary, or index volume, select the type of Object Storage and a prefix to identify the volume. You can set this volume as Centralized, which proves useful in case it will be shared by multiple servers.
Hint
You need to have already configured a bucket to create a volume of type Object Storage.
HSM Settings#
HSM settings are policies for automatically processing objects in the mailstore: e-mails, documents, contacts, and events.
HSM Policies can be scheduled to be run automatically at given times and days; after this operation, deduplication can be enabled to save space in case of duplicated items, by keeping only one copy of an item.
The syntax of the policies’ scheduling is the same used in the crontab: you need to provide a value for each of the 5 fields:
Field |
Allowed values |
|---|---|
minute |
0–59 |
hour |
0–23 |
day of month |
1–31 |
month |
1–12 (or names: jan. feb, and so on) |
day of week |
0–7 (or names: sun, mon, and so on.) Depending on the system locale, 0 can be Sunday or Monday |
You can use an asterisk instead of a value, to mean all the values for that field. For example, 52 6 1 * * means that the policies will be run at 6:52 AM on every first day of the month; while 47 4 * * sun run at 4:47 every Sunday.
See also
For more information about the syntax, and for more complex examples, please refer to the crontab’s manpage: frm CLI, run man 5 crontab.
New policies can be added using the NEW button (see section below, Create a New Policy), while all existent policies can be run at once by clicking the RUN ALL button. To remove an existent policy, select it and click the DELETE button.
Create a New Policy#
The dialog that opens after clicking the NEW button allows to create a new HSM policy in a few steps.
A new policy will be the first in the list: when policies are run, either manually or via schedule, they are processed in the order shown, from top to bottom.
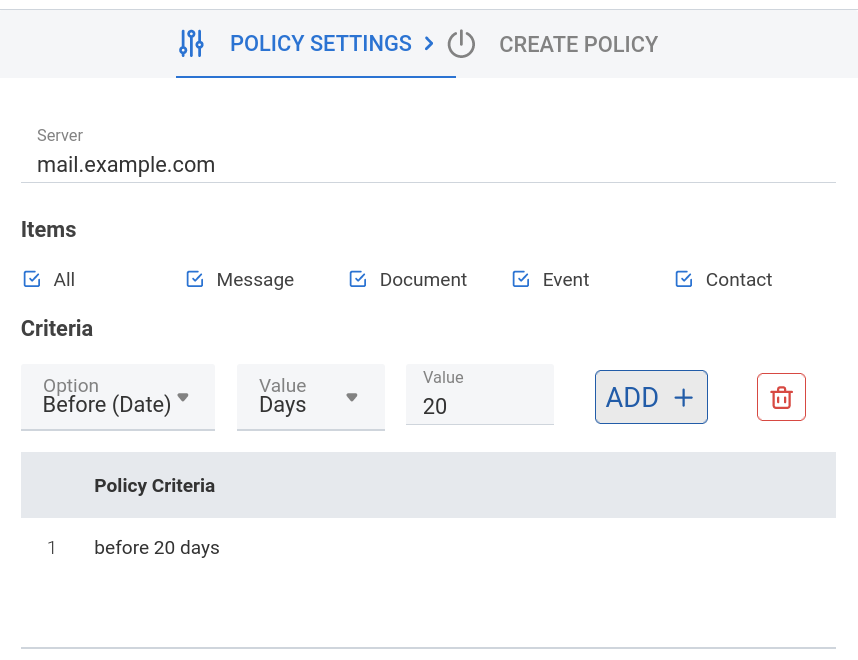
In the upper part of the dialog, select to which items the policy will be applied.
Hint
A click on the All checkbox toggles all items at once.
In our example, we move all items older than 20 days: if today is March 21st, this means all items whose date is before March 1st.
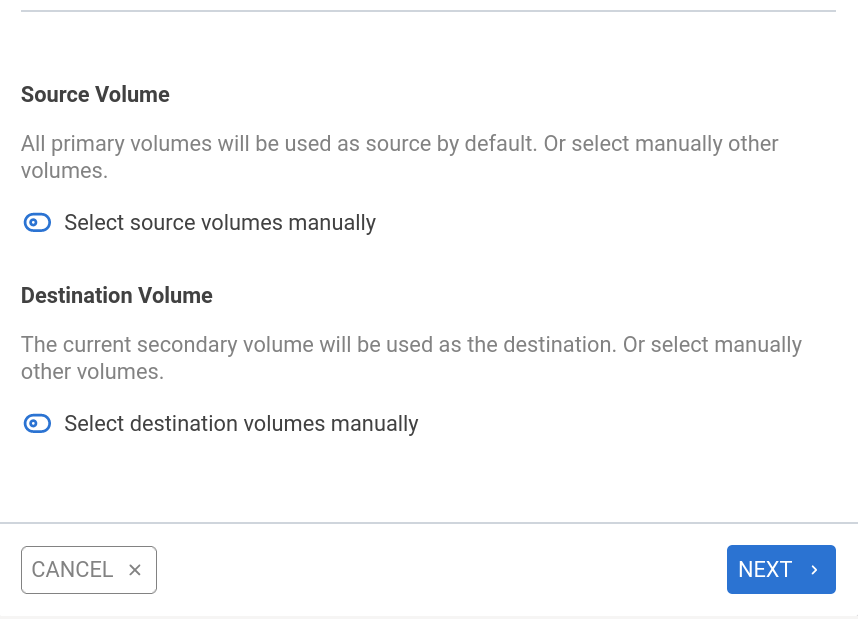
In the lower part of the dialog, chose the source and destination volumes to which the policy is applied. By default, all the primary volumes are selected as source, while the destination is always the current secondary volume. While it is possible to manually specify the volumes from the list, we do not change this.
Hint
You can select multiple source volumes, but only one destination volume.
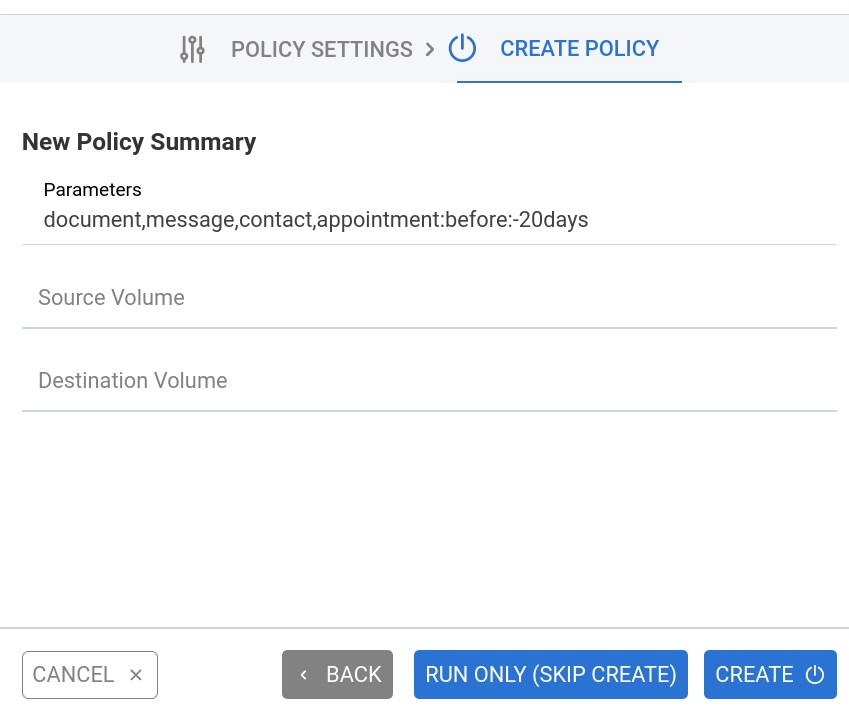
The last step shows the settings for review. You can use the buttons at the bottom to:
CANCEL exit the policy creation and close the dialog
BACK go back to change any options
RUN ONLY run the policy once and exit
CREATE create the policy
Note
For detailed information and advanced configuration options for HSM policies, refer to the Command Line Interface (CLI) section: Defining Policies.