Create Accounts

Create Accounts#

In this section we provide directions to create a new account or shared account, by configuring the most common options. You can then further configure the user features and data: have a look at the full list of options for a new account can be found in section Accounts.

If you want to create a Global Admin or Delegated (Domain) Admin, please create a new account, then refer to section How to Create an Administrator, where you can also find information about administrator’s rights (permissions), their management, and the various types of administrators.

Create an Account#

In order to create a new account, click the + button: a dialog window opens and allows you to set up the basic configuration of the new account.

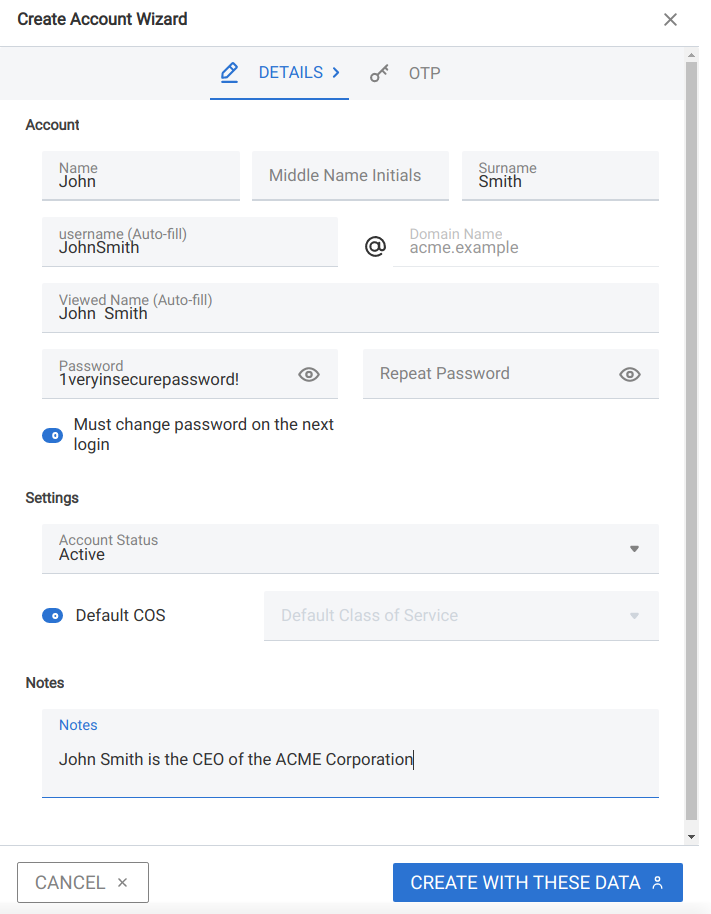
Step 1: Create New Account John Smith

We create the first account for the CEO of ACME Corporation and provide the following data.

  • Name, Middle Name Initials, and Surname will be used to define the user name. We use only Name (John) and Surname (Smith), which result in the JohnSmith username.

    If the name or surname contain non-ASCII characters, an automatic mapping will be enforced: for example, ä, à will become a. When there is no mapping available, message Auto fill user is disabled will be displayed: in this case, the username must be filled manually. This is the case for example, for letters using diacritics, cedillas or German’s ß.

    Hint

    You can change the automatically generated username at will, for example to match company policies.

  • Password is the one used by John for the first login only

  • User will change password on the next login requires that John, after the first log in (and before accessing his mailbox) must change the password.

We also explicitly configure the Account Status (see the list of possible values), but do not change the Default COS. Click the CREATE WITH THESE DATA button to create the account

Note

When assigning a COS to a user, all the values defined in that COS will be inherited by the user. They can be later changed on a user basis later, when editing the account.
../../_images/new-account-details.png
(Optional) Step 2: Send OTP or grant rights to John Smith

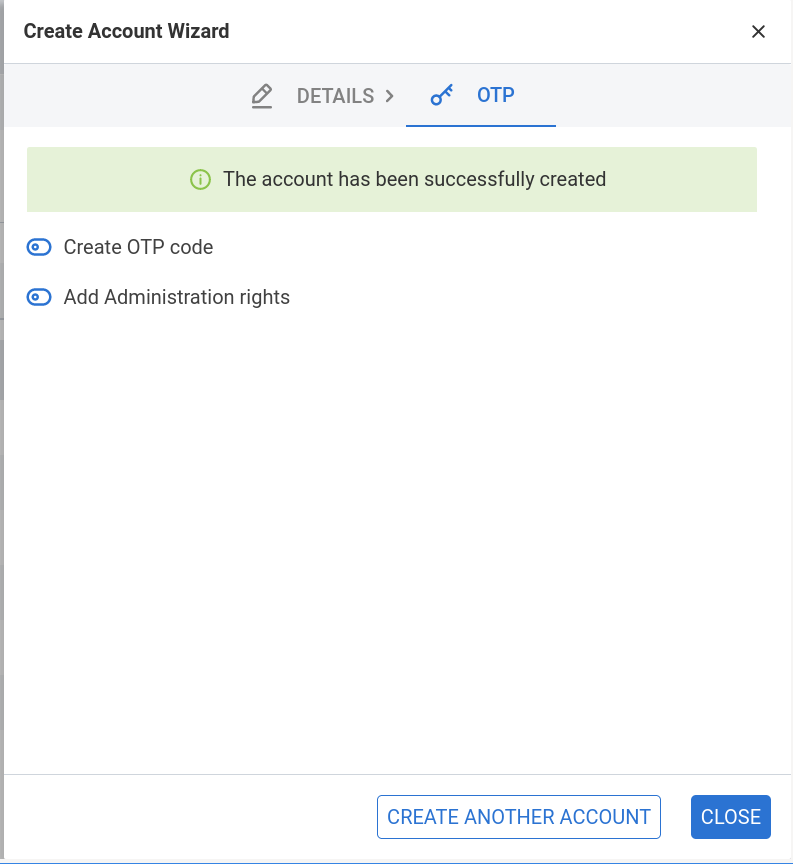
Once the account has been created, you can optionally create an OTP code for John Smith, that he can use to quickly access his account.

You can also give the account administrative rights, that you can customise. In this case, the account creation procedure continues and allow to grant Global Administration Rights (see Section How to Create an Administrator) or Delegated rights (see Section Administrative Roles Explained.
../../_images/new-account-otp.png

Create a Shared Account#

In order to create a new Shared Account, first create a new account, then select the account and click the EDIT button. In the DELEGATES tab you can configure who has access to the account and assigned rights in two ways: a Simplified and an Advanced View. There are small differences in the two views, the most relevant is how to set the permission.

Hint

Details on the rights that can be granted can be found in the box.

Simplified View

In the Simplified View, select a user or group, then the permission and click the ADD THE ACCOUNT button to add it as a delegate. The delegated accounts will appear at the bottom of the tab.

Advanced View

In the Advanced View, click ADD NEW +, then select an existing user or group (Distribution List). Proceed to the next tab (SET RIGHTS) and select the right to be assigned to the user or group from the drop-down menu.

Note

The user who delegates and the user who is the delegated can not share the same account; in other words, it is not possible to add as a delegated user the same account of the user who is delegating.

Available Delegate’s Rights

The Rights that can be granted to a user are basically to read, write, and send emails, and to access e-mails folders. Rights can be granted when editing an account, in the dedicated Delegates tab. Rights can be granted using a Simplified or an Advanced method.

The Simplified method permissions are granted using checkboxes:

  • read, access with no permission to change

  • read/write, full read and write permission

  • send, the recipient will see as sender the selected user

  • send on behalf, similar to the previous. the recipient will see the the sender’s e-mail preceded by the string On behalf of

In the Advanced method, rights are given in a slight different way and can be defined in a more granular way. In the SET RIGHTS step it is possible to grant the following rights: Send Mails only, Read Mails only, Send and Read Mails, Manage and Send, Read, and Manage Mails (all of the above). Depending on the choice, the bottom part will show additional options, according to the following table.

Option

Additional options

Send Mails only

Send, Send on Behalf of

Read Mails only

folders to share

Send and Read Mails

Send, Send on Behalf of; folders to share

Manage

Folders to share

Send, Read, and Manage Mails

Send, Send on Behalf of; folders to share