
Extend Manual Installation: Video Server Node#
This section contains the architectural diagram, requirements, network configuration, and directions to set up the additional Video Server Node.
Architecture#
The architecture of this scenario is depicted in the following diagram.
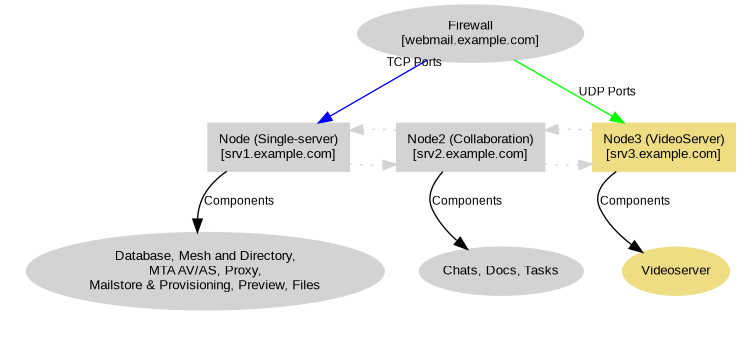
Fig. 7 Sample diagram of Video Server Node within the Single Server scenario.#
Network Configuration#
The following ports must be forwarded from the external network, i.e., they are required for proper access to Carbonio from the Internet.
Public hostname |
Ports & Service |
Mapping |
|---|---|---|
mail.example.com |
|
srv3.example.com |
Video Server Node Installation#
Directions are separated in steps, organised in drop-downs. Click each of them to expand the content.
Step 1: Configuration of Repositories
Carbonio
In order to configure Carbonio’s repository, you need to some files with the necessary information.
It you install Carbonio on Ubuntu, you also need to import the GPG key used for signing the packages and verify them.
You need to create file /etc/apt/sources.list.d/zextras.list
and add the following content to it:
deb [arch=amd64 signed-by=/usr/share/keyrings/zextras.gpg] https://repo.zextras.io/release/ubuntu jammy main
Hint
Make sure the above content is correctly saved on the same line
You need to create file /etc/apt/sources.list.d/zextras.list
and add the following content to it:
deb [arch=amd64 signed-by=/usr/share/keyrings/zextras.gpg] https://repo.zextras.io/release/ubuntu noble main
Hint
Make sure the above content is correctly saved on the same line
You need to create file /etc/yum.repos.d/zextras.repo
and add the following content to it:
[zextras]
name=zextras
baseurl=https://repo.zextras.io/release/rhel8
enabled=1
repo_gpgcheck=1
gpgcheck=0
gpgkey=https://repo.zextras.io/repomd.xml.key
You need to create file /etc/yum.repos.d/zextras.repo
and add the following content to it:
[zextras]
name=zextras
baseurl=https://repo.zextras.io/release/rhel9
enabled=1
repo_gpgcheck=1
gpgcheck=0
gpgkey=https://repo.zextras.io/repomd.xml.key
This step is required only on Ubuntu systems (Ubuntu 22.04 and Ubuntu 24.04).
Download and save the GPG key
# wget -O- "https://keyserver.ubuntu.com/pks/lookup?op=get&search=0x5dc7680bc4378c471a7fa80f52fd40243e584a21" | gpg --dearmor | sudo tee /usr/share/keyrings/zextras.gpg > /dev/null
Assign correct access permissions to the key
# chmod 644 /usr/share/keyrings/zextras.gpg
Download and save the GPG key
# wget -O- "https://keyserver.ubuntu.com/pks/lookup?op=get&search=0x5dc7680bc4378c471a7fa80f52fd40243e584a21" | gpg --dearmor | sudo tee /usr/share/keyrings/zextras.gpg > /dev/null
Assign correct access permissions to the key
# chmod 644 /usr/share/keyrings/zextras.gpg
This step is not needed.
This step is not needed.
This step is not needed.
This step is not needed.
You need to add the EPEL repository and enable the BaseOS, Appstream, and CodeReady repositories.
# dnf -y install https://dl.fedoraproject.org/pub/epel/epel-release-latest-8.noarch.rpm
# subscription-manager repos --enable=rhel-8-for-x86_64-baseos-rpms
# subscription-manager repos --enable=rhel-8-for-x86_64-appstream-rpms
# subscription-manager repos --enable=codeready-builder-for-rhel-8-x86_64-rpms
You need to add the EPEL repository and enable the BaseOS, Appstream, and CodeReady repositories.
# dnf -y install https://dl.fedoraproject.org/pub/epel/epel-release-latest-9.noarch.rpm
# subscription-manager repos --enable=rhel-9-for-x86_64-baseos-rpms
# subscription-manager repos --enable=rhel-9-for-x86_64-appstream-rpms
# subscription-manager repos --enable=codeready-builder-for-rhel-9-x86_64-rpms
Step 2: Setting Hostname
Carbonio needs a valid FQDN as hostname and a valid entry in the
/etc/hosts file. Therefore, it is necessary to take care of
properly configuring the /etc/hosts file, otherwise the services
will not be able to bind to the correct address, leading to a
disruption in Carbonio's functionality.
To configure the file and the hostname, execute these two commands.
Note
Replace the values srv1.example.com and 172.16.0.10
with values suitable for your setup.
First, set the hostname
# hostnamectl set-hostname srv1.example.com
then replace the content of the /etc/hosts file with IP and
hostname.
# echo -e "127.0.0.1 localhost\n172.16.0.10 srv1.example.com srv1" > /etc/hosts
You can also simply get the current IP and hostname and save it in the
file /etc/hosts/:
# echo "$(hostname -I) $(hostname -f)"
Step 3: System Upgrade and Package Installation
After configuring the repositories, the installation of Carbonio requires to run a few commands.
We start by updating and upgrading the system.
# apt update && apt upgrade
# apt update && apt upgrade
# dnf upgrade
# dnf upgrade
Next, we install all packages needed for Carbonio.
# apt install service-discover-agent \
carbonio-videoserver-advanced carbonio-videorecorder
# apt install service-discover-agent \
carbonio-videoserver-advanced carbonio-videorecorder
# dnf install service-discover-agent \
carbonio-videoserver-advanced carbonio-videorecorder
# dnf install service-discover-agent \
carbonio-videoserver-advanced carbonio-videorecorder
Step 4: Bootstrap Carbonio
To carry out this step, you need the LDAP password and the Node hostname that you have retrieved at Step 9 of the Core Node (see Data Required for Additional Nodes).
Use the following command to configure and launch Carbonio.
# carbonio-bootstrap
Before finalising the bootstrap, press y to apply the configuration. The process will continue until its completion: click Enter to continue.
What does carbonio-bootstrap do?
This command makes a few checks and then starts the installation, during which a few messages are shown, including the name of the log file that will store all messages produced during the process:
Operations logged to /tmp/zmsetup.20211014-154807.log
In case the connection is lost during the installation, it is
possible to log in again and check the content of that file
for information about the status of the installation. If the
file does not exist anymore, the installation has already
been completed and in that case the log file can be found in
directory /opt/zextras/log.
The first part of the bootstrap enables all necessary services and creates a new administrator account (zextras@mail.example.com), initially without password (see below for instruction to set it).
Step 5: Setup Carbonio Mesh
To carry out this step, you need the Carbonio Mesh secret generated during the installation of the Core Node (see Data Required for Additional Nodes).
The Carbonio Mesh configuration is interactively generated by command
# service-discover setup-wizard
To complete Carbonio Mesh installation, run
# pending-setups -a
Step 6: Configure Carbonio VideoServer
1. Routing & mapping
Starting from 25.3 release, the /etc/janus/janus.jcfg
configuration file will be updated automatically to include the Carbonio VideoServer
public IP address (i.e., the one that will accept incoming
connections to the Carbonio VideoServer) using a curl call.
Different IPs for outgoing and incoming traffic
This might be incorrect in case the Node setup has different IP addresses for incoming and outgoing traffic, for example:
the incoming traffic to the Carbonio VideoServer node is routed using IP address 203.0.113.102
the outgoing traffic from the Node to the Internet is routed through IP address 203.0.113.105
In cases like this one, the curl call would return the latter IP (i.e., 105), but the actual IP in the configuration file should be the former (102).
Therefore, after the installation, make sure that the correct public
IP address is present in the file: the line containing the
nat_1_1_mapping variable should be:
nat_1_1_mapping = "203.0.113.102"
VideoServer not exposed to the Internet (LAN-only deployments)
In some deployment scenarios, the VideoServer is not publicly exposed, and video meetings take place only between peers within the same local network (LAN).
In these cases, the automatically configured public IP address is not suitable and may cause connectivity issues.
Required action
When the VideoServer is not exposed externally, the
nat_1_1_mapping parameter must be manually set to the private IP
address of the host where the VideoServer component is installed.
For example:
nat_1_1_mapping = "192.168.1.50"
Apply changes after updating janus.jcfg
After each change to the nat_1_1_mapping parameter in the
/etc/janus/janus.jcfg configuration file, restart the
VideoServer service to apply the new IP address.
Enable and start the service with the commands
# systemctl enable carbonio-videoserver.service
# systemctl start  carbonio-videoserver.service
2. Check Video Server & Broker
To make sure that videoserver and message broker are connected successfully, check that in the carbonio-videoserver logs (journalctl -u carbonio-videoserver) you find the line:
RabbitMQEventHandler: Connected successfullySetup of RabbitMQ event
handler completed