

Details#
In the various subsection present in Details, it is possible to refine the configuration of the domain. Values for most of the options (for example the Time Zone), if not specified for a given domain, are inherited from the main domain defined.
General Settings#
General setting influence the basic domain configuration; most of them
appear during the creation of the domain. More
options allow to define the time zone, the use of HTTP or
HTTPS protocol (we suggest using always the latter), and a mail
server used for spam-relay purposes.
Option Search users from a specific domain allows to see whether a Global Administrator has allowed users of the domain to search for users in other domain. This option has effect only if option Allow searching users’ information in all domains is disabled (see , this box), and can not be modified by Domain Administrators.
Moreover, a default COS and its status can be attached to the domain.
A COS can be defined for a whole domain or an account and determines its status, that is, its ability to log in to the domain and access the e-mail. If the domain COS and a user’s COS differ, the resulting status of the account is shown. Each COS can be defined with one of the following five values.
Active. The COS is enabled, therefore the domain and its accounts can be used for everyday operations.
-
Closed. The domain is shut down, no access is granted, and all incoming e-mails are rejected.
Hint
This status overrides the individual accounts COS status.
Locked. In this state, user access is not possible, unless individual accounts are marked as Active. Incoming e-mails are regularly delivered to the accounts.
Maintenance. Users can not log in, their incoming e-mails are not delivered but are kept in a queue by the MTA. If the account’s status is closed, it overrides the domain status setting, that is, the user’s incoming e-mails are rejected.
Suspended. A status similar to maintenance, with the difference that no accounts or distribution lists can be changed. If the account’s status is closed, it overrides the domain status setting, that is, the user’s incoming e-mails are rejected.
We build on the domain created in previous section and attach some property.
Public Service Hostname#
Force clients to connect only using https.
The timezone is set to Hawaii’s time.
The COS used by the domain, which is left to the default
one.
It is the FQDN (mail.acme.example) used by clients to
connect to the domain and must correspond to the DNS A
record to be reachable publicly. If the A record is set to a
private IP address, to reach the WebGUI you need some mechanism,
like e.g., a VPN tunnel.
More details about this parameter in Section Domain Parameters to Publish Carbonio Webmail.
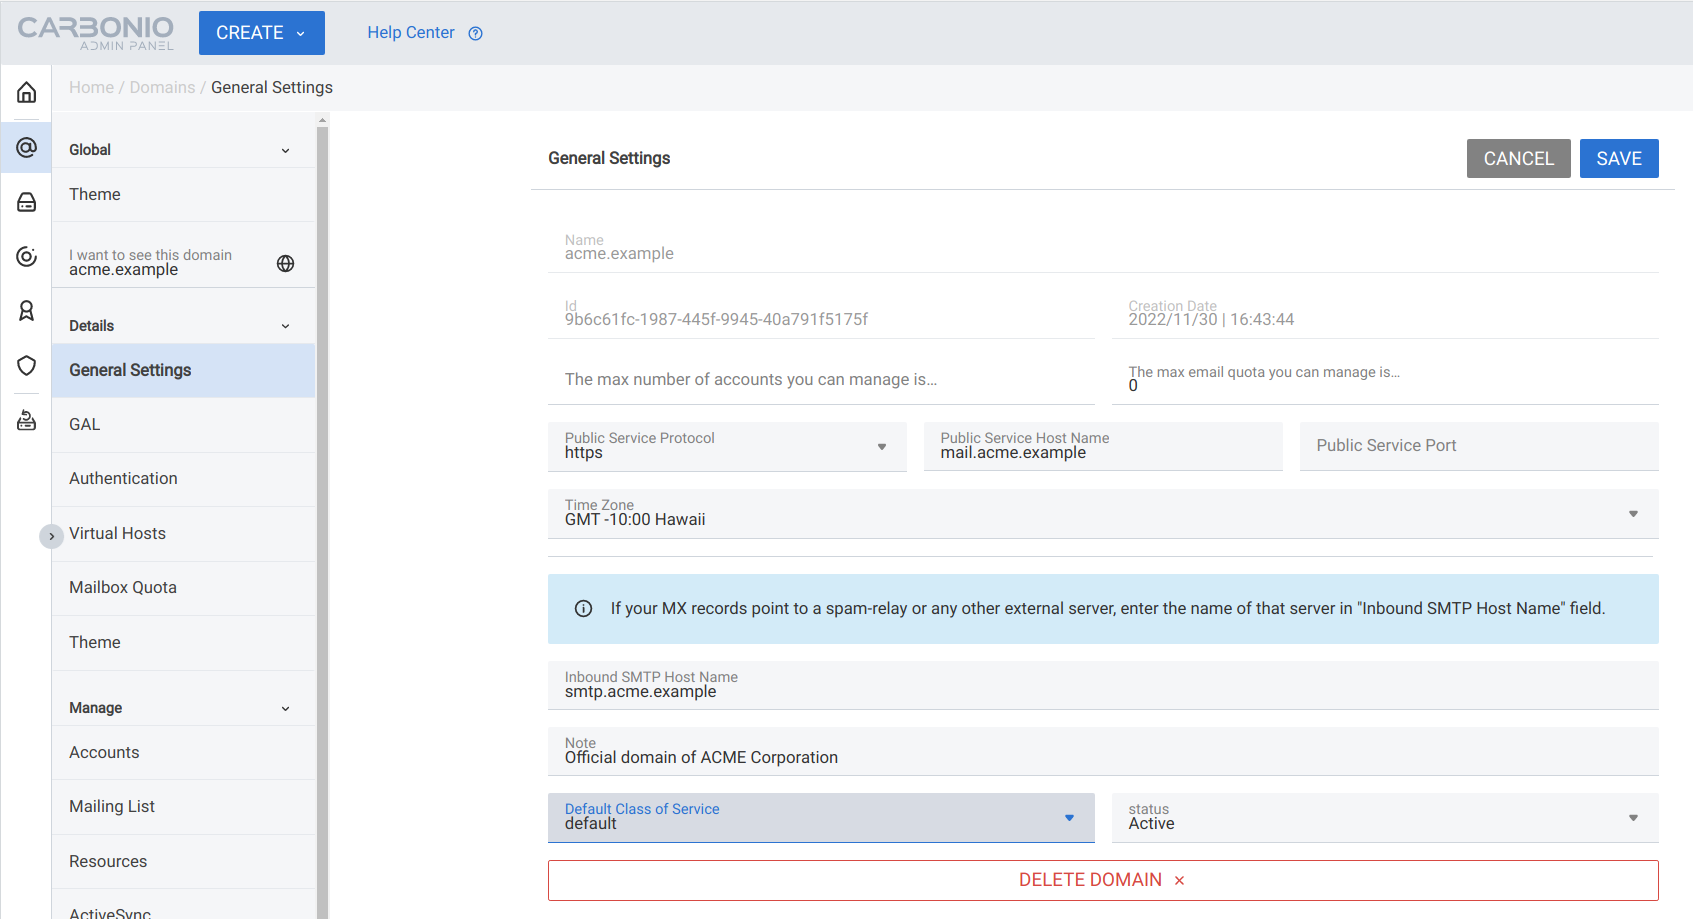
At the bottom of the page, button DELETE DOMAIN allows to delete the domain. When clicked, a dialog will open, listing all items defined on the domain (Accounts, Distribution Lists, Resources, and so on) and that will be deleted together with the domain. Two choices are available: to Close the domain, keeping all items but preventing access, or Remove the domain and all its items.
Warning
The removal of the domain is an operation that can not be undone: all the items are gone forever.
Global Address List#
A GAL is a special account (“GALSync Account”) that contains all e-mail accounts configured on the server and provides the ability to quickly search e-mail addresses, for example when composing an email or adding participants to an event in the Calendar. A GAL can be internal when configured on Carbonio, external (when configured on the LDAP used by Carbonio, or both. In this page you see the email-address of the GALSync account, you can change it from external to internal, or vice versa, or both. you can also remove it, create it if missing, and change some of its options.
The GALSync account is updated regularly, according to the interval specified in the Settings section of the page. Administrators can force a resynchronisation of all GALs defined on a domain by clicking the RE-SYNC button.
Authentication#
Options in this page control how a user can log in to Carbonio. The supported methods are Carbonio, Carbonio’s local authentication backend, a Local LDAP, an External LDAP, or an External Active Directory server. You can refer to Section Authentication Methods for more information about these backends.
If the method is different from Carbonio, on the one side you need to provide the various parameters and check it the connection is successful, while on the other side, the use of 2FA will not be allowed, as it is not possible to enforce 2FA with authentication methods other than Carbonio.
Local LDAP#
The local LDAP authentication allows to define new users directly on Carbonio.
External LDAP#
A typical connection is shown in Fig. 9, the following scenario describes the parameters to be used.
This scenario defines a few values that are used for the connection to an external LDAP server. Adapt them according to your needs!
Define on Carbonio the domain
authentication.example.com-
On an external LDAP server, located at
172.24.0.155, a domain calledldapexternal.localexistsNote
This external source can also be another Carbonio.
On the external LDAP server a dedicated admin user exists, that will be used for the LDAP connection (for example
service.ldap@ldapexternal.localwith passwordastrongpwd)The LDAP class that stores the users and their password is called
uid
Our goal is to have the authentication.example.com domain users
authenticate with the passwords of the domain accounts
ldapexternal.local defined on the external ldap server
- URL
-
The hostname or IP address where the LDAP is located, which should include the port (default is 389). In our scenario it is 172.24.0.155:389.
- Filter
-
Represents the attribute that identifies the user in the external LDAP (uid=%u).
- Basic Search
-
The LDAP query that is used to filter the users. It contains the domain defined on the LDAP server (dc=ldapexternal,dc=local) and the organisation (or, in a broader sense, the LDAP class) to which the filter above belongs.
- Search Bind user & Search Bind Password
-
The user password used to execute the query (user service.ldap@ldapexternal.local with password astrongpwd).
- Verify Auth
-
This two fields allow to test whether an LDAP user, identified by username and password, can successfully authenticate.

Fig. 9 An example connection to an external LDAP.#
See also
You can carry out the same procedure from the CLI, please refer to Section External LDAP.
External AD#
A typical connection is shown in Fig. 10, the following scenario describes the parameters to be used.
This scenario defines a few values that are used for the connection to an external AD server. Adapt them according to your needs!
Define on Carbonio the domain
ad-auth.example.com-
On an external AD server, located at
172.24.0.100a domain calledexternal_ad.comexistsNote
This external source can also be another Carbonio.
On the external AD server a dedicated user exists, that will be used for the AD connection (for example
service.ad@external_ad.comwith passwordvery_strong_pass!)
Our goal is to have the ad-auth.example.com domain users
authenticate with the passwords of the domain accounts
external_ad.com defined on the external ldap server
- URL
-
The hostname or IP address where the AD is located, which should include the port (default is 3268). In our scenario it is 172.24.0.100:3268.
- Filter
-
Represents the attribute that identifies the user in the external AD
(|(userprincipalname=%u@external_ad.com)(samaccountname=%u)). - Basic Search
-
The query that is used to filter the users. It contains the domain defined on the AD server (dc=external_ad,dc=com).
- Search Bind user & Search Bind Password
-
The user password used to execute the query (user service.ad@external_ad.com with password very_strong_pass!).
- Verify Auth
-
These two fields allow to test whether an AD user, identified by username and password, can successfully authenticate.

Fig. 10 An example connection to an external AD.#
See also
You can carry out the same procedure from the CLI, please refer to Section External Active Directory.
Other options#
Once the selected authentication backend has been configured, a few additional options are available:
- Show “Forget password” link in the login page
-
With this option enabled, a user can proceed to recover a lost password, by sending an email address to the configured recovery address (see tab Security in Carbonio Admin Panel’s Accounts Section).
- Enable Secure Connection
-
By disabling this option, users can login using an unencrypted HTTP connection.
Virtual Hosts & Domain Certificates#
A Virtual Host is an alternative name given to a domain that can
be used to access the same domain. To be able to use the virtual host,
the name must be registered on the domain’s DNS with an A or
CNAME record.
To each virtual host you can associate an SSL certificate. Carbonio supports the upload of multiple SSL domain certificates from the Carbonio Admin Panel and associate them to different domains, a procedure that requires only a few steps.
During the Carbonio installation, a self-signed SSL certificate is created to allow basic access and configuration. However, before you put Carbonio in a production environment, you should install an infrastructure certificate.
The server-side generation of an infrastructure certificate or even a wildcard certificate is a task that can be carried out from the CLI only: check out section Deploy a Commercial SSL Certificate for directions.
If you do not plan to have additional domains configured on Carbonio, you’re all done: no additional certificate is needed.
If you need to configure multiple domains on the same Carbonio infrastructure, you can do it directly from the Carbonio Admin Panel, by generating a new certificate or uploading a commercial one that you have purchased. Let’s Encrypt certificates are also supported and can be generated from the Carbonio Admin Panel, see the procedure.
If you plan to allow IMAP or POP clients to connect to Carbonio, you need to always configure them using the FQDN of the Carbonio infrastructure, for example mail.example.com, independent of the number (and names) of the domains present on the Carbonio infrastructure.
Select the virtual host, then you can choose:
GENERATE A LET’S ENCRYPT CERTIFICATE: Make sure to satisfy the requirements before clicking the GENERATE CERTIFICATE button. Complete the procedure according to the directions below.
-
UPLOAD A CERTIFICATE: In this case, you need to provide by yourself the three files of the authorisation chain (i.e., the Domain Certificate, the Certificate CA Chain, and the Private Key). You can either upload a certificate file or paste the content of the file in the corresponding textfields.
Note
If you paste the certificate, remember to add a carriage return (CR) at the end of the certificate (i.e., after the
-----END CERTIFICATE-----line), like in the following screenshot.
Click VERIFY to verify the certificates: if everything is correct, notification The certificate is valid will appear. To use the certificate, click the I WANT TO USE THIS CERTIFICATE button to upload and use the certificate. Again, a notification will be shown (The certificates have been saved). To complete the procedure, restart the Node on which the Proxy is installed.
You can REMOVE or DOWNLOAD the certificates by clicking the appropriate button above the certificates themselves.
Install a Let’s Encrypt certificate#
Before attempting to ask for a Let’s Encrypt certificate, make sure that:
Public Service Protocol and Public Service Host Name are correctly set in the Carbonio Admin Panel’s
There is a Virtual Host correctly configured for the domain you want the certificate
A, AAAA, and CNAME records are configured in the domain’s DNS configuration
The domain has a valid FQDN that can be resolved from anywhere (i.e., the domain must be publicly accessible)
The Proxy Nodes are reachable from the Internet on port 80 (http). In case the proxy can not be directly reached, you must add some forwarding rules.
You run all command in this section as the
zextrasuser-
The
zimbraReverseProxyMailModeattribute has been set to redirect at global level. You can verify if this is the case with commandzextras$ carbonio prov gacf zimbraReverseProxyMailModeIf the output is not redirect, you can set it with
zextras$ carbonio prov mcf zimbraReverseProxyMailMode redirect -
you have unset the same attribute on the Proxy Nodes
zextras$ carbonio prov ms $(zmhostname) zimbraReverseProxyMailMode "" (Optional) To receive e-mail responses from Let’s Encrypt, Carbonio attributes
carbonioNotificationRecipientsandcarbonioNotificationFromare defined at global level.
Hint
If you have more than one Proxy Node, execute the commands on each Proxy Node.
Once done, execute the following commands to pick up the changes on the Proxy Node
zextras$ /opt/zextras/libexec/zmproxyconfgen
zextras$ zmproxyctl restart
To correctly issue a Let’s Encrypt certificate for your Carbonio installation, you should carry out the following steps.
The starting point is to generate the certificate using the Carbonio Admin Panel button, as shown in the previous section. besides the message on the bottom right corner, you will receive in a few minutes an e-mail, provided you set Carbonio attributes, see list above, stating the success or failure of the certificate’s generation.
Hint
You can follow the process by checking the log file
/var/log/carbonio/letsencrypt/letsencrypt.log on the Proxy
Node, using the tail -f command from the CLI.
In case of failure, the e-mail will report the errors encountered that you need to fix before attempting again. Take into account that if you continuously ask for a certificate without success, you can be temporarily be prevented to ask again.
The message Successfully received certificate appears in the e-mail when the issue is successful, together with other information, including the expiry date, followed by a second confirmatory e-mail.
At this point you can deploy the certificate on your
infrastructure. Log in to the CLI and issue, as the zextras user, the
commands
zextras$ /opt/zextras/libexec/zmproxyconfgen
zextras$ /opt/zextras/bin/zmproxyctl reload
The certificate expires after 90 days, and, according to Let’s Encrypt recommendations should to be renewed 30 days before expiration. you can check the certificate status and renew it from CLI, either manually or automatic, please refer to section Renew a Let’s Encrypt Certificate for directions.
Once done, run again the two deployment commands
zextras$ /opt/zextras/libexec/zmproxyconfgen
zextras$ /opt/zextras/bin/zmproxyctl reload
Mailbox Quota#
These settings allow to define a maximum limit (in gigabytes, with 0 meaning no limit) for the space used by each account and by the entire domain. It is also possible to set a value that, when reached, will send a warning by e-mail to a given address. The values configured here are inherited by all accounts that will be created, but can be overridden on a per-user basis.
To ease monitoring quota available to users for Mails and Carbonio Files, the bottom of the page contains a list of accounts and their respective quotas (total quota and percentage of quota used) for both services. The accounts can be sorted by the total quota or percentage quota of Mails or Carbonio Files.
Additionally, click the DOWNLOAD QUOTA REPORT button to download a CSV file containing the current status of the used quota.
White-label Settings#
These setting are the same that appear in Global’s section (), but are domain-specific: if not defined at domain level, the global theme settings will be applied. The description of the available options can be found in the dedicated section.
2-Factor-Authentication#
In this page it is possible to configure 2FA for the various services offered by Carbonio, only for the selected domain. To modify settings for all domains, refer to 2-Factor-Autenthication.
These settings are available only if the authentication method (under , see Authentication) for the current domain is set to Carbonio.
2FA limitations
These are the main limitations for adding 2FA to the login procedure.
2FA applies only to those protocols or apps supporting it, for example HTTP and HTTPS but not to IMAP, POP and SMTP
The Carbonio Admin Panel does not support second authentication factor and will stop working once 2FA is activated, except for Trusted Network scenario (described later) or Service Credentials (see section Service Credential Management)
Selecting Trust the Device implies that users must use the same browser, otherwise they will be required to log in again: if a 2FA login is carried out on Chrome, accessing the same page with Firefox will fail. More on this in the dedicated box below.
There are 3 main application scenarios for 2FA:
In the default scenario, the second authentication factor is not required. This implies that users can access Carbonio with their own username and password, from any IP, via all supported protocols.
This implies that to access Carbonio, users must provide their own username, password, and the second factor (OTP) from any IP, via all supported protocols. Trying to access with an unsupported protocol results in an automatic failure.
To deploy this scenario, configure the options as follows:
In the What to trust? field, select either Trust the IP or Trust the Device
Leave the Trusted Networks (IP ranges) field empty
Click APPLY TO ALL SERVICES, then save.
In this case, depending from where the users connect, different mechanisms apply. If they connect from outside the trusted networks, they need username, password, and the second factor (OTP). If they are initiating the connection from a trusted network, it depends on which alternative you choose to configure the options:
Trusted Networks for all protocols
In the What to trust? field, select either Trust the IP or Trust the Device
-
Enter the subnet to trust in the Trusted Networks (IP ranges) field, for example
172.24.0.0/24. You can add multiple, comma-separated subnets.Hint
Single IP addresses can be trusted using the
/32suffix, e.g.,192.168.1.1/32. Click APPLY TO ALL SERVICES, then save.
To login, users within the trusted subnet do not require 2FA.
Trusted Networks for a specific protocol
In the What to trust? field, select either Trust the IP or Trust the Device
-
Enter the subnet to trust in the Trusted Networks (IP ranges) field, for example
172.24.0.0/24. You can add multiple, comma-separated subnets.Hint
Single IP addresses can be trusted using the
/32suffix, e.g.,192.168.1.1/32. For each protocol or a specific one, select whether to trust an IP or device, then enter an IP range.
There are slight differences between the two options.
With the Trust the IP option active, once a user authenticates using the second factor, the current user IP is temporary added to the user’s trusted networks, from any of the supported protocol. Hence, they do not have to enter the second factor for other authentications: for example, we want to give users the possibility to trust their home address at the first login.
- What happens at login
-
At the first attempt, users must log in with their username, password, and OTP. They can check “Trust this device and IP address” to mark their own network address as trusted. All future requests coming from that IP will be considered valid and will not need the second authentication factor. Once the grant period is over, it will be necessary to log in again (to webmail or from a mobile app) by entering the second factor.
- Services/Protocols
-
All services used by the IP will be considered trusted, including services that do not support 2FA, for the duration of the trust period.
Important note on Trusted IP
With the Trust the IP policy, even services and protocols that don’t support 2FA could become accessible outside the trusted network.
For example, an admin that wants to allow SMTP and IMAP from the user’s home IP can configure that domain to allow the user to
authenticate to the WebMail using the OTP
add the home IP to the trust IPs
use the SMTP or the IMAP from a trusted connection
once the trust expires, the user must re-authenticate with the WebClient
With the Trust the Device option, once the user authenticates using 2FA from any of the supported protocols, the current device (browser or mobile device) is temporarily added to the user’s trusted devices. This allows the user to skip the second authentication factor for subsequent logins from the same device until the trust period expires (e.g., enabling users to trust their browser session or mobile phone after the first login).
- What happens at login
-
At the first attempt, users must log in with their username, password, and OTP. They can check “Trust this device and IP address” to mark their own trusted device. All requests coming from that browser session or mobile device will be considered trusted and will not need the second authentication factor. Once the grant period is over, it will be necessary to log in again (to webmail or from a mobile app) by entering the second factor.
SAML#
The management of SAML access to Carbonio is carried out from this page.
See also
The same SAML configuration tasks can be carried out from the CLI, please refer to Section Setting up SAML Configuration.
At the top of the page, two buttons allow to copy the ENTITY ID and SERVICE URL of the current Carbonio, which are required to carry out the configuration on the SAML IDP provider’s side: click each of them to paste the respective value and generate the configuration.
Once the configuration has been carried out, it is possible to copy its URL and paste it in the textfield. Click the Allow Unsecure if the configuration URL uses HTTP and not HTTPS. Click IMPORT to import the configuration.
The three button below allow to generate the SP certificate to configure the logout from the IDP and to export or delete the current configuration.
The procedure to follow for the complete logout from the IDP is described in detail in the CLI Section Configure SAML Logout. You can accomplish the same goal from the Carbonio Admin Panel by writing in the two bottom textfields the variables mentioned in that section and their corresponding value, then clicking the ADD button. Remember also to add the SP certificate to the IDP’s configuration.
Admin Panel Access with SAML Authentication
After SAML authentication is enabled, login is handled by the configured SAML Identity Provider for both the Webmail interface and the Admin Panel. Therefore, the SAML login screen will also be presented when administrators access the Admin Panel.
Disclaimer#
Note
These settings are available only if the disclaimer is active in the global configuration ().
To add a disclaimer to e-mails, use either textfield present in the page. The text written in the left-hand side will be appended to e-mails of users that have the mail editor set for plain-text, while the text written in the right-hand side is for user using the rich-text editor.
Please check the Carbonio’s global settings for further configuration.
The text can contain for example a legal, confidentiality, or copyright notice: an example in text:
This email and any files transmitted with it are confidential and
are for the sole use of the individual or entity to which they are
addressed. If you received this email in error, please notify your
system administrator.
One example in HTML:
<h2>Contacts</h2>
<p>Company Phone: +00 123 456 7890</p>
<p>Company e-mail: info@example.com</p>
See also
Domain disclaimer can be managed from the CLI as well, please refer to Section Configuring Domain Disclaimer.
Important
On Ubuntu 22.04 and Red Hat 8, every time you enable or disable
the disclaimer or modify its content, you must run the following command
as the zextras user on each node hosting the MTA component:
zextras$ /opt/zextras/libexec/zmaltermimeconfig
On systemd-based OS versions such as Ubuntu 24.04 and Red Hat 9, no additional manual action is required.