
Single-Server Manual Installation#
The manual installation is organised in steps and requires to execute commands from the command line, so make sure you have access to it.
Carbonio can be installed on a single server node which provides the essential functionalities:
Mail
Calendar
Contacts
Backup
Files
Preview
If your use case also requires collaboration tools or video features, the single-server installation can be extended by adding:
a Collaboration Node that consists of Docs, Chats, and Tasks
a Video Server Node to enable video streaming and video recording
When the installation process has successfully finished, you can access Carbonio's GUI using a browser, see Section Access to the Web Interface.
Architecture#
The architecture of this scenario is depicted in the following diagram.
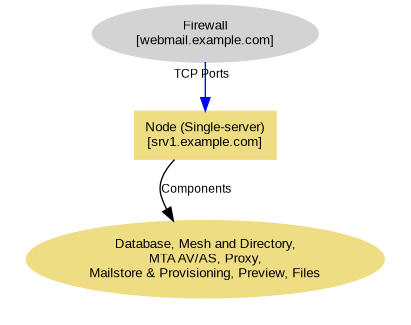
Fig. 5 Sample diagram of the Single Server Node.#
Network Configuration#
The following ports must be forwarded from the external network, i.e., they are required for proper access to Carbonio from the Internet.
Public hostname |
Ports & Service |
Mapping |
|---|---|---|
mail.example.com |
|
srv1.example.com |
Installation#
The installation procedure start with the configuration of the repositories.
Step 1: Configuration of Repositories
Carbonio
In order to configure Carbonio’s repository, you need to some files with the necessary information.
It you install Carbonio on Ubuntu, you also need to import the GPG key used for signing the packages and verify them.
You need to create file /etc/apt/sources.list.d/zextras.list
and add the following content to it:
deb [arch=amd64 signed-by=/usr/share/keyrings/zextras.gpg] https://repo.zextras.io/release/ubuntu jammy main
Hint
Make sure the above content is correctly saved on the same line
You need to create file /etc/apt/sources.list.d/zextras.list
and add the following content to it:
deb [arch=amd64 signed-by=/usr/share/keyrings/zextras.gpg] https://repo.zextras.io/release/ubuntu noble main
Hint
Make sure the above content is correctly saved on the same line
You need to create file /etc/yum.repos.d/zextras.repo
and add the following content to it:
[zextras]
name=zextras
baseurl=https://repo.zextras.io/release/rhel8
enabled=1
repo_gpgcheck=1
gpgcheck=0
gpgkey=https://repo.zextras.io/repomd.xml.key
You need to create file /etc/yum.repos.d/zextras.repo
and add the following content to it:
[zextras]
name=zextras
baseurl=https://repo.zextras.io/release/rhel9
enabled=1
repo_gpgcheck=1
gpgcheck=0
gpgkey=https://repo.zextras.io/repomd.xml.key
This step is required only on Ubuntu systems (Ubuntu 22.04 and Ubuntu 24.04).
Download and save the GPG key
# wget -O- "https://keyserver.ubuntu.com/pks/lookup?op=get&search=0x5dc7680bc4378c471a7fa80f52fd40243e584a21" | gpg --dearmor | sudo tee /usr/share/keyrings/zextras.gpg > /dev/null
Assign correct access permissions to the key
# chmod 644 /usr/share/keyrings/zextras.gpg
Download and save the GPG key
# wget -O- "https://keyserver.ubuntu.com/pks/lookup?op=get&search=0x5dc7680bc4378c471a7fa80f52fd40243e584a21" | gpg --dearmor | sudo tee /usr/share/keyrings/zextras.gpg > /dev/null
Assign correct access permissions to the key
# chmod 644 /usr/share/keyrings/zextras.gpg
This step is not needed.
This step is not needed.
This step is not needed.
This step is not needed.
You need to add the EPEL repository and enable the BaseOS, Appstream, and CodeReady repositories.
# dnf -y install https://dl.fedoraproject.org/pub/epel/epel-release-latest-8.noarch.rpm
# subscription-manager repos --enable=rhel-8-for-x86_64-baseos-rpms
# subscription-manager repos --enable=rhel-8-for-x86_64-appstream-rpms
# subscription-manager repos --enable=codeready-builder-for-rhel-8-x86_64-rpms
You need to add the EPEL repository and enable the BaseOS, Appstream, and CodeReady repositories.
# dnf -y install https://dl.fedoraproject.org/pub/epel/epel-release-latest-9.noarch.rpm
# subscription-manager repos --enable=rhel-9-for-x86_64-baseos-rpms
# subscription-manager repos --enable=rhel-9-for-x86_64-appstream-rpms
# subscription-manager repos --enable=codeready-builder-for-rhel-9-x86_64-rpms
Configure PostgreSQL Repository
# echo "deb https://apt.postgresql.org/pub/repos/apt $(lsb_release -cs)-pgdg main" > /etc/apt/sources.list.d/pgdg.list

# wget --quiet -O - https://www.postgresql.org/media/keys/ACCC4CF8.asc | sudo apt-key add -
# echo "deb https://apt.postgresql.org/pub/repos/apt $(lsb_release -cs)-pgdg main" > /etc/apt/sources.list.d/pgdg.list

# wget -O- "https://www.postgresql.org/media/keys/ACCC4CF8.asc" | \
gpg --dearmor | sudo tee /usr/share/keyrings/postgres.gpg > \
/dev/null

# chmod 644 /usr/share/keyrings/postgres.gpg
# sed -i 's/deb/deb [signed-by=\/usr\/share\/keyrings\/postgres.gpg] /' /etc/apt/sources.list.d/pgdg.list
# dnf -y install https://download.postgresql.org/pub/repos/yum/reporpms/EL-8-x86_64/pgdg-redhat-repo-latest.noarch.rpm
# dnf -y install https://download.postgresql.org/pub/repos/yum/reporpms/EL-9-x86_64/pgdg-redhat-repo-latest.noarch.rpm
Step 2: Setting Hostname
Carbonio needs a valid FQDN as hostname and a valid entry in the
/etc/hosts file. Therefore, it is necessary to take care of
properly configuring the /etc/hosts file, otherwise the services
will not be able to bind to the correct address, leading to a
disruption in Carbonio's functionality.
To configure the file and the hostname, execute these two commands.
Note
Replace the values srv1.example.com and 172.16.0.10
with values suitable for your setup.
First, set the hostname
# hostnamectl set-hostname srv1.example.com
then replace the content of the /etc/hosts file with IP and
hostname.
# echo -e "127.0.0.1 localhost\n172.16.0.10 srv1.example.com srv1" > /etc/hosts
You can also simply get the current IP and hostname and save it in the
file /etc/hosts/:
# echo "$(hostname -I) $(hostname -f)"
Step 3: System Upgrade and Package Installation
After configuring the repositories, the installation of Carbonio requires to run a few commands.
We start by updating and upgrading the system.
# apt update && apt upgrade
# apt update && apt upgrade
# dnf upgrade
# dnf upgrade
Next, we install the base packages needed for Carbonio.
# apt install service-discover-server \
carbonio-directory-server carbonio-proxy carbonio-mta \
carbonio-advanced carbonio-zal carbonio-user-management \
carbonio-storages carbonio-message-broker carbonio-files \
carbonio-preview carbonio-catalog carbonio-webui \
carbonio-files-public-folder-ui carbonio-files-ui \
carbonio-mailbox-db carbonio-files-db postgresql-16
The installation on RHEL is divided in few steps: install the Carbonio Mesh service
# dnf install service-discover-server
Disable PostgreSQL 12
# dnf -qy module disable postgresql
Install all other packages
# dnf install service-discover-server \
carbonio-directory-server carbonio-proxy carbonio-mta \
carbonio-advanced carbonio-zal carbonio-user-management \
carbonio-storages carbonio-message-broker carbonio-files \
carbonio-preview carbonio-catalog carbonio-webui \
carbonio-files-public-folder-ui carbonio-files-ui \
carbonio-mailbox-db carbonio-files-db postgresql16-server
Initialise and enable the database
# /usr/pgsql-16/bin/postgresql-16-setup initdb
# systemctl enable --now postgresql-16
Step 4: Initialise and configure PostgreSQL
Initialisation
Carbonio relies on a number of databases to store and keep track of all the objects it needs to manage. The main database can be configured in few steps.
We start by defining a robust password for PostgreSQL’s administrative user.
# read -s -p "Insert Password:" DB_ADM_PWD
When prompted, enter a password of your choice: it will be stored
in a variable denoted $DB_ADM_PWD that can be used throughout the
whole procedure. It is important to notice that the password is
accessible to the user (root) in the current terminal only. No
one else can access it and it will be deleted upon logging out.
# su - postgres -c "psql --command=\"CREATE ROLE carbonio_adm WITH LOGIN SUPERUSER encrypted password '$DB_ADM_PWD';\""
Remember to replace the password with a robust password of your choice and store it in a safe place (preferably using a password manager), as you need it in the remainder of the procedure, and you also might need them in the future. This password will be denoted as DB_ADM_PWD.
The second step is to create the database.
# su - postgres -c "psql --command=\"CREATE DATABASE carbonio_adm owner carbonio_adm;\""
Configuration
# su - postgres -c "psql --command=\"ALTER SYSTEM SET listen_addresses TO '*';\""
# su - postgres -c "psql --command=\"ALTER SYSTEM SET max_connections = 500;\""
# su - postgres -c "psql --command=\"ALTER SYSTEM SET shared_buffers = 5000;\""
# echo "host    all             all             0.0.0.0/0            md5" >> /etc/postgresql/16/main/pg_hba.conf
# systemctl restart postgresql
# su - postgres -c "psql --command=\"ALTER SYSTEM SET listen_addresses TO '*';\""
# su - postgres -c "psql --command=\"ALTER SYSTEM SET max_connections = 500;\""
# su - postgres -c "psql --command=\"ALTER SYSTEM SET shared_buffers = 5000;\""
# echo "host    all             all             0.0.0.0/0            md5" >> /var/lib/pgsql/16/data/pg_hba.conf
# systemctl restart postgresql-16
Hint
You may replace the 0.0.0.0/0 network with the one
within Carbonio is installed (e.g., 172.16.0.0/24) to prevent
unwanted accesses.
Step 5: Bootstrap Carbonio
Use the following command to configure and launch Carbonio.
# carbonio-bootstrap
Before finalising the bootstrap, press y to apply the configuration. The process will continue until its completion: click Enter to continue.
What does carbonio-bootstrap do?
This command makes a few checks and then starts the installation, during which a few messages are shown, including the name of the log file that will store all messages produced during the process:
Operations logged to /tmp/zmsetup.20211014-154807.log
In case the connection is lost during the installation, it is
possible to log in again and check the content of that file
for information about the status of the installation. If the
file does not exist anymore, the installation has already
been completed and in that case the log file can be found in
directory /opt/zextras/log.
The first part of the bootstrap enables all necessary services and creates a new administrator account (zextras@mail.example.com), initially without password (see below for instruction to set it).
Step 6: Setup Carbonio Mesh
Carbonio Mesh is required to allow communication between Carbonio and its components. The configuration is interactively generated by command
# service-discover setup-wizard
This command will:
ask for the IP address and netmask
-
ask for the Carbonio Mesh secret, which is used for setups, management, and to access the administration GUI. See section Carbonio Mesh Administration Interface for more information.
Hint
We suggest to use a robust password which is at least 16 characters long, including at least one of lowercase and uppercase letters, numbers, special characters and store it in a password manager.
In case the password is lost or the credential file becomes corrupted and unusable, you can reset them using the procedure detailed in section Carbonio Mesh Credentials.
store the setup in file
/etc/zextras/service-discover/cluster-credentials.tar.gpg
To complete Carbonio Mesh installation, run
# pending-setups -a
Hint
The secret is stored in file
/var/lib/service-discover/password, which is accessible
only by the root user.
The command will ask for the password stored in the
/var/lib/service-discover/password on the Directory Leader
Node (i.e., the node on which the Mesh server is installed).
Step 7: Databases Bootstrap
Now you have to bootstrap the DBs with the DB_ADM_PWD password set in the Initialisation in Step 4.
# PGPASSWORD=$DB_ADM_PWD carbonio-mailbox-db-bootstrap carbonio_adm 127.0.0.1
# PGPASSWORD=$DB_ADM_PWD carbonio-files-db-bootstrap carbonio_adm 127.0.0.1
Step 8: Complete Installation
After the successful package installation, start all Carbonio services by using
As the zextras user
zextras$ zmcontrol restart
As the root user
# systemctl restart carbonio-directory-server.target
# systemctl restart carbonio-appserver.target
# systemctl restart carbonio-mta.target
# systemctl restart carbonio-proxy.target
As the zextras user
zextras$ zmcontrol restart
As the root user
# systemctl restart carbonio-directory-server.target
# systemctl restart carbonio-appserver.target
# systemctl restart carbonio-mta.target
# systemctl restart carbonio-proxy.target
If you chose to install only the core services, installation has completed. Otherwise, if you plan to use collaboration features, please read Data Required for Additional Nodes before proceeding to the installation of the other Nodes.
Data Required for Additional Nodes#
The following data from this Node will be needed during the installation of the Collaboration and Video Server Nodes.
-
The Node hostname
# hostname -f
-
The LDAP password for bootstrapping Carbonio
# su - zextras -c "zmlocalconfig -s ldap_root_password"
-
the PostgreSQL password (
DB_ADM_PWD) of usercarbonio_adm, needed to bootstrap the databases# echo $DB_ADM_PWD
-
the Carbonio Mesh secret, that you can retrieve with command
# cat /var/lib/service-discover/password
Check Services Status#
The quickest way to check the status of services is by issuing the following command and verify that in the output they are appear as Active or Running.
# zmcontrol status
zextras$ systemctl status carbonio.target
zextras$ zmcontrol status
# systemctl status carbonio.target