

Carbonio Mobile#
This section describe the various settings that can be changed to allow access to Carbonio features from mobile devices. They are currently available from the CLI only, so you need console access to change the settings.
This section describes the most common tasks and introduces the commands and most used sub-commands needed for the management of all functionalities available to mobile devices.
Enable Carbonio Mobile Synchronization for a COS#
Use the following commands to enable or disable the COS-level settings. However, remember that these settings can be overridden by each user.
To enable Carbonio Mobile for all users in a COS from the CLI, run the command:
# carbonio prov mc COSName zimbraFeatureMobileSyncEnabled TRUE
To disable Carbonio Mobile for all users in a COS from the CLI, run the command:
# carbonio prov mc COSName zimbraFeatureMobileSyncEnabled FALSE
Enable Carbonio Mobile for a Single User#
By enabling the Carbonio Mobile Module for a single user you authorise a single user to use all the mobile functions of the Carbonio Mobile Module.
To enable Carbonio Mobile for a given user (e.g., user@example.com) in a COS from the CLI, run the command:
# carbonio prov ma user@example.com zimbraFeatureMobileSyncEnabled TRUE
To disable Carbonio Mobile for a given user in a COS from the CLI, run the command:
# carbonio prov ma user@example.com zimbraFeatureMobileSyncEnabled FALSE
Disable Sync for an account and Device#
In certain situation it can be useful to stop some of a user’s devices from synchronisation with the server. In those cases it is possible to use the following command
zextras$ carbonio mobile doSuspendDeviceSync account-uuid id
Here, account-uuid is the UUID of the user’s account to which the
device belongs, while id is the identifier of the device.
Hint
Both parameters are mandatory.
To restore synchronisation, use the command
zextras$ carbonio mobile doResumeDeviceSync account-uuid device_id id
If you specify device_id id, only synchronisation to that device
will be resumed, while if you omit it, all user’s device will be
restart synchronisation.
The Mobile Password Feature#
The Mobile Password feature allows Global and Delegated Admins to set an additional password for an account to be used for Exchange ActiveSync authentications only.
The main benefits of using this feature are:
Enforce set-and-forget safe passwords, regardless of any other password policy. In this way, in case the account password changes, tthere will be no need to change the password saved on all mobile devices synchronised with an account.
Avoid to disclose the real password in case of unauthorised access to the device/client
A Mobile Password will not be valid for Webmail/POP3/IMAP/SMTP
logins, and the account password will not be valid for mobile logins.
How to Set a Mobile Password for a Mailbox#
Mobile Passwords are handled by the Carbonio Auth module, so please refer to the User Guides for more information.
SyncStates#
Carbonio Mobile and the SyncState#
The SyncState (short for Synchronization Status) is a set of information kept on the server about the synchronization with a mobile device. Each time a device establishes a connection with Carbonio Mobile, the following steps take place:
-
The device requests a folderSync operation to synchronize the local Folders with the ones on the server
One SyncKey per local folder is sent, but if this is the first connection between the device and the server, a single SyncKey set to 0 is sent
-
The server replies with a list of available folders
One SyncKey per folder is sent by the server
-
The device requests an itemSync operation to synchronize all due items
The server stores the items synchronized in the SyncState
-
After completing the itemSync operation, the device sends a
pingto keep the connection aliveStep 4 is repeated as long as no changes happen to the synchronised account
Every time a new item is stored on the mailbox or an old item is modified, the server notifies the availability to the device, which closes the active connection (the one kept alive by the ping command) and repeats steps 3 and 4.
The SyncState is the combination of the SyncKeys saved on step 2 and the itemIDs saved on step 3. It is saved by the server per the userID/deviceID unique pair.
Sync Request#
The Sync Request is the actual synchronization process, started by either Carbonio Mobile or by the client. During a sync request, any change in the mailbox that happened since the last request is synchronized to the device and vice-versa.
A sync request is issued when:
The SyncState changes
A sync is forced client-side
The current
pingexpires and a new one is sent by the device (the keepalive duration is defined by the client)
Managing the SyncStates#
To manage the SyncStates of synchronised mobile devices use any of the following commands from the CLI:
doRemoveDevice commandSyntax:
carbonio mobile doRemoveDevice {account} {device_id}
Usage example:
carbonio mobile doRemoveDevice john@example.com Appl79032X2WA4S
Removes John’s Appl79032X2WA4S device SyncState
doResetDevice commandSyntax:
carbonio mobile doResetDevice {account} [attr1 value1 [attr2 value2...
Usage example:
carbonio mobile doResetDevice john@example.com Appl79032X2WA4S
Resets John’s Appl79032X2WA4S device SyncState
doResetAccount commandSyntax:
carbonio mobile doResetAccount {account}
Usage example:
carbonio mobile doResetAccount john@example.com
Resets all the device states for John’s account
Advanced Settings#
Carbonio Mobile DoS Filter Configuration#
This section allows to manage the DoS protection for mobile devices that connect to the Carbonio infrastructure.
The Mobile DoS Filter is configured at global level via CLI with command carbonio config global set|get|clear. Specific information for each property can be obtained via carbonio config info attribute [name], where [name] is one of the following:
mobileAntiDosServiceEnabled: enable the Mobile DoS Filter service. Defaultfalse;mobileAntiDosServiceJailDuration: duration (in milliseconds) of synchronization “jail”. Default 600000;mobileAntiDosServiceTimeWindowinterval of time to calculate the connection ratio. The jail is triggered if a device sends more thanmobileAntiDosServiceMaxRequestsrequests in this time window. Default 30000ms;mobileAntiDosServiceMaxRequestsmaximum number of requests received withinmobileAntiDosServiceTimeWindowmilliseconds). Default 150;
When the anti-dos service is running and mobileAntiDosMaxRequests is
greater than 0, the system stores in memory the timestamp of the last
mobileAntiDosMaxRequests requests. If the maximum number of request
timestamps has been stored and all stored requests are within the time
window, all new requests from this device/account are dropped for
mobileAntiDosJailDuration milliseconds.
When the rate has been exceeded, a warning is sent via email to admin and added to server notifications.
Note
Issuing the command carbonio mobile doRestartService anti-dos will reset all jails and counters.
See also
You can configure the DoS Filter from the Carbonio Admin Panel (. Please refer to Section ActiveSync.
Carbonio Mobile Performance Tuning#
Carbonio Mobile provides three useful options to fine-tune Carbonio Mobile according to system performance.
ZxMobile_NotificationsLatency represents the seconds of
delay between an event on the server and its notification to the
mobile device.
ZxMobile_UseInstantNotficiations enables or disables instant
notifications. If true, it also overrides Notifications
Latency.
ZxMobile_MaxPingHeartbeat defines the maximum interval
between ping commands.
All settings can be edited via CLI using the carbonio config
command carbonio config.
When to Edit the Performance Tuning Settings#
Default settings should be optimal for most situations. However, in case you experience one or more of the problems listed below, please apply the suggested solution.
Problem |
Suggested solution |
|---|---|
High system load |
Disable instant notifications |
High system load after disabling instant notifications |
Raise notification latency |
Mobile users experience high network usage |
Disable instant notifications and tweak notifications latency |
Devices can connect but sessions are interrupted frequently |
|
Adjust Max Ping Heartbeat according to your network configuration |
|
Items are synchronized from server-to-device with an excessive delay |
Lower notification latency or enable instant notifications |
EAS Filters#
In the EAS protocol, the protocol version used for the synchronization is defined during the initial handshake and never changed. The server presents a list of all available protocol versions and the client chooses one among that list.
EAS filters are a way to limit the EAS version available to a subset of users or clients to ensure that the proper version is used.
Multiple EAS filters can be set up and will be evaluated in sequential
order (see the getAllEASFilters and doMoveEASFilter commands
in section Managing EAS Filters below).
Anatomy of an EAS Filter#
An EAS filter is composed of 5 parts:
- Type
-
Defines the type of filter rule.
- Parameter
-
The filtering identifier (e.g. device brand or email address).
- Mode
-
Defines whether the software will limit the available versions or provide a fixed list.
-
easversionsfield -
Contains the protocol versions enforced by the filter.
-
BlockingBoolean value -
Defines whether other filters are executed once the current one is successfully matched.
Managing EAS Filters#
EAS filters are managed through the CLI using the following four dedicated commands.
getAllEASFilters
This command lists all existing filters.
Sample Output:
filters

    ID                                                          0
    mode                                                        fixed
    rule                                                        [type = or; rules = [[type = contains; rule = outlook/] OR [type = contains; rule = microsoft.outlook]]
    easversions                                                 14.0
    blocking                                                    true

    ID                                                          1
    mode                                                        limit
    rule                                                        [type = contains; rule = samsung]
    easversions                                                 2.5
    blocking                                                    false

    ID                                                          2
    mode                                                        limit
    rule                                                        [type = always]
    easversions                                                 14.1
    blocking                                                    false
doAddEASFilter
This command adds a new EAS filter.
Syntax:
carbonio mobile doAddEASFilter {and|or|regex|contains|account} {text|user@example.com|account=otheruser@example.com,contains=android} {add|subtract|fixed|limit} {easversions} [attr1 value1 [attr2 value2...]]
Usage example:
carbonio mobile doAddEASFilter contains android fixed 2.5,12.0,14.1
Adds a protocol filter that will restrict the pool of available EAS versions to 2.5, 12.0 and 14.1 if the user agent name contains the string ‘android’.
carbonio mobile doAddEASFilter and account=user@example.com,contains=android fixed 14.1 blocking true
Adds a protocol filter that will restrict the pool of available EAS versions to 14.1 if the user agent name contains the string ‘android’ only for . No more EAS filters will be evaluated after this one due to the ‘blocking’ directive.
doDeleteEASFilter
This command deletes an existing EAS Filter.
Syntax:
carbonio mobile doDeleteEASFilter _id_
Usage example:
carbonio mobile doDeleteEASFilter 2
Removes the filter with id = 2.
doMoveEASFilter
This command is used to move EAS filters to a different position in the filter queue.
Syntax:
carbonio mobile doMoveEASFilter {from} {to}
Usage example:
carbonio mobile doMoveEASFilter 0 5
Moves the filter with id = 0 to the position 5.
Mobile Account Loggers#
Mobile account loggers are dedicated loggers that can output the
entirety of a user’s EAS logs into a dedicated logfile, with a
different verbosity than the one of the sync.log file. This
allows for quicker troubleshooting.
When creating an account logger, the following parameters must be specified:
The target account
The log_level, i.e., the verbosity of the log
The dedicated log_file
The window_size to enforce on all devices synchronizing with the account while the logger is running
Warning
Account loggers are removed automatically when the mailboxd is stopped or restarted and do not usually survive a mailboxd crash. Log files won’t be affected.
Account Logger Management#
Account loggers can only be managed via the CLI through the following commands:
doAddAccountLogger
Syntax:
carbonio mobile doAddAccountLogger {account} {debug|info|warn|err|crit} {log_file} [attr1 value1 [attr2 value2...]]
Usage example:
carbonio mobile doaddaccountlogger john@example.com info /tmp/john_logger
Creates an info account logger for john’s account to file /tmp/john_logger
carbonio mobile doaddaccountlogger john@example.com info /tmp/john_logger window_size 1
Creates an info account logger for john’s account to file /tmp/john_logger with window size set to 1.
doRemoveLogger
Syntax:
carbonio mobile doRemoveLogger {logger_id|"all_loggers"}
Usage example:
carbonio mobile doremovelogger 5
Removes the account logger with ID = 5
getAccountLoggers
Sample output:
carbonio mobile getAccountLoggers

      loggers

              id                                                          7
              level                                                       DEBUG
              name                                                        AccountLogger
              description                                                 Logging account user@example.com using level debug, log file /tmp/user.log
              remove command                                              carbonio mobile doRemoveLogger 7
ABQ - Allow/Block/Quarantine device control#
The “Allow/Block/Quarantine” feature allows for granular access control of mobile devices connecting to the server. It’s a “pre-emptive” type of security feature, meaning that it acts upon the first connection to the server and it’s made to ensure that only authorized devices can finalize synchronization with server. This allows a full administrator to keep track of all mobile device used in their network. Presently only CLI tools are provided.
The global Boolean attribute abq_enabled_at_startup controls
whether ABQ will start together with Carbonio. While by default the
attribute is true, it is suggested to set it to false if it
not used, because this would save server resources.
To disable the ABQ, execute the following command, then restart
mailboxd:
# carbonio config set global abq_enabled_at_startup false
To verify that ABQ was disabled, in the output of carbonio mobile getServices, ABQ should appear as not running (i.e., the value for ABQ’s running property should be false).
Components#
The ABQ feature is composed of three main logical components:
a Device Control List
an Authorization Engine
a set of CLI tools
The Device Control List, also known as the “ABQ List”, holds the information about allowed devices within the config engine. Devices can be added to the Device Control List via CLI based on their “Device ID” which can be obtained via CLI.
It is also possible to further limit access by limiting the accounts that can synchronise with the server on a specific device.
Note
On module startup, if the Device Control List is empty all mobile devices previously recognized by the Carbonio server will be imported as Allowed.
The Authorization Engine takes care of checking devices against the Device Control List and setting their ABQ status to the appropriate value.
Each rule is applied to all accounts connecting using a device it is a device id. It applies to a specific account connecting using that device if it has the format device_id/account_id or device_id/accountName
The CLI Toolset allows administrators to interact with the device control list and with the synchronization status of a device, specifically to:
Display the Device Control List
Display all Quarantined and Blocked Devices
Add one or more devices to the Device Control List
Move a device from “Quarantine” to “Allowed” or “Blocked”
Change the synchronization status of a device
Every time the administrator changes a device’s status in an ABQ-enabled environment, depending on the issued state the device will be forced to re-sync folders with the server resulting in an immediate re-route to either a Dummy Data that will explain to the user what’s happened, or to the real mailbox to perform the re-sync.
ABQ Modes#
The ABQ feature is triggered for every mobile device that tries to synchronize with server, and can be set to one of four possible modes: “Permissive”, “Interactive”, “Strict” and “Disabled”. This attribute is Global for all the cluster.
After authenticating the user and checking their account status for safety reasons, the Device Control system will check the “Device ID” sent by the device against the list of allowed devices:
-
- if the device/user couple is in the “allowed” list the
-
synchronization will continue.
if the device/user couple is not in the device list but device is in the “allowed” list the synchronization will continue.
-
- if the device is not in the “allowed” list the synchronization
-
will be paused, a dummy email notifying the user of its “Quarantine” status will be sent and the connection will be set to “Quarantine” status.
Administrators can be notified at regular intervals, and every notification email will only include new Quarantined devices. They will then be able to allow or deny the synchronization for each device using the appropriate CLI tools.
After authenticating the user and checking their account status for safety reasons, the Device Control system will check the “Device ID” sent by the device against the list of allowed devices:
if the device/user couple or the device by itself is in the “allowed” list the synchronization will continue.
if the device is not in the “allowed” list the synchronization will be put in “Blocked” state, no data will be synchronised and a dummy email notifying the user of the device’s “Blocked” status will be sent.
The Authorization Engine is not active, so after authenticating the user and checking their account status for safety reasons, the synchronization will continue. It is still possible to block specific devices but non-blocked devices will always be allowed to sync.
ABQ is disabled, no checks are triggered and no policies are enforced.
ABQ Mode Control#
The current mode can be checked by running the following command:
# carbonio config global get attribute abqMode
The ABQ mode can be changed running the following command:
# carbonio config global set attribute abqMode value [Permissive|Interactive|Strict|Disabled]
Dummy Data#
The feature makes use of Dummy emails and a Dummy mailbox to put devices on hold while waiting for authorization (Interactive Mode) or to notify their Blocked status (Permissive Mode, Interactive Mode and Strict Mode).
The Dummy Mailbox is a virtual mailbox consisting of only an Inbox folder that will be synchronized to the device while this is in either Quarantine or Block status, while Dummy Emails are predefined email messages that are synchronised to a device in Quarantine or Block status to alert the user. Whenever the ABQ status of a device is changed, the device’s sync state will be reset.
Note
Currently, Dummy email messages can not be customised.
Dummy data have been introduced to make sure the user knows what is happening, since the alternative being forcing the synchronization to fail with no descriptive response for the user itself – which would likely cause a significant overhead on support calls.
Custom ABQ E-mails#
Quarantine and block dummy emails can be customized by using the carbonio mobile setABQMessage message command; messages can be customised at global or domain level, and multiple languages can be set.
Given two files, /tmp/quarantine_body.txt and
/tmp/quarantine_body.html containing the French language
plaintext and html message bodies and the
support email address, the following command will set the
quarantine message for the example.com domain without affecting
other domains or users:
# carbonio mobile setABQMessage domain example.com quarantined fr from support@example.com body_plain_file /tmp/quarantine_body.txt body_html_file /tmp/quarantine_body.html``
Warning
Before being able to customize the ABQ messages, a default must be set using default as the language in the command, e.g., carbonio mobile setABQMessage global quarantined default
Notifications#
Administrators can be notified via email of quarantined devices at a
specific interval defined by the abqNotificationsInterval
configuration attribute, expressed in milliseconds:
The interval can be checked by running the following command:
# carbonio config global get attribute abqNotificationsInterval
The interval can be changed running the following command:
# carbonio config global set attribute abqNotificationsInterval value [delay in milliseconds]
By default, the abqNotificationsInterval is set to 0, meaning that
no notifications will be delivered.
ABQ Service Status#
The ABQ service status can be checked running the following command:
# carbonio mobile getServices
The service can be stopped or started using the default service control of the Mobile module:
# carbonio mobile doStartService abq
# carbonio mobile doStopService abq
When mode is Disabled, the ABQ service does not automatically start, hence devices are always allowed to sync.
ABQ CLI#
The ABQ has its own set of CLI commands, including three Rule
commands (namely deleteRule, listRules, and
setRule). They share the same syntax of their delete,
list, and set counterparts, with the difference that the Rule
commands accept regular expressions, which must comply with the Java
regex patterns
standard (ERE with doubled backslashes).
allow-
A specific command for quarantined device, and sets device status to Allowed.
block-
A specific command for quarantined device, and sets device status to Blocked.
-
deleteanddeleteRule -
Delete a device from all lists.
import-
This command imports a list of device IDs from a file, and always requires two parameters: an Input File with a list of Device IDs separated by a newline and the “status” the imported device(s) will be set to.
Given file
/tmp/listwith content:androidc133785981 androidc1024711770 SAMSUNG1239862958/user@example.com,
the command:
# carbonio mobile abq import /tmp/list Allowedallows devices androidc133785981 and androidc1024711770 to sync entirely regardless of the account, while device SAMSUNG1239862958 can only synchronise the user@example.com account
-
listandlistRules -
List all devices ABQ status. The “status” argument will filter the list in order to only show devices in that specific status.
Sample output:
devices
       device_id   androidc133785981
       status      Quarantined

       device_id   androidc1024711770
       status      Blocked

       device_id   SAMSUNG1239862958
       status      Allowed
-
setandsetRule -
Set any status for any single device (either known or unknown).
setNotificationInterval-
Set the notification interval for new quarantined devices.
The Address Book Service#
This feature, part of the Mobile module, provides an LDAP Address Book that Outlook clients can connect to in order to access the system’s GAL, the user’s own address books and other address books defined by the Administrator.
This service is the core of the LDAP Address Book feature, as it provides the endpoint to which the Outlook clients connect.
The service is exposed on port 8636 and uses the SSL encryption protocol.
This endpoint is read-only, to improve the system’s security.
Accessing the LDAP Address Book#
The LDAP Address Book can be only accessed by Outlook clients through the same credentials used for Exchange ActiveSync connection (e-mail address and either their password or a dedicated Mobile Password.)
To allow seamless connection to the service, it is necessary to make sure that incoming request to port 8636 to the domain (e.g., mail.example.com) are correctly forwarded to the Proxy node. In other words, assuming that mail.example.com is the Public Service Hostname and the Proxy Node is installed on proxy.example.com, then all incoming connections to mail.example.com:8636 must be forwarded to proxy.example.com:8636.
Contacts and Address Books#
By default, the LDAP Address book provides access to the following items:
An user’s own address books and contacts.
The user’s GAL.
Other users’ address books, including shared ones, are not visible in the LDAP Address Book.
Additional Address Books#
An Administrator can manage additional Address Books at domain and global levels through the carbonio mobile addressBook subcommands.
zextras$ carbonio mobile addressBook list
List all current Address Books exposed in the LDAP Address Book
zextras$ carbonio mobile addressBook add
Add a new Address Book to the LDAP Address Book
zextras$ carbonio mobile addressBook remove
Remove an Address Book from the LDAP Address Book
The first parameter of the add and remove sub-command is the
scope to which the Address Book will be visible, either Global or
Domain.
Moreover, both sub-commands also require the Address Book owner’s e-mail address or UUID and the FolderID of the address book being added.
Examples
zextras$ carbonio mobile addressBook add global user@example.com 7
This command adds folder 7 (the default /Contacts folder) of the
user@example.com user to the LDAP Address Book of all users in
the system.
zextras$ carbonio mobile addressBook add domain example.com user@example.com 7
This command adds folder 7 (the default /Contacts folder) of the
user@example.com user to the LDAP Address Book of all users in
the example.com domain.
Additional Address Books will be displayed in Outlook’s LDAP Search by showing the owner’s Display Name and the Address Book name separated by a slash, e.g. “John Doe/EMEA Distributors”.
Outlook Setup#
To access the LDAP Address Book from Outlook simply follow these steps:
In the Account Settings section, enter the Address Books tab and click Add
-
Select Internet Directory Service (LDAP) and press Next
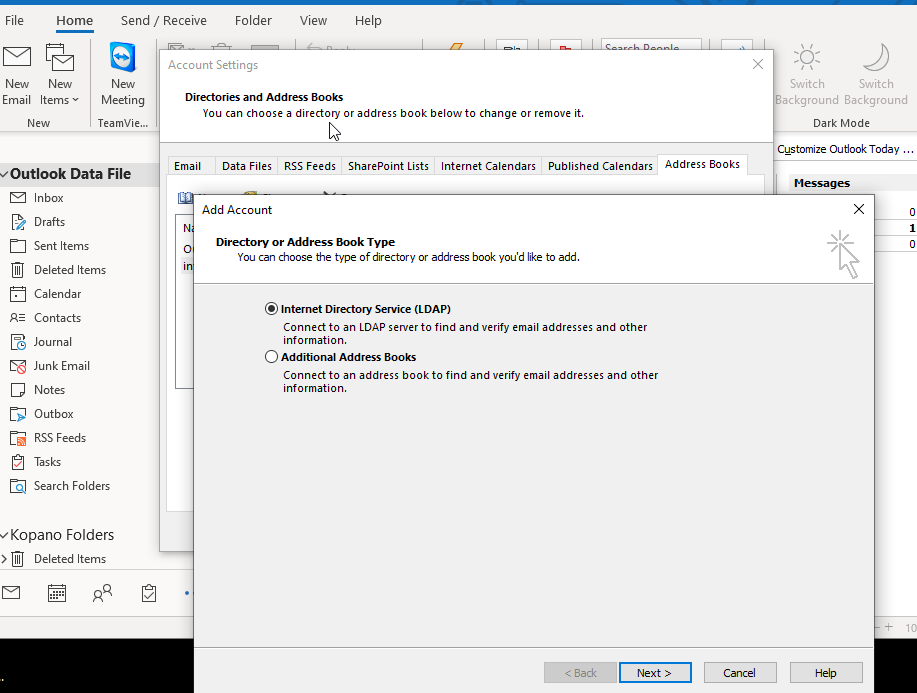
Fig. 16 First two steps of the procedure#
-
Enter the direct URL of the Public Service Host name, then tick the This server requires me to log in checkbox and enter your email address and password (or Mobile Password if existing)
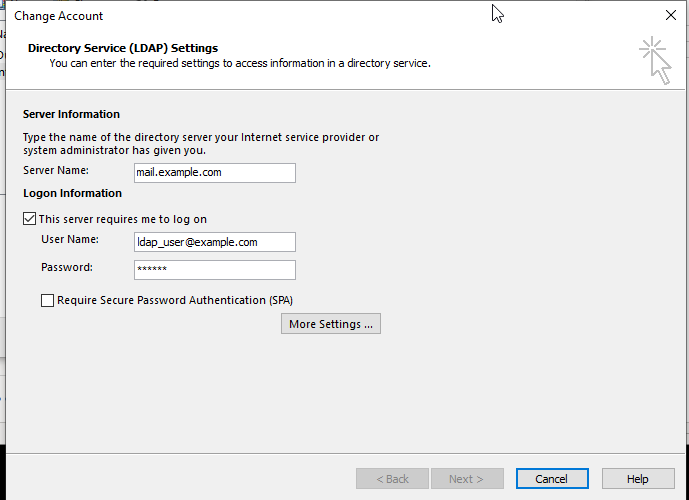
Fig. 17 URL and credentials setup#
Click More Settings
-
In the Connection tab enter the server’s URL as the Display Name and 8636 as the port, then tick the Use Secure Socket Layer checkbox
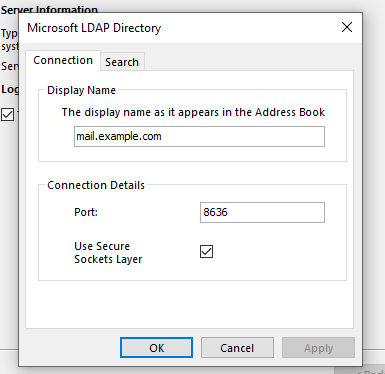
Fig. 18 Secure the connection#
-
In the Search tab, select Custom as the search base and leave the input field blank.
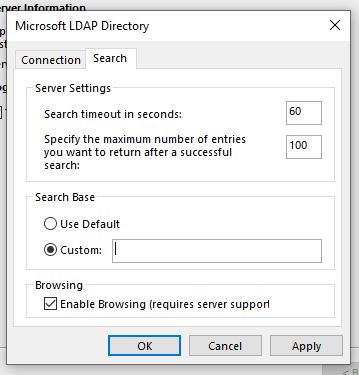
Fig. 19 Set up LDAP search#
Click Ok to close the More Options window and Next on the Add Account window to conclude the process.
Address Book Naming#
In Outlook, own Address Books accessed by LDAP are named with a slash character preceding the name of the folder, e.g. “/Contacts”.
GAL entries and Address Books also include the name of the datasource, e.g. “InternalGAL/_zextras”.
Other users’ Address Books include the Display Name of the owner and the folder name, e.g. “John Doe/EMEA Partners”.
Removing Orphaned Address Books#
In some cases (for example, after deleting a user account), LDAP Address Book entries configured at domain or global level may remain orphaned and cannot be managed through standard commands.
To remove these broken configurations, administrators can use the
carbonio mobile addressBook remove command by specifying the
account ID (UUID) and using all as the folder parameter. This forces
the removal of all associated address book entries for the given account.
The account UUID can be retrieved using the following command:
carbonio prov ga user@example.com zimbraId
Example output:
# name user@example.com
zimbraId: d54d53b1-46b8-496c-a451-bc2cc0d0bc05
Examples:
carbonio mobile addressBook remove global d54d53b1-46b8-496c-a451-bc2cc0d0bc05 all

carbonio mobile addressBook remove domain example.com d54d53b1-46b8-496c-a451-bc2cc0d0bc05 all