

Install Carbonio Using Ansible#
Carbonio can be installed by using the inventory file, with the Ansible. The components of a sample Carbonio installation and their interaction is depicted in the diagram below.
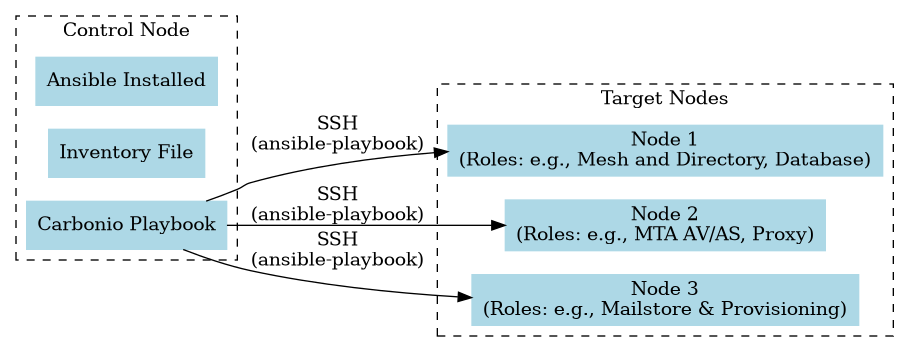
Fig. 2 Sample Ansible installation on a three Nodes setup#
Prepare Inventory#
Download the inventory file and place it under a directory of your choice. Remember to give the inventory file a meaningful name.
The carbonio_inventory file contains various sections, one for
each of the available Components. You need to edit the file and provide the
FQDN of the Node on which the Component will be installed. Suppose that you
install on 5 nodes, whose FQDNs are srv1.example.com to
srv5.example.com, an excerpt of the file might look like:
[postgresServers]
srv1.example.com

[masterDirectoryServers]
srv1.example.com

[dbsConnectorServers]
If you do not want to install a Component, simply leave the corresponding section empty.
For some of the Components you need to provide some additional value for a proper configuration. Currently, these sections are
-
The Proxy Component:
[proxyServers:vars]
#webmailHostname=webmailPublicHostname
This is the FQDN of the domain, for example
mail.example.com, so:[proxyServers:vars] webmailHostname=mail.example.com
-
The Carbonio VideoServer, if installed:
[videoServers]
#hostname public_ip_address=x.y.z.t
In this case, supposing that the Component is installed on
srv5.example.comand the public IP address of the Carbonio VideoServer is 8.9.10.11, this entry should look like:[videoServers] srv5.example.com public_ip_address=8.9.10.11
-
The Default Domain:
#Custom Default Domain (Optional)
[masterDirectoryServers:vars]
#Replace domain.com with your desired domain
default_domain=domain.com
This parameter allows administrators to explicitly define the default domain during installation.
If
default_domainis set, the playbook uses this value as the name of the default (first) domain instead of deriving it from the server hostname.If the parameter is omitted, the playbook falls back to generating a domain name based on the server’s hostname.
In order to run the script, first go to the directory in which you saved the Inventory.
$ ansible-playbook  zxbot.carbonio_install.carbonio_install \
-u root -i carbonio-inventory
Make sure to replace carbonio-inventory with the proper name of the
inventory you want to install.
The playbook executes all required tasks and displays the results on the screen. Once finished, a summary of the outcomes is shown.
Any passwords created during the installation are saved in the directory from which the command was run, along with the carbonio-inventory file.
This ensures you always have access to them when needed, for example during upgrades or routine maintenance.
To keep this sensitive information secure, make sure to:
Restrict access to the directory to trusted personnel only.
Create regular backups of the directory.
If for any reason the installation fails, you can check the log file (to set it up, see Section Configure Ansible) to see what happened, fix it, then execute again the inventory. Ansible will recognise the steps already successfully carried out and run only those that failed.
Validating VM Hostname / FQDN with the Ansible inventory#
Starting from Carbonio 26.6.0, the Ansible installation playbook performs an early FQDN validation check.
During the initial checks, the playbook compares the FQDN reported by each Node with the FQDN defined for the same Node in the Ansible inventory. If the two values do not match, the playbook stops before continuing with the installation.
This check helps prevent configuration issues caused by installing Carbonio on a Node whose operating-system hostname does not match the inventory entry.
The inventory must contain the full FQDN of each Node. Short hostnames, such as srv04, are not valid for this check.
To verify the FQDN reported by a Node, run the following command on the Node:
hostname -f
The value returned by this command must match the corresponding hostname in the Ansible inventory.
For example, if the inventory contains:
[postgresServers]
srv04.example.com
the Node must report:
$ hostname -f
srv04.example.com
If the Node reports a different FQDN, for example:
$ hostname -f
srv-mail-04.example.com
the playbook stops with an error similar to the following:
TASK [../roles/pre_installation_checks : FQDN CHECK | Fail if OS hostname does not match inventory FQDN] ***
[ERROR]: Task failed: Action failed: FQDN MISMATCH on srv04.example.com |  OS: srv-mail-04.example.com | Expected: srv04.example.com

fatal: [srv04.example.com]: FAILED! => {"changed": false, "msg": "FQDN MISMATCH on srv04.example.com |  OS: srv-mail-04.example.com | Expected: srv04.example.com"}
In this example, the inventory expects srv04.example.com, but the operating system reports srv-mail-04.example.com.
To solve the issue, make the Node hostname and the inventory hostname consistent, then run the playbook again.
You can either update the inventory with the correct FQDN or correct the operating-system hostname, depending on which value is wrong. For example, on many Linux distributions, you can update the hostname with:
sudo hostnamectl set-hostname srv04.example.com
After correcting the mismatch, verify the value again:
hostname -f
When the FQDN reported by the Node matches the FQDN defined in the inventory, run the Carbonio installation playbook again.
Closing Remarks#
Once the script has successfully completed, you can immediately access your new Carbonio installation and execute the first necessary tasks, see Section Access to the Web Interface. You can then proceed to carry out further administration tasks, see Post-Install.
Troubleshooting Ansible Installation#
While most of the times the Carbonio installation using Ansible is flawless, there are a few cases in which a playbook run is not successful. This can happen for example when communication between the Control Node, the Nodes, and the repositories fails.
When the playbook does not terminate successfully, the best choice is to run it again. Even though Ansible can be invoked to run only selected tasks, due to the nature of Carbonio installation, manually running only those tasks may not suffice to successfully complete the installation.
Moreover, since Ansible features an internal mechanism that, during a playbook run, keeps track of the tasks that were completed, failed, or not executed, the best solution is to run the playbook another time. Indeed, during this second run, only the tasks that failed or were not executed during the first run are carried out.